Clipping Path Source

  • Home
  • Services
    • Clipping Path Service
    • Image Background Removal
    • Image Masking Service
    • Photo Retouching Service
    • Drop Shadow Service
    • Ghost Mannequin Service
    • Raster to Vector
    • Photo Enhancement
    • eCommerce Photo Editing
    • Color changes
    • Multi Clipping Path Services
    • Car photo editing service
    • Image editing services
  • Pricing
  • Blog
  • Contact
    • FAQ
    • About Us
  • Quotation
  • Login
FREE TRIAL

Photo to Pencil Sketch

Photo to Pencil Sketch

by Sayadul Arafin Tamjid / Thursday, 12 November 2015 / Published in Tutorial

>> What you’ll learn in this article

Toggle
  • Duplicate background layer:
  • Converting a color photo to black & white:
  • Blending mode changing:
  • Invert the photo:
  • Convert the layer to a smart object:
  • Implementation of Gaussian blur:
  • Adjust Gaussian blur window:
  • You will find the Gaussian blur option is in the layer panel:
  • Simple line drawing effect:
  • Again duplicate background copy layer:
  • Drag/Move layer to top:
  • Desaturating top layer:
  • Apply filter gallery:
  • We have to adjust the style in the filter gallery:
  • Inverting the image:
  • Changing the blending to multiply:
  • Add shadow to the existing line drawing:
  • Desaturating the image:
  • Applying the filter gallery:
  • Changing the blending to multiply:

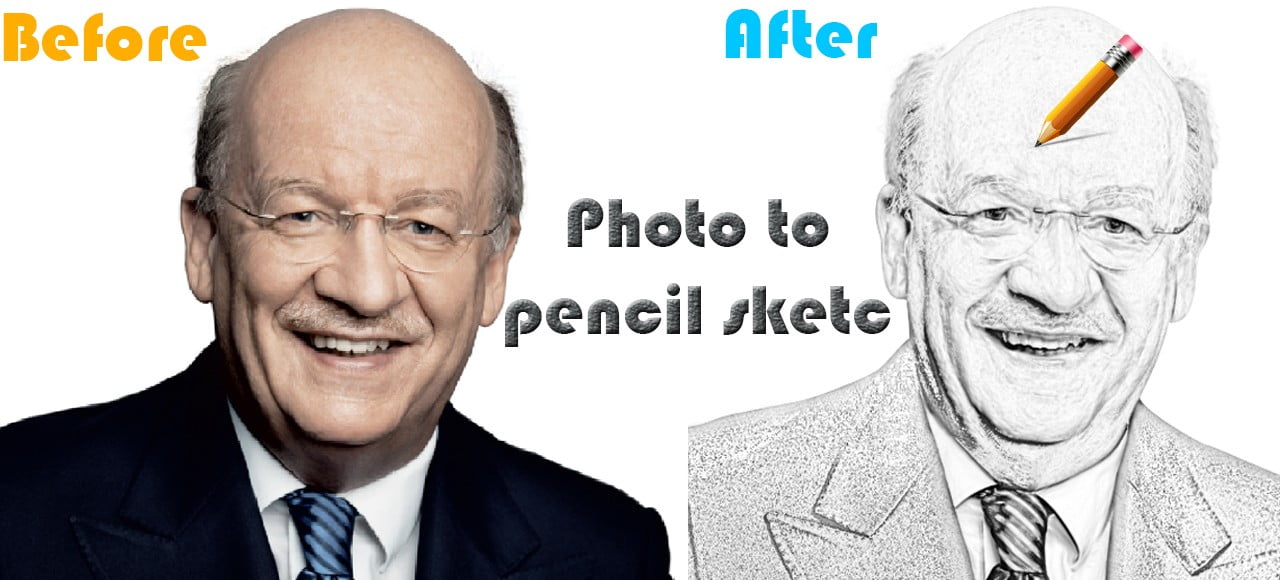
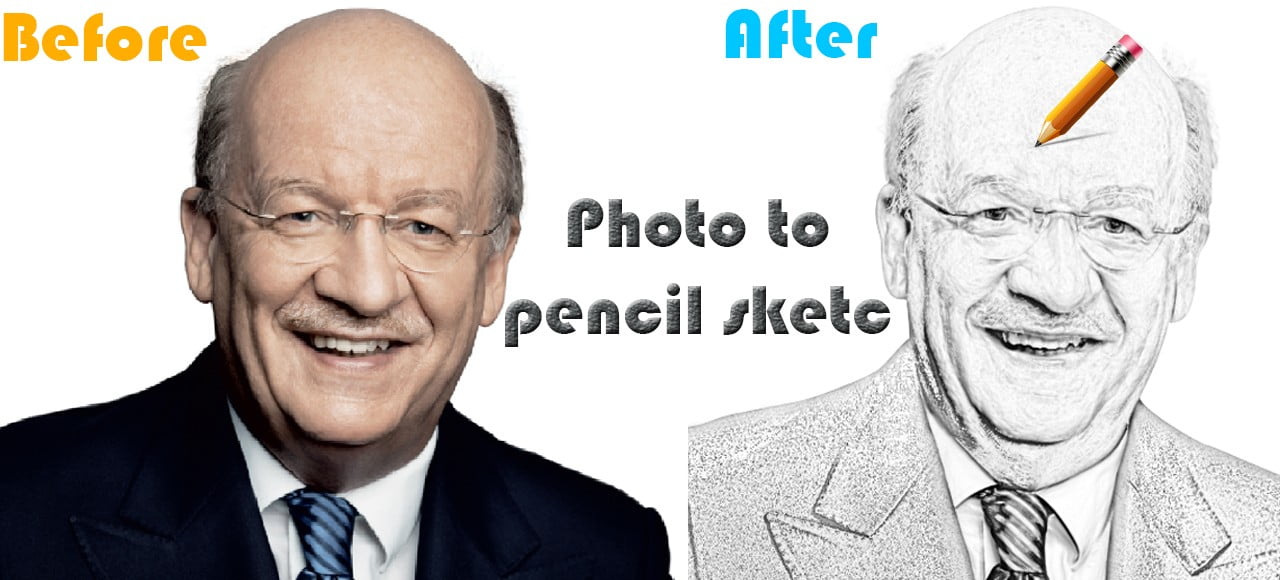
Learn how to turn a photo into a line drawing effect/sketch in Photoshop.

Welcome back with another basic tutorial for all Photoshop beginners. In this tutorial, you will come to know how to turn a normal photo into a pencil to sketch.  Follow the following instructions and say “how easy”!

You can use these steps with any photo you have. But ensure that the image is on a white background.

Choose a photo with a white background:

First thing you need to choose an image from your desktop with a white background to have the best effect. If you haven’t any image with a white background, you can remove the background manually using the Photoshop pen tool or the image masking method if you have an image with hazy hair. If you can’t, we can follow another tutorial on how to remove the background from any image.

Duplicate background layer:

The second step is to get started from the background and put it by dragging into the duplicate layer showing below the layer panel left of the delete button. If you don’t know about using layers in Photoshop – you can easily get the basic knowledge about how to use layers in Photoshop.

Drag-the-background-in-to-the-new-layer-icon-area

Converting a color photo to black & white:

Then we click the button named “Normal” and there will be a drop-down menu. There we will select the “Black & White” tab (then the photo will be turned into black and white rather than color). To close the drop-down menu – click the double arrow sign.
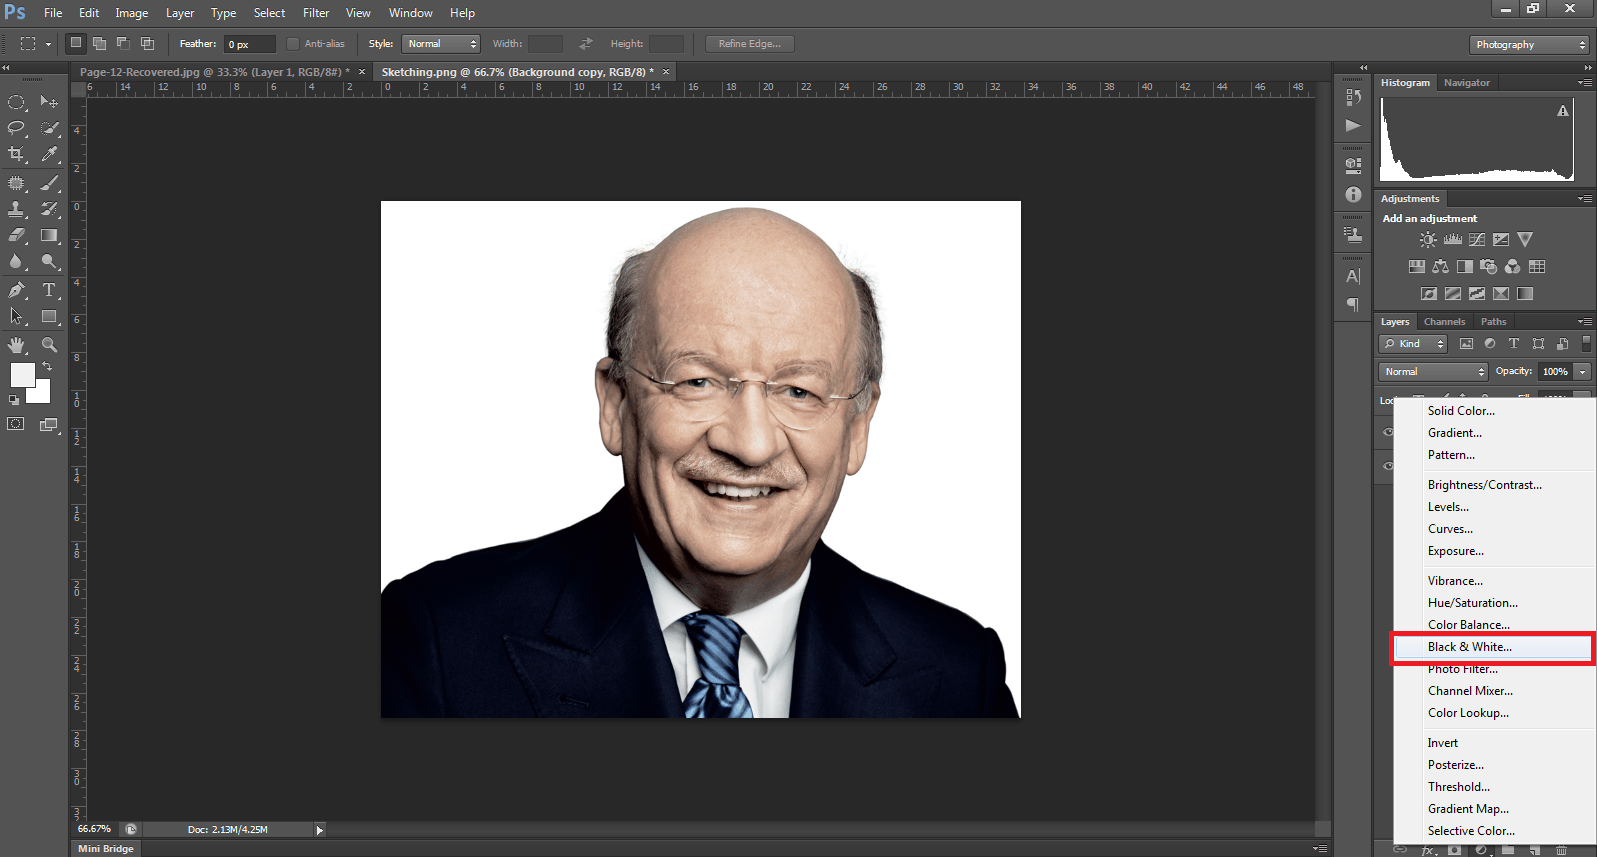
Make-a-new-black-and-white-adjustment-layer-from-the-lower-portion-of-layer-panel

Blending mode changing:

After that we will go to the blending option and select the “Color Dodge” option. This will result the image more contrast.
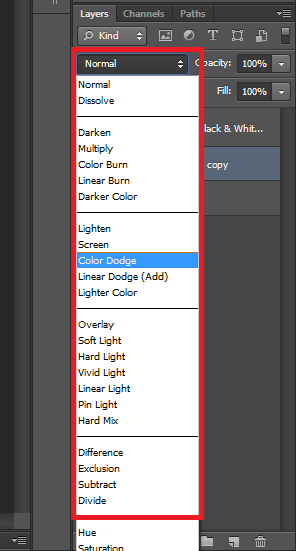
Click-blending-mode-to-the-color-dodge

Invert the photo:

Then we need to invert the color following the steps below. Or you can go with Ctrl+I
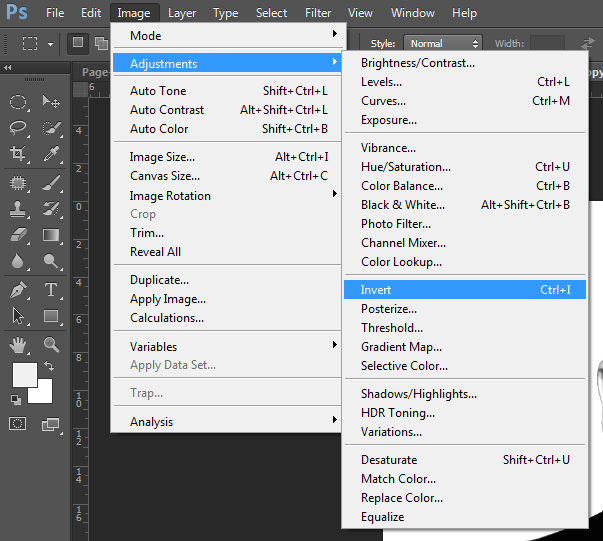
Go-to-image-adjustment-and-invert

Then you will see that the image is disappeared.
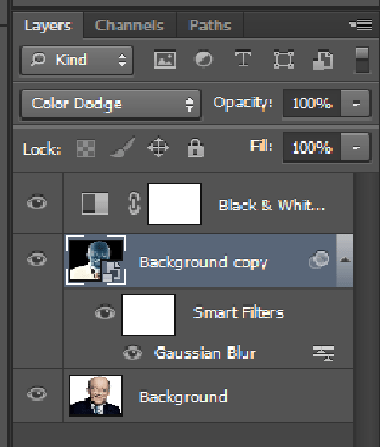
Everything-is-now-disappears

Convert the layer to a smart object:

Then we will right-click the copied background and select “convert to smart object” to convert the layer.
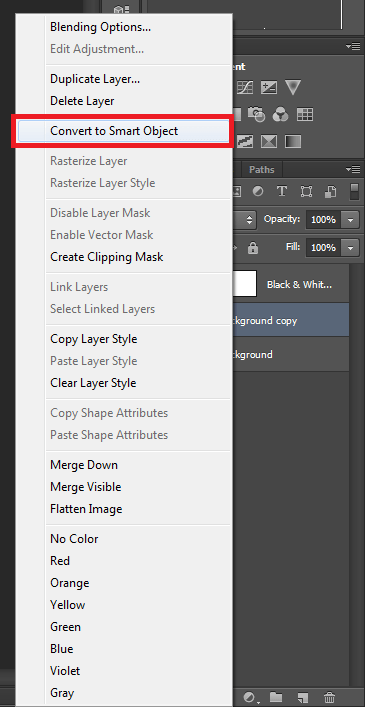
Convert-black-and-white-layer-to-smart-object

Implementation of Gaussian blur:

In the Filter above – there we will follow “Filter->Blur->Gaussian” Blur to have the effect.
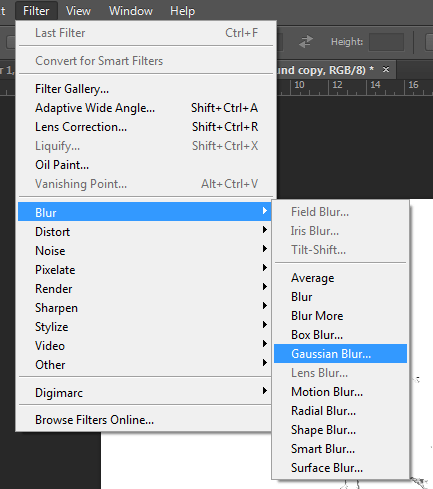
Go-to-filter-blur-gaussian-blur-to-make-the-object

Adjust Gaussian blur window:

Then we need to adjust the radius. There you select the radius 6.4. If you want can adjust with your own measurements.

Select-3.4-pixel-in-Gaussian-blur

You will find the Gaussian blur option is in the layer panel:

You will find the Gaussian Blur window in the layer panel.
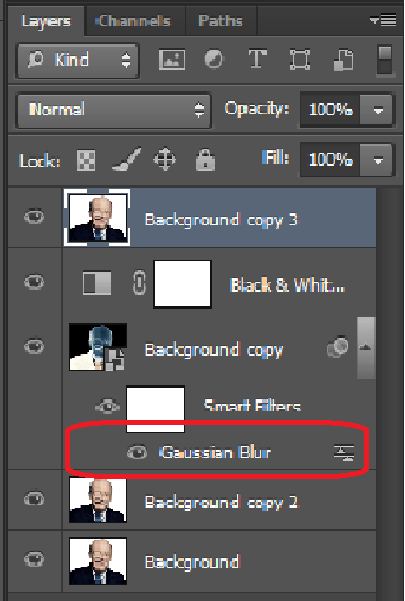
Gaussian-blur-option-to-go-back-to-adjust-later

Simple line drawing effect:

You can use this sketching (line drawing) which I have created so far. If you want to make a more realistic effect can follow the following steps below.
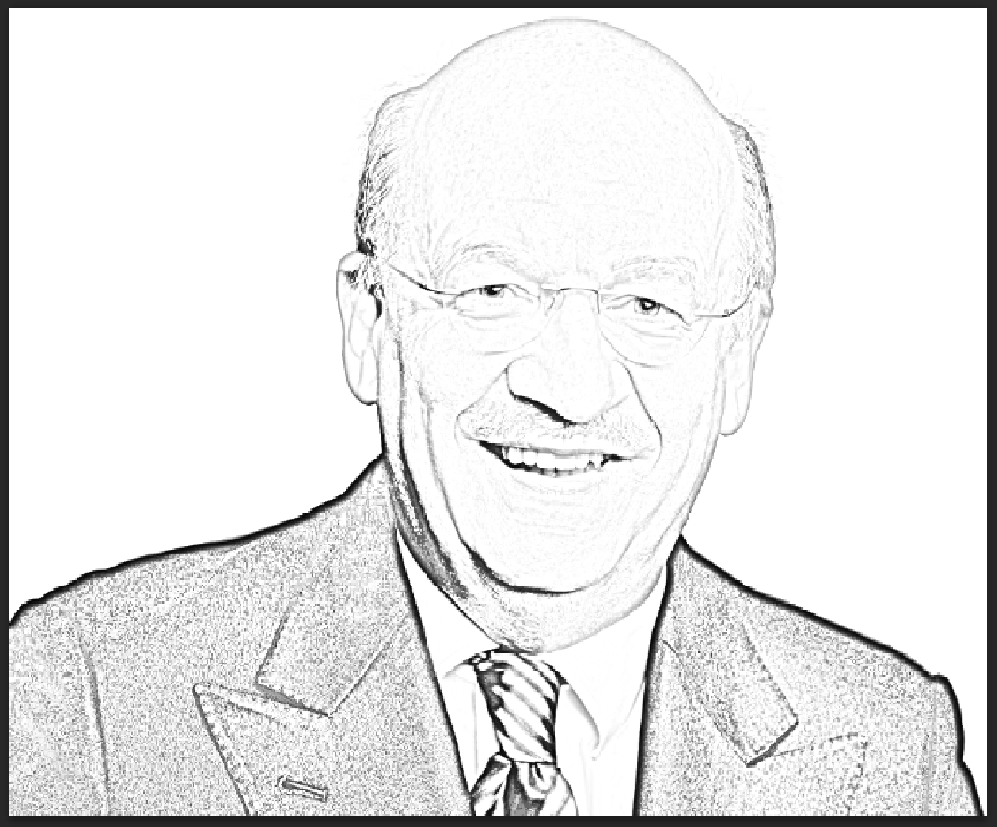
Simple-effect-line-drawing-by-first-step

Again duplicate background copy layer:

After that we have to make again a duplicate layer using the Ctrl+J.
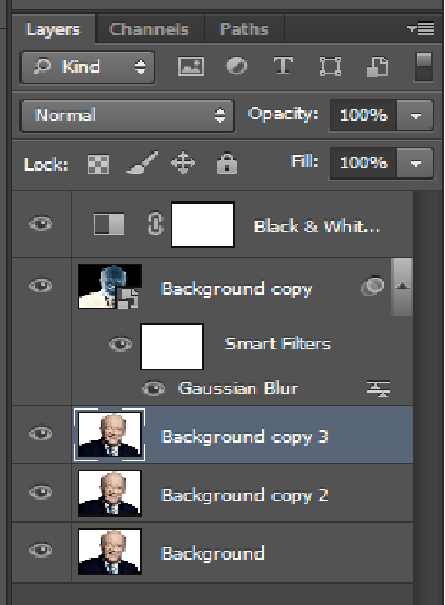
Copy-the-background-image

Drag/Move layer to top:

Then we will move or drag the copied layer to top.
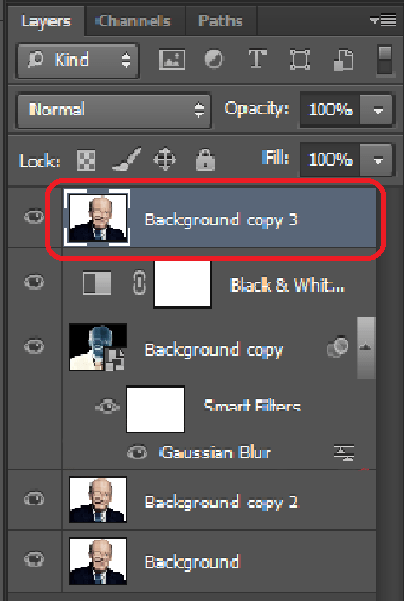
Drag-the-layer-again

Desaturating top layer:

Next we will go to the top of the screen and do as follow —  adjustments > desaturate
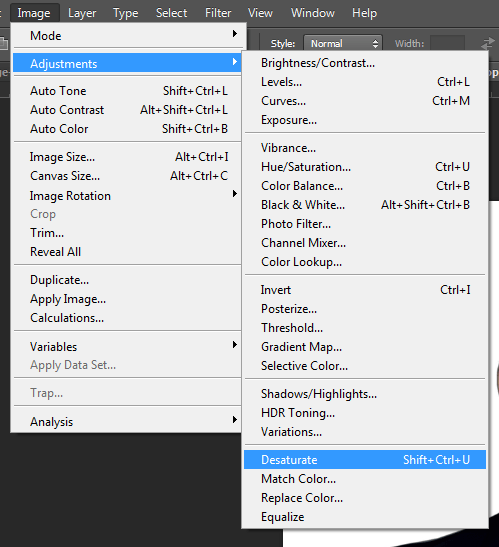
Click-on-image-adjustment-and-desaturate

Apply filter gallery:

At next we will go to the Filter at the top of the image and click the Filter Gallery option. It results in a negative effect and will let you see the outline of the photo.
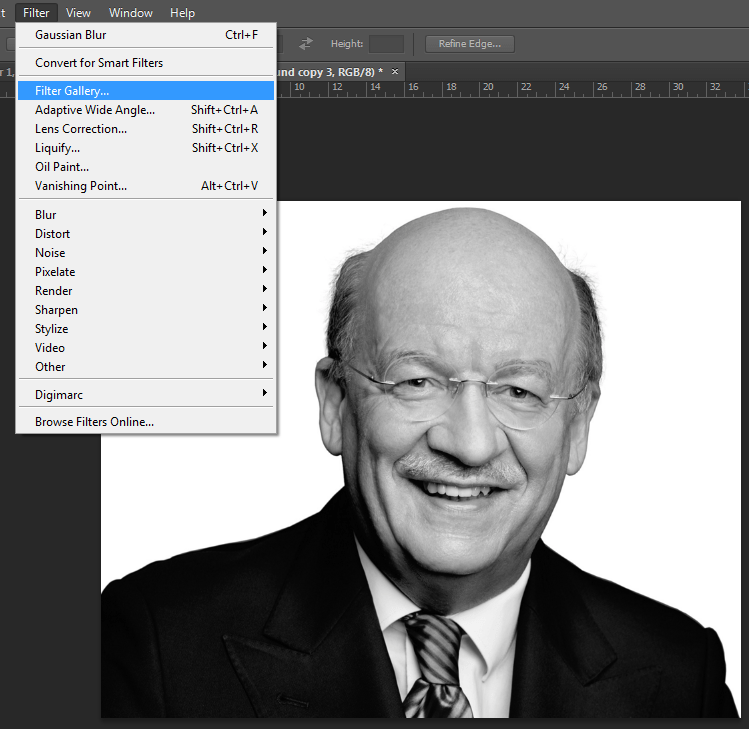
applying-filter-gallery

We have to adjust the style in the filter gallery:

You will see a white line out of the image. At the left of the image there, you will find an option “Glowing Edges” to make the edge sharp and adjust the brightness as you want. Finally, click finish to make the effect.
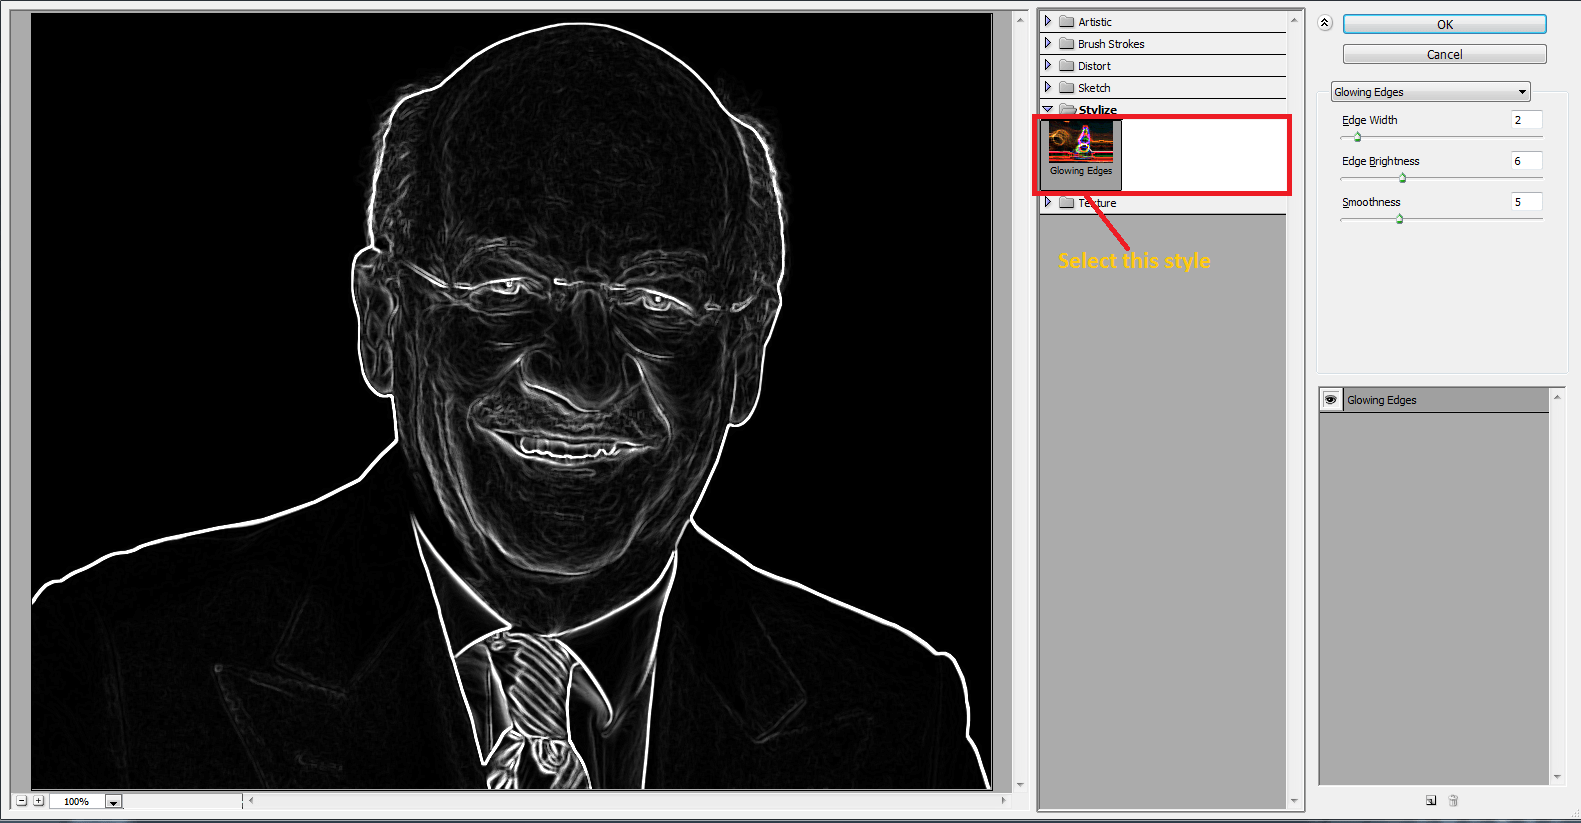
negative

Inverting the image:

You will need to invert the image again with Ctrl+I or following the shown steps.

18

Changing the blending to multiply:

At last we need to remove the white color, to do this we will find the blend mode and need to change it to multiply.
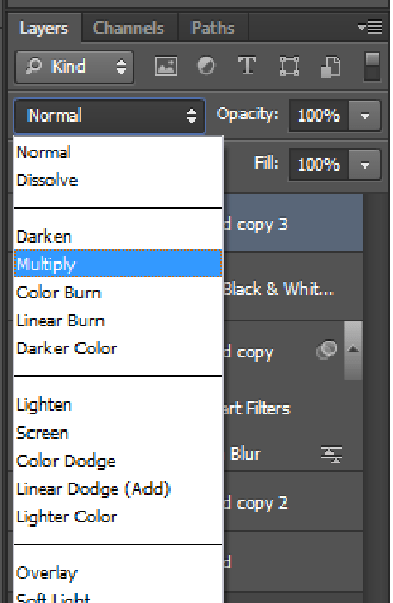
Changing-the-blending-mode-to-multiply

Add shadow to the existing line drawing:

At next you might want to add a little shadow to improve the contrast of the sketch. In this step you have to click on the background layer and duplicate it again. Then you need to drag this copied layer to the top of the layers.
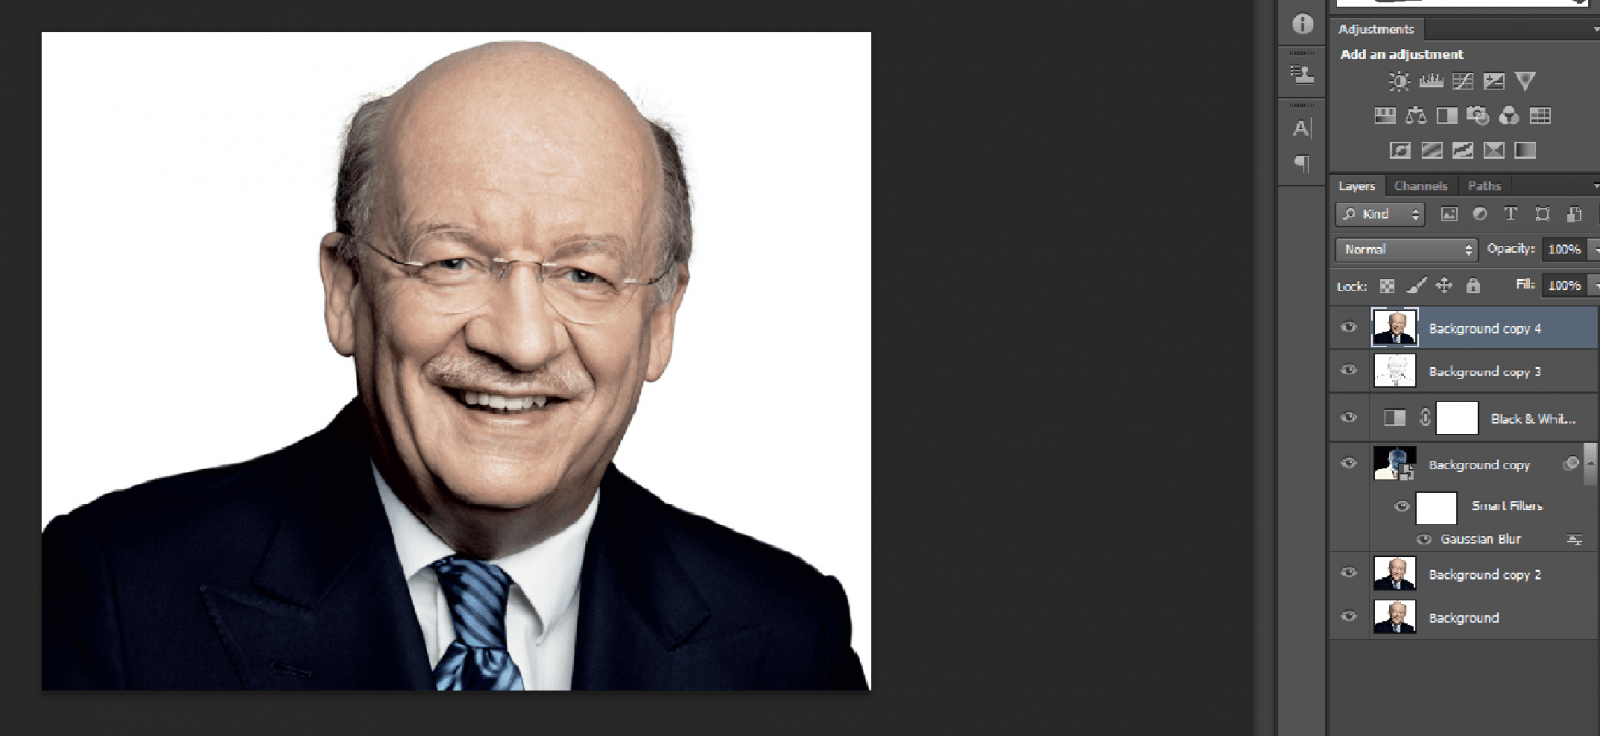
Add-shadow-to-the-existing-line-drawing

Desaturating the image:

Again we need to Desaturate the image like we did before.

21

Applying the filter gallery:

Now you will go back again to the filter option and there select the filter gallery. After that there you will find a popup menu with sketch selection, and there you will select the sketch called charcoal. This will bring a result with a sketch effect that is nearly similar to the pencil-made sketch drawing. You need to adjust another setting according to your want. Click Ok at last.
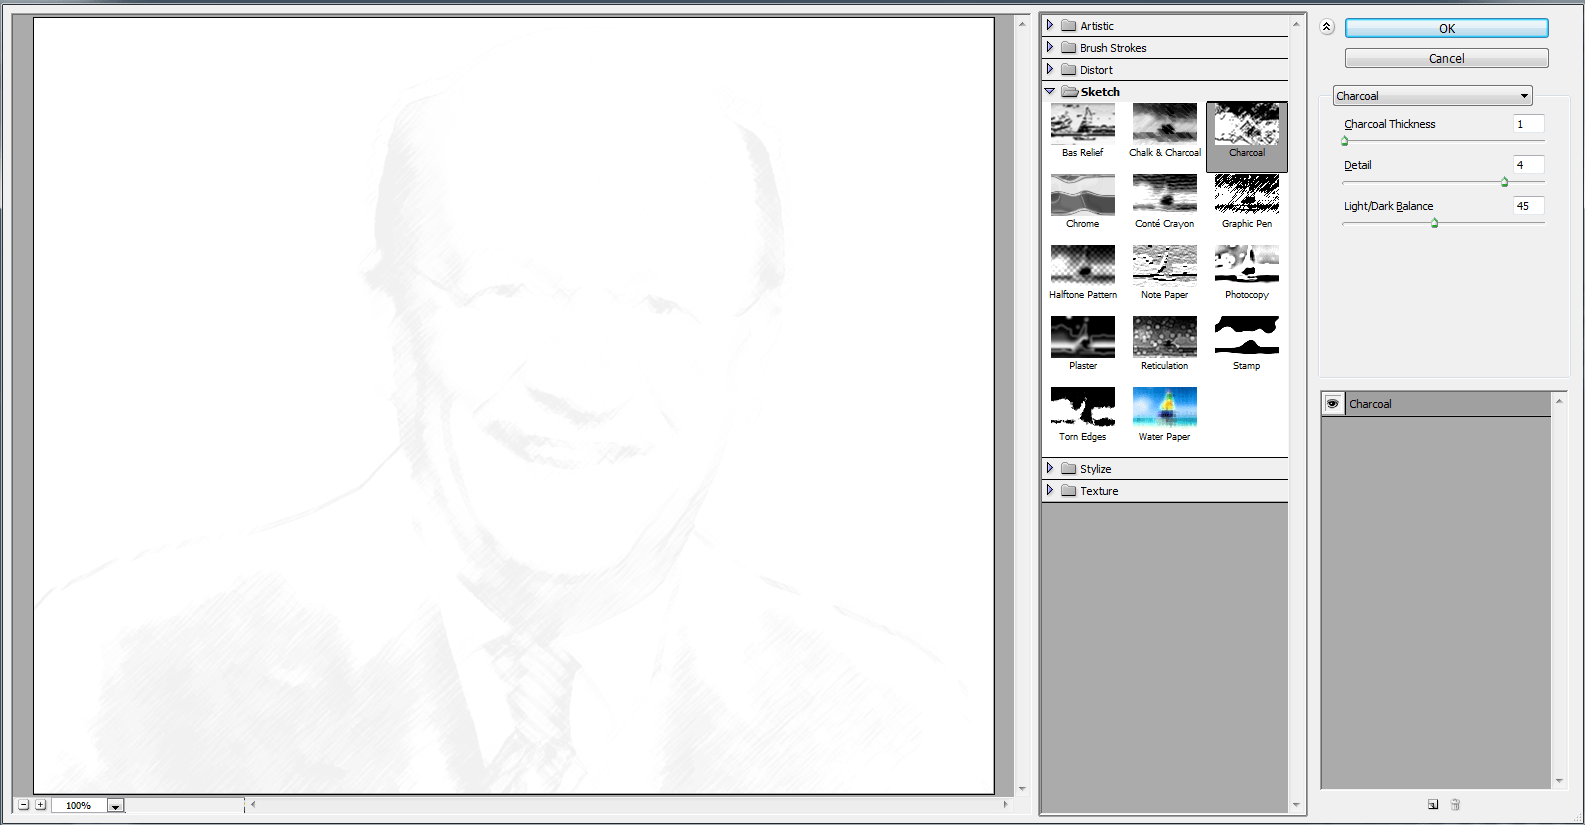
Applying-filter-gallery

Changing the blending to multiply:

At last we need to remove the white color, to do this we will find the blend mode and need to change it to multiply.
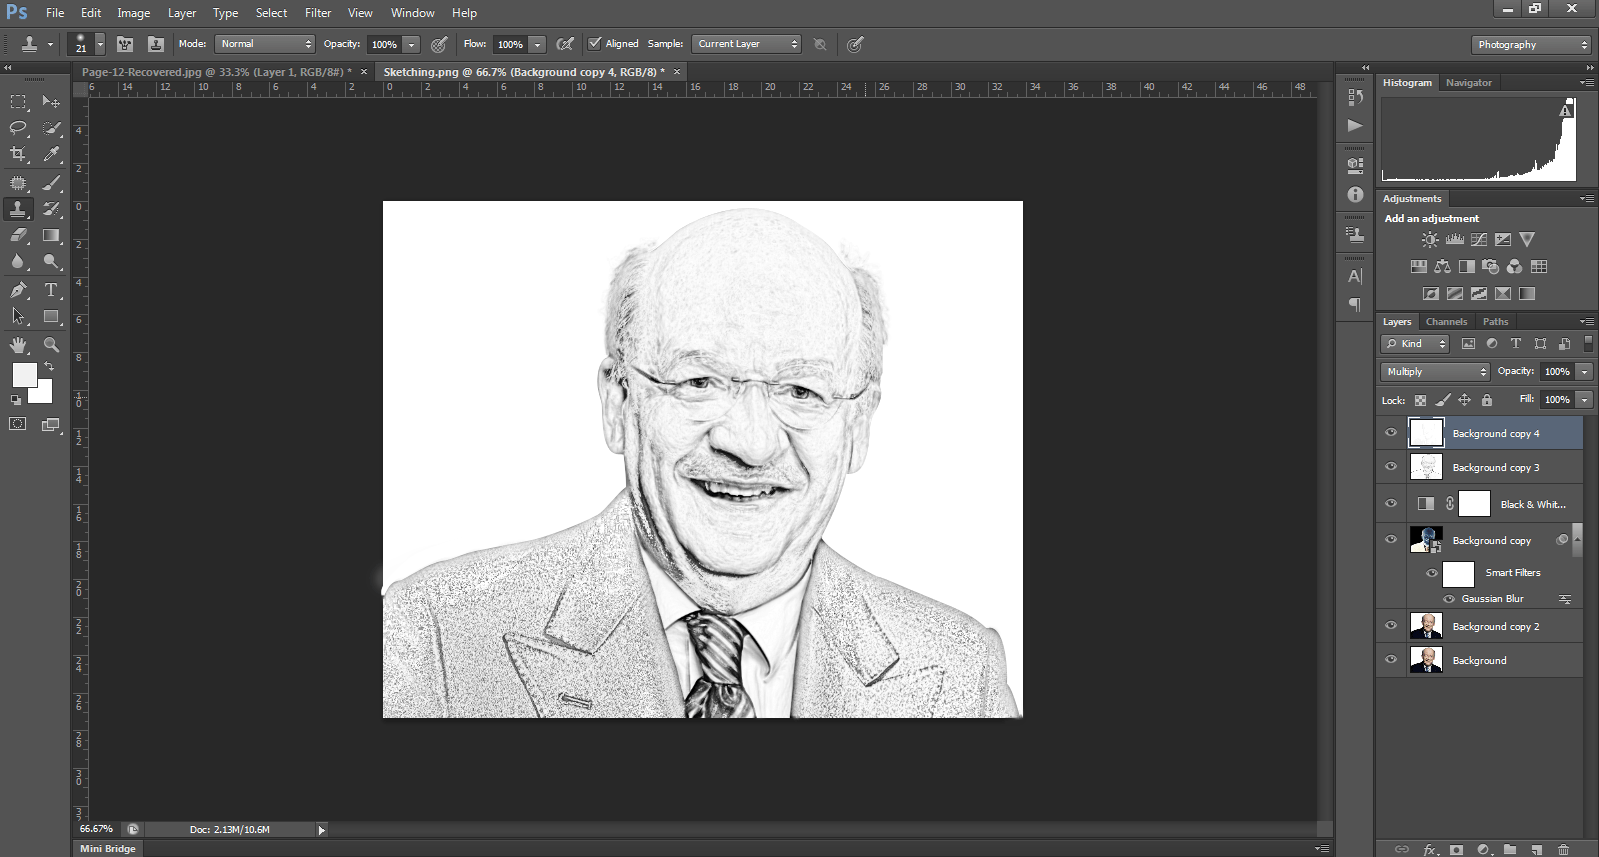
Got-original-line-drawing-image1

Before after result:

Banner-of-how-to-turn-a-photo-into-a-line-drawing-effect-in-Photoshop

Save

Save

  • Tweet
Tagged under: HOW TO CREATE LINE DRAWING EFFECT PHOTOSHOP, LINE DRAWING EFFECT, PENCIL DRAWING EFFECT, PHOTO TO PENCIL SKETCH, photoshop tutorial

About Sayadul Arafin Tamjid

Hi, I’m Tamjid, CEO of Clipping Path Source, and a seasoned expert in image editing and SEO. With a commitment to excellence and a creative approach, I consistently deliver high-quality results across every project. My passion for graphic design drives me to share industry insights and uphold exceptional service standards, empowering clients to achieve their goals with confidence.

What you can read next

How To Remove Background From Hair In Photoshop CC18
Photo Retouching Technique
Learning The Skin & Photo Retouching Technique
What is image masking?
IMAGE MASKING SERVICES AT CLIPPING PATH SOURCE

Get our weekly insights and tips

Subscribed for the newsletter

Recent Posts

  • 10 Product Photography Trends Driving Sales in 2025

    10 Product Photography Trends Driving Sales in 2025

    0 comments
  • What is 4k Resolution?

    What is 4K Resolution? | A Detailed Guide

    0 comments
  • Adobe Photoshop vs. GIMP – A Brief Comparison on Their Utility

    Adobe Photoshop vs. GIMP – A Brief Comparison on Their Utility

    0 comments
  • Top and populer Luxury Fashion Brands

    Top 15 Most Popular Luxury Fashion Brands

    0 comments
  • Mastering Motion Photography

    Mastering Motion Photography: A Beginner’s Journey

    0 comments

Categories

  • Article
  • Clipping path
  • Clipping Path Source
  • Ecommerce business
  • Erase tool
  • Graphic designer
  • Image Editing Service
  • Photo retouching
  • Photographer and Photography
  • Product Photography
  • Raster to vector conversion
  • Review
  • Tips and tricks
  • Tutorial
  • Website image optimization

Services

  • Clipping Path
  • Image shading
  • Photoshop masking
  • Photo retouching
  • Raster to vector
  • Mannequin removing
  • Photo enhancement
  • Image stitching
  • eCommerce product images editing

Important links

  • Gallery
  • About us
  • Blog
  • Privacy policy
  • Term and conditions
  • Request an FTP Access
  • Glossary

Important links

  • Contact us
  • FAQ
  • Partnership
  • Refund policy
  • Sitemap
  • Testimonials
  • About us

Recent posts

  • 10 Product Photography Trends Driving Sales in 2025

    10 Product Photography Trends Driving Sales in 2025

    In the fast-paced world of e-commerce, high-qua...
  • What is 4k Resolution?

    What is 4K Resolution? | A Detailed Guide

    Let’s take a journey through the evolution of s...

Headquarter


2360 Stony Brook Dr Louisville KY 40220.
Phone: USA: +447878629153; UK: +19292269462
Mail: [email protected]
Web: www.clippingpathsource.com

DMCA.com Protection Status

Subscription Form
  • GET SOCIAL

© 2025. All rights reserved Clipping Path Source.

TOP
  • USD $ USA Dollar
  • EUR € Europian Euro
TRY US NOW

WhatsApp us