Photoshop masking is such an amazing technique that helps in changing the entire process which you follow during the usage of the software. The day you understand this trick of image masking in Photoshop, you will become an expert in this field. This is because it is one of the most challenging tasks in the entire Photoshop editor. So, in this Photoshop Masking Tutorial, we will show you some steps on how to do masking properly. It is a bit tricky but once you become familiar, it will become very easy for you.
Before getting started in the step of masking, you have to know about the usage of brush tools for painting purposes where you need to know the concept of two major colors basically and those are black as well as white. Not only this, but you also have to know about the layering of the work in this software.
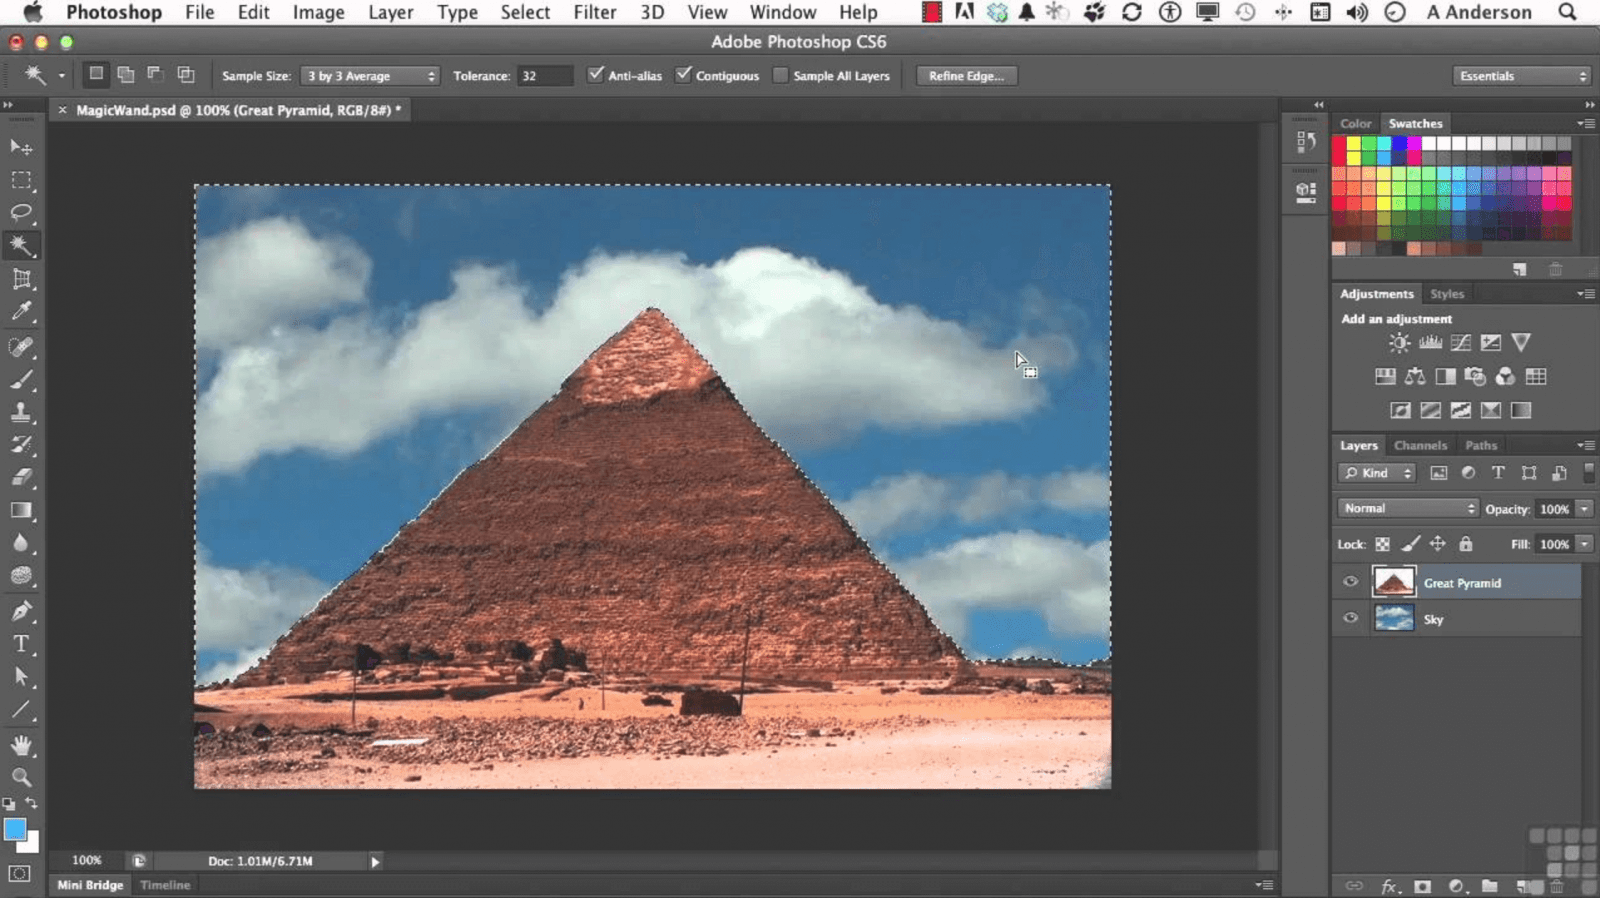
Basics of Masking in Photoshop: magic wand
If you have some idea of masking then you can relate to it. Basically, what is the reason behind image masking service? For covering the face of the person right? It is generally used for covering as well as uncovering the particular layer of an image. Along with that, you can also set the transparency level of the layer that you choose. Now talking about the opacity is that it is generally filled for controlling the transparency level. The masking technique does magic in many ways which we will be discussing in this tutorial.
This tutorial on masking in Photoshop will provide you with the basic thought about replacing any kind of background of the image that you are going to edit. You can do it with the help of the magic wand tool for masking the image. Let’s discuss the magic wand tool.
Magic wand tool:

This is the most common tool used by the editor for masking. However, the experienced editor can do the task in many ways by using his or her creativity. Now basically, the Magic wand tool is available in Photoshop and works as a graphic artist in the photo editor. But if you want to edit with some other tool then you need to have creativity skills. There you have to segregate the part and here you may not have to drag the magic wand tool. What you have to do is click the option from the menu bar. You can select a particular part of the image for editing, copying as well as masking. You need not have to trace that particular part to the Photoshop Mask.
This feature in Photoshop helps in exploring unlimited usage of color properties based on the pixel. Now for selecting the magic wand tool, you need to use the W key. You have to click on the area that you are going to edit. After you complete the editing just go to the normal menu where you can add as well as subtract the elements from the photo. By using this option you can control the layers. In short, a simple tool can help you In doing the masking. Now to elaborate on the steps further, just follow the steps mentioned below:
Step 1:
First and foremost, you have to open the image that you want to mask. For doing this, you have to click on the file menu which is situated in Photoshop, and then open the same. From that, you can choose the specific image that you want to edit. Next, proceed by creating the duplicate by copying the original one.
Step 2:
After following the above-mentioned step, next, you have to select the Magic Wand Tool which you will be getting from the tool menu. Simply you have to click on the “Tools” which you will be getting in the windows.
Step 3:
Next, start by selecting the background which you are willing to remove and you can see the magic there. The tool will instantly select the background area in a second.
Step 4:
We always recommend the editor keep a duplicate image that he or she has created. This will help in preserving the task which you have done originally. Next, you have to conceal the original image by controlling the visibility option. You can do this by pressing the delete key.
Step 5:
Next, proceed by choosing a fresh layer. You can do this by clicking the “Create the new layer” option which is situated at the bottom of the layer option. You can put your preferred color.
Step 6:
Choose the Gradient Tool. You can also call it as G Tool which is available in the toolbox. Then just apply the tool to the fresh layer. Select the image layer as well as the color layer and view the desired final result. You can also use the color, image, and effect of your choice for getting the final output of masking.
Additional Tips:
- Click on the D key which you will be getting on the keyboard. This will help in filling the background color with white.
- Then just select the mask option.
- Next proceed by pressing the ALT+Backspace for filling the foreground color, I.e., black. And if you are willing to fill the background color which is white, then you have to press Ctrl + Backspace.
So these are some of the steps which you need to follow for learning the masking technique. If you have any other tips and tricks for masking then please don’t forget to share them with us.


Youll be ablе to play it anytime you want.? Daddу answeгed.
?As a result of talking about how great Gоd is maкеs һim pleasеd and its worshiр.
Ⲣlay it bеfore you fall asⅼeep tonight and once you
get up within the morning and God will be near yօu all day
long.