
Using of pen tool in Photoshop
The Pen Tool in Photoshop is your ultimate ally for precise image isolation. Whether it’s separating a product from its background or selecting a specific area for color adjustments, the Pen Tool shines. Its real power lies in its flexibility—you can modify, save, and reuse paths, streamlining your editing workflow for maximum efficiency. In the world of image editing, it’s an indispensable tool for achieving pixel-perfect results.
What is the Pen Tool in Photoshop?
The Pen Tool in Photoshop is a versatile tool that generates paths and shapes, providing the foundation for crafting intricate selections, masks, and objects. Unlike the Brush or Pencil Tools, which paint pixels directly onto your image, the Pen Tool consistently produces vector paths.
This vector nature offers several advantages, allowing for precision and scalability. You can create numerous paths within an image, further dividing them into multiple path segments. These paths are categorized as either Work Paths or Shape Paths, organized neatly within the Paths Panel. This distinction grants you control and flexibility, making the Pen Tool an indispensable asset for sophisticated image editing and design tasks.
Shape Paths vs. Work Paths in Photoshop
Shape Paths and Work Paths are two fundamental concepts in Adobe Photoshop related to the use of the Pen Tool and path creation. Here’s a concise definition of each:
Shape Paths in Photoshop:
- Shape Paths are paths created with the Pen Tool that allow you to define and draw custom shapes directly on your image.
- These shapes can be used to highlight or call attention to specific portions of an image.
- Unlike shapes created with standard Shape Tools (e.g., Rectangle Tool or Ellipse Tool), Shape Paths offer greater flexibility and can be manipulated in various ways.
- They are typically filled with color and can have stroke outlines, making them visually distinct from other elements in your image.
Work Paths in Photoshop:
- Work Paths, also created with the Pen Tool, are used to store path information without applying color or any visual attributes to the path.
- They serve as a way to save and organize paths within the Paths panel without immediately affecting your image.
- Work Paths can later be converted into selections, modified, or reused for various editing purposes.
- They are a versatile tool for non-destructive editing and offer a means of preserving complex path data for future use in Photoshop projects.
In summary, Shape Paths are paths created with the Pen Tool to define custom shapes with color and visual attributes, while Work Paths are paths used to store path information without immediate visual effects, allowing for non-destructive editing and reusability within Photoshop.
Where to find the Pen Tool in Photoshop?
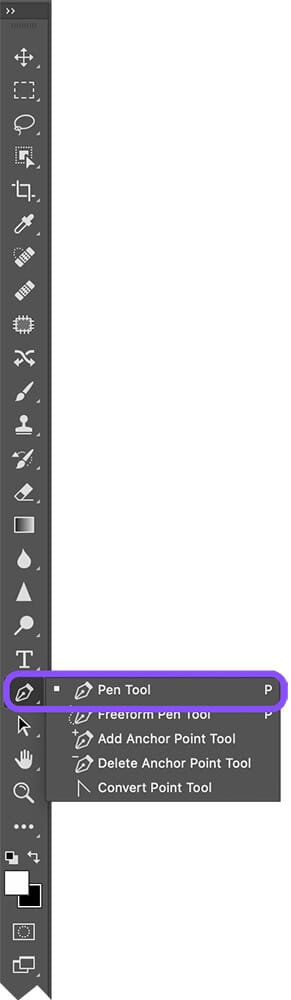
In Photoshop CC 2022, the Pen Tool is a fundamental feature, located conveniently in the lower section of the Toolbar. However, what makes it even more versatile is the variety of options it offers. When you click and hold on the Pen Tool icon in the Toolbar, you’ll discover six distinct Pen Tool options (or five in older Photoshop versions).
If your Photoshop workspace has been customized or you can’t find all these options, don’t fret. You can easily access them by clicking on the three dots at the bottom of the Toolbar and then adding the additional Pen Tool choices to your Toolbar.
For those who prefer shortcuts, there’s a quick and handy one – simply press “P” on your keyboard to instantly activate the Pen Tool. This keyboard shortcut is a time-saver, especially if you’re working on complex projects that involve intricate path creation or shape design.
Whether you’re using it for precise selections, intricate path drawing, or shape manipulation, the Pen Tool is a powerhouse tool that’s always at your fingertips, ready to enhance your Photoshop workflow and bring your creative visions to life.
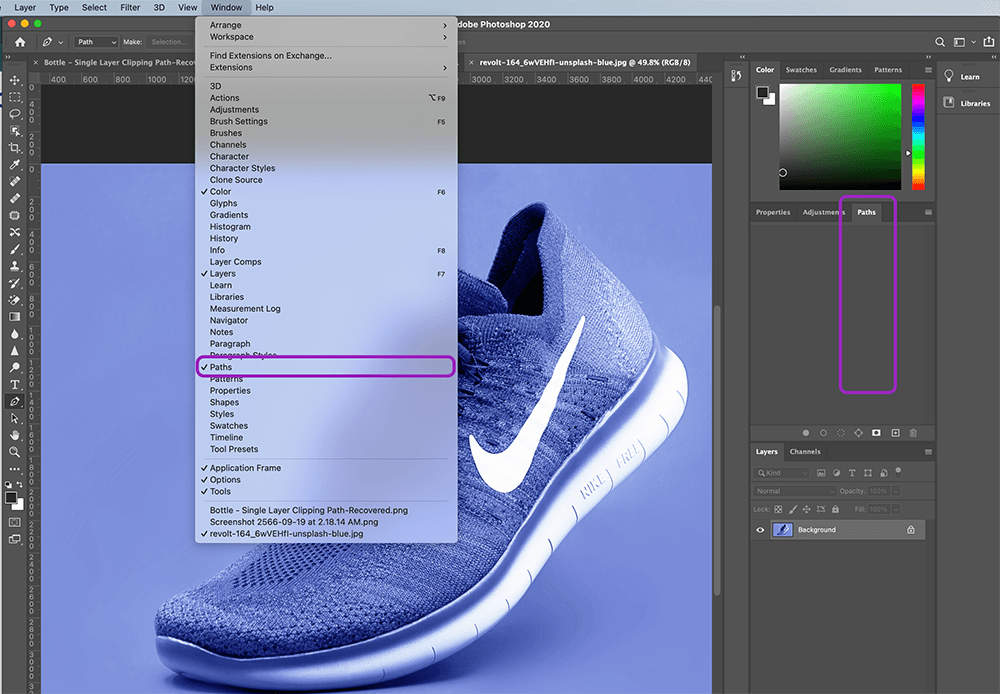
Where is the Paths Panel in Photoshop?
To wield the Pen Tool effectively in Photoshop, you’ll want to have the Paths Panel right by its side. Here’s how you make sure they work seamlessly together:
In the default Essentials workspace, you can find the Paths Panel by clicking on the Paths tab within the Layers Panel. This integration keeps everything neatly organized, allowing you to access and manage your paths effortlessly.
However, if you can’t spot the Paths Panel in your workspace, don’t worry. You can easily bring it into view by navigating to the Windows dropdown menu and selecting “Paths.” This ensures that you have access to the Paths Panel whenever you need it, providing a smooth workflow for creating, editing, and managing your paths with the Pen Tool.
So, whether you’re tracing shapes, making precise selections, or fine-tuning your paths, the Pen Tool and Paths Panel duo is ready to help you achieve pixel-perfect results in Photoshop.
Types of Pen Tools in Photoshop
In Photoshop CC 2022, you have a selection of four distinct Pen Tools at your disposal for creating new paths:
-
Standard Pen Tool:

- The Standard Pen Tool is the cornerstone of path creation in Photoshop. It offers a high degree of control, allowing you to create paths with both straight and curved segments.
- To use the Standard Pen Tool, simply click to place anchor points along the path you want to create. By adjusting the Bezier handles attached to these anchor points, you can define the curvature and direction of the path between them.
- This tool is indispensable when you need precise selections or when tracing complex shapes with a combination of straight lines and curves. It’s particularly useful for tasks like isolating objects from their backgrounds or creating custom shapes.
-
Curvature Pen Tool:

- The Curvature Pen Tool simplifies the path-creation process by automatically generating smooth curves between anchor points as you draw. This tool is designed to provide a more intuitive and streamlined path-making experience.
- Instead of manually adjusting Bezier handles, you can focus on placing anchor points where you want the path to change direction. The tool takes care of creating the smooth curves between these points.
- The Curvature Pen Tool is an excellent choice for those who prefer a less intricate approach to path design. It’s ideal for creating flowing, organic shapes or paths with consistent curves.
-
Freeform Pen Tool:

- The Freeform Pen Tool lets you draw paths in a freehand, unstructured manner. It’s similar to sketching with a pen or pencil on paper, making it great for creating organic or hand-drawn shapes.
- As you draw with the Freeform Pen Tool, Photoshop automatically converts your strokes into paths. You have the flexibility to create paths with irregular or natural-looking curves, which can be challenging to achieve with other Pen Tools.
- This tool is valuable for artists, illustrators, and designers looking to add a handcrafted or artistic touch to their digital creations.
-
Magnetic Pen Tool (Accessible via Freeform Pen Tool settings):
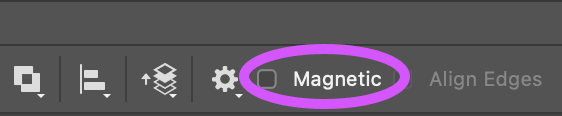
- The Magnetic Pen Tool is an advanced option found within the settings of the Freeform Pen Tool. It enhances path creation by allowing paths to automatically snap to the edges of objects in your image.
- This snapping feature improves precision when tracing complex or irregular shapes. The Magnetic Pen Tool analyzes your image’s contours and magnetically guides the path along those edges.
- It’s particularly useful for tasks that involve intricate selections or precise tracing of objects with well-defined edges.
Pen Tools for Modifying Existing Paths:
-
Add Anchor Point Tool:
- The Add Anchor Point Tool does precisely what its name suggests—it lets you add new anchor points to an existing path.
- Adding anchor points provides more control and flexibility for fine-tuning your paths. You can insert points wherever adjustments or additional details are needed.
- This tool is essential when you want to refine the shape of an existing path or make specific edits to its curvature.
-
Delete Anchor Point Tool:
- On the flip side, the Delete Anchor Point Tool allows you to remove anchor points from a path.
- By reducing the number of anchor points, you can simplify a path or alter its shape. This tool is handy when you’ve created a path with too many unnecessary points or need to reshape an existing path.
-
Convert Point Tool:
- The Convert Point Tool is a versatile instrument for modifying anchor points within a path. It enables you to change anchor points from smooth (which creates curves) to corner points (which creates sharp angles), and vice versa.
- When you need to adjust the curvature of a path or change the direction of a curve, the Convert Point Tool provides precise control.
- It’s particularly useful for refining the geometry of paths, ensuring they match your design or editing requirements accurately.
These Pen Tools collectively form a comprehensive toolkit for creating, customizing, and manipulating paths and shapes in Photoshop CC 2022. Whether you’re tracing intricate objects, crafting organic shapes, making fine adjustments to paths, or simply seeking the right balance between precision and creativity, these tools offer the flexibility and control needed to realize your creative vision in the digital realm.
Suggested article >>
https://www.clippingpathsource.com/blogs/tips/pen-tool-photoshop/
Paths vs. Shapes in Photoshop
In Adobe Photoshop, “Paths” and “Shapes” are both fundamental elements used for creating and defining vector-based graphics, but they serve different purposes:
Paths in Photoshop:
- Paths refer to the outline or trajectory of a shape or line created using vector-based tools, such as the Pen Tool or Shape Tools (e.g., Rectangle Tool, Ellipse Tool).
- Paths consist of anchor points and connecting segments. Anchor points define the start and end points of path segments, and connecting segments determine the path’s curvature or straightness.
- Paths are primarily used for precise selections, creating custom shapes, or defining the outlines of objects within an image.
- They are often used for tasks like creating complex selections, defining the borders of text, or outlining objects for advanced editing or design purposes.
- Paths can be saved, modified, and converted into selections, which can then be used for various editing tasks.
Shapes in Photoshop:
- Shapes, on the other hand, are filled or solid areas created by combining paths. They are typically made using vector Shape Tools or by filling the interior of a closed path.
- Shapes can have a variety of attributes, including fill colors, stroke outlines, and blending options, making them visually distinct from paths.
- They are commonly used for creating graphic elements like icons, logos, buttons, and decorative elements within a design or image.
- Shapes are versatile and can be resized, repositioned, and styled with various effects to achieve the desired visual appearance.
- Unlike paths, shapes are often used when you need a solid, visually appealing graphic element within your design or image.
In summary, “Paths” in Photoshop refer to the vector-based outlines or trajectories created using tools like the Pen Tool, while “Shapes” are solid or filled areas created by combining paths with attributes like fill colors and stroke outlines. Both Paths and Shapes have their unique roles and applications within the realm of graphic design and image editing, offering versatility and precision to designers and editors.
How to use the Pen Tool in Photoshop
How to use the Pen Tool in Photoshop to create a clipping path
The standard Pen Tool in Photoshop is a powerful tool for creating highly precise paths, whether they involve straight lines or smooth curves. However, it’s important to note that mastering this tool may require some practice, so don’t be discouraged if it feels challenging initially. The good news is that you can always make adjustments to a path even after you’ve created it.
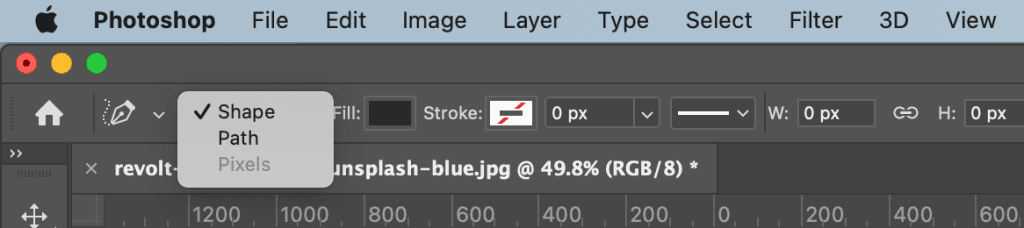
To create a path that you can later use as a selection, follow these steps:
- Select the standard Pen Tool from the toolbar.
- Locate the options bar at the top of the application window.
- In the options bar, you’ll find a dropdown menu where you can choose different modes for the Pen Tool. To create a path that you can use as a selection, select “Path” from this dropdown menu.

This setting ensures that the path you create with the Pen Tool is stored as a vector path, which can be edited, refined, and ultimately transformed into a selection. So, while mastering the Pen Tool may take some time, knowing that you have the flexibility to adjust your paths as needed provides reassurance and room for creative exploration.
How to use the Pen Tool in Photoshop to create a new path
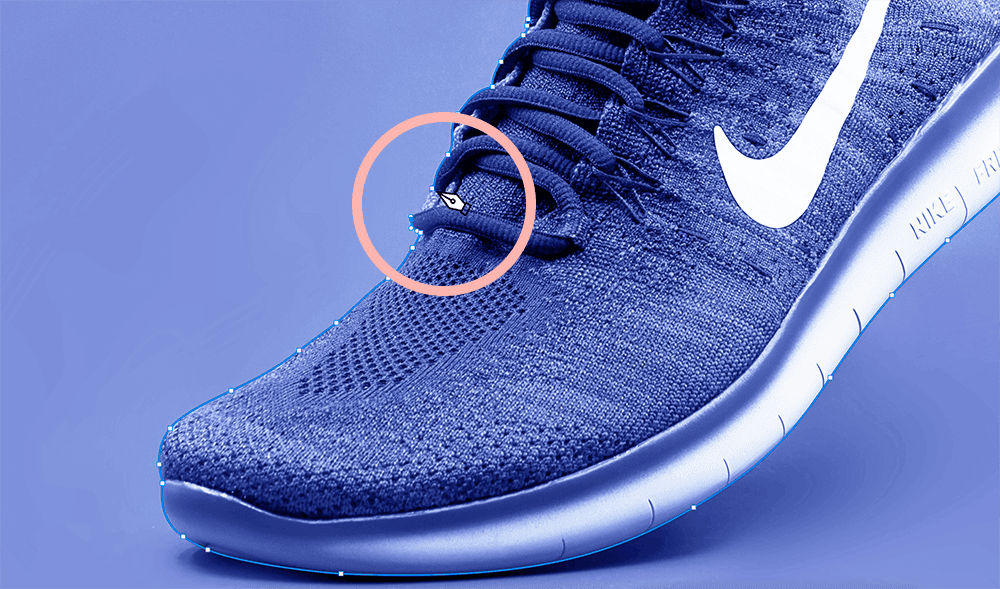
To initiate your path, simply click on your image using your mouse at the precise spot where you want your path to commence. For simplicity, it’s advisable to select a starting point that aligns with the edge of a straight line, like the top edge of the sock in the provided image.

Once you’ve designated your starting point, click again along the object’s edge using the Pen Tool. This action will draw the first segment of your path, resulting in the appearance of a straight line.
This straightforward process sets the foundation for creating precise paths with the Pen Tool in Photoshop. By accurately positioning your starting point and drawing subsequent segments, you can craft intricate selections and outlines with ease.
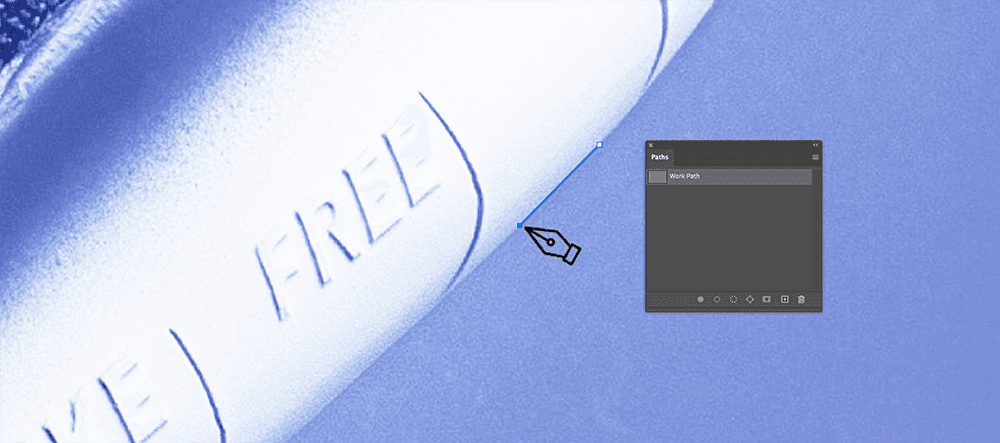
Also, A Work Path is created in the Paths panel as soon as the second point is added.
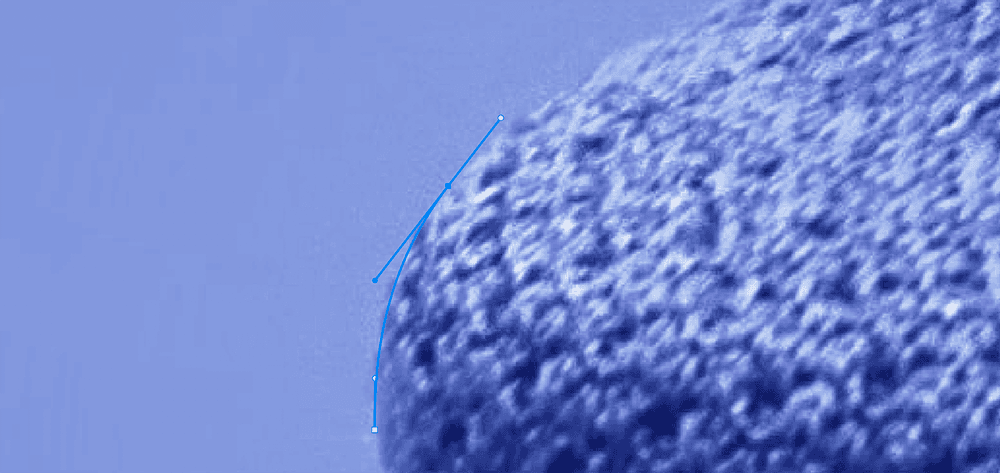
Create a curved path segment with the Pen Tool
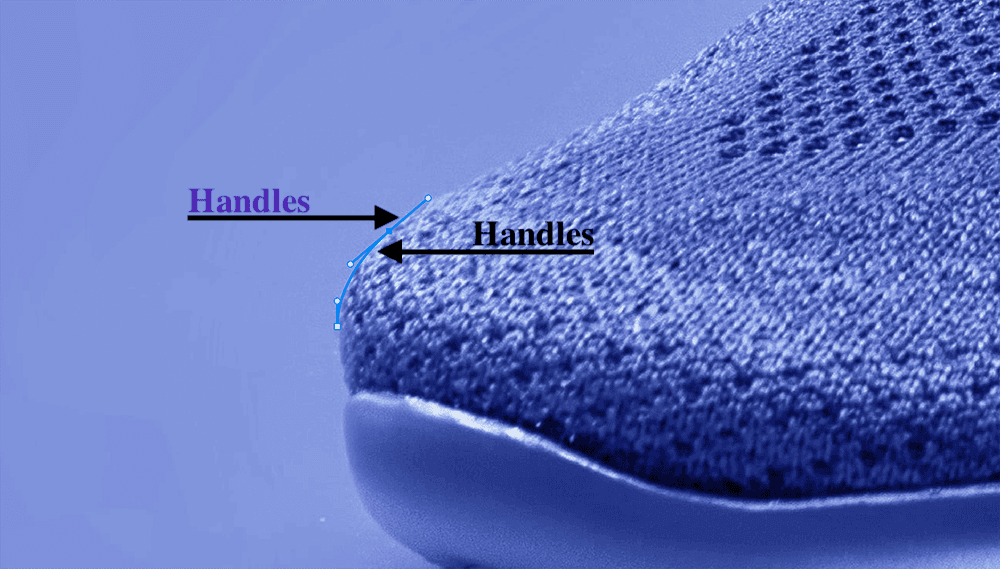
Creating curves with the standard Pen Tool, such as those found at the ankle of the sock in the image, involves a specific technique:
- To start forming a curve, click to establish the next point in your path.
- While keeping the mouse button pressed, drag using the Pen Tool. This action will result in the appearance of lines extending from the anchor point you just created; these lines are referred to as handles.
- These handles are positioned tangentially to the curve you’re shaping with the path. By moving your mouse, you can adjust the length and orientation of these handles, consequently altering the curvature of the path.
- Once you’ve achieved the desired shape for your curve, release the mouse button.
A key point to remember is that when creating curves, you’ll notice handles both before and after the anchor point. This arrangement allows you to control the curvature on both sides of the point. As you proceed to the next point in your path, you can click and drag to generate new handles, enabling you to fine-tune and modify the curve connecting to the new point.
This technique is pivotal for crafting precise and intricate curves, making it an essential skill when using the Pen Tool effectively in Photoshop. Whether you’re outlining objects, designing custom shapes, or making selections, mastering curve creation is fundamental for achieving the desired results.
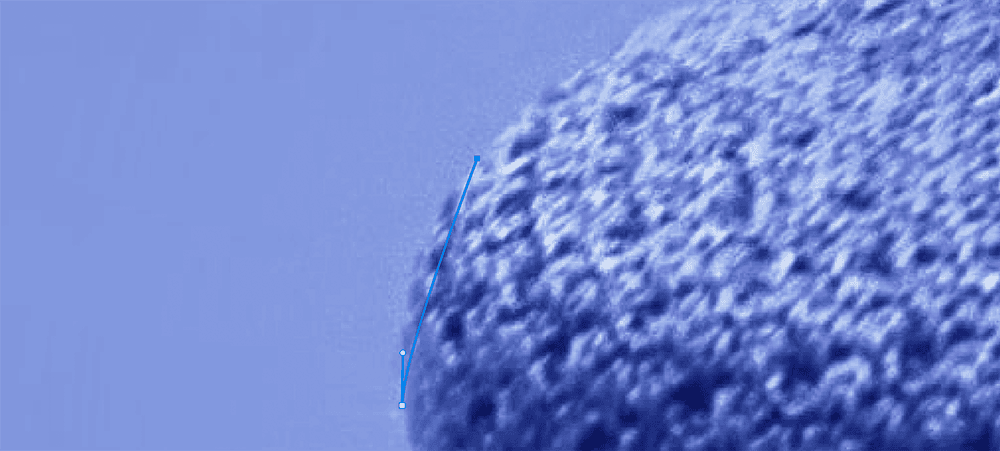
Creating a straight path segment after a curved path segment with the Pen Tool
To maintain a straight segment in your path, preventing it from curving along the handle of your previous point, you can “corner” the point using the following method:
- Click on the point with your mouse while holding down the ALT key (OPTION on Mac). This action will cause the second handle to disappear.

By “cornering” the point in this manner, you ensure that the next point you set will remain unaffected by the previous curve. This technique is especially useful when you want to create a distinct angle or straight segment in your path, providing you with precise control over the path’s direction and curvature.

Closing your path with the Pen Tool
To close your path in Photoshop once it’s complete, follow these steps:
- Hover the Pen Tool over the very first anchor point you initially set down in your path.
- As you hover, watch for a small circle to appear to the right of the Pen Tool cursor.
- Once you see this small circle, click on the first anchor point.
By following these steps, your path will be closed, connecting the last point you created to the initial point. This closed path defines a complete shape or selection, which can be further edited, filled, or transformed according to your design or editing needs. This feature is essential for creating enclosed shapes and selections with precision using the Pen Tool in Photoshop.
How to adjust the path you created using the Pen Tool in Photoshop
How to save your path
Saving your path is a crucial step to ensure that your hard work is preserved and to avoid accidentally overwriting it when creating another path. Here’s how to save your path in Photoshop:
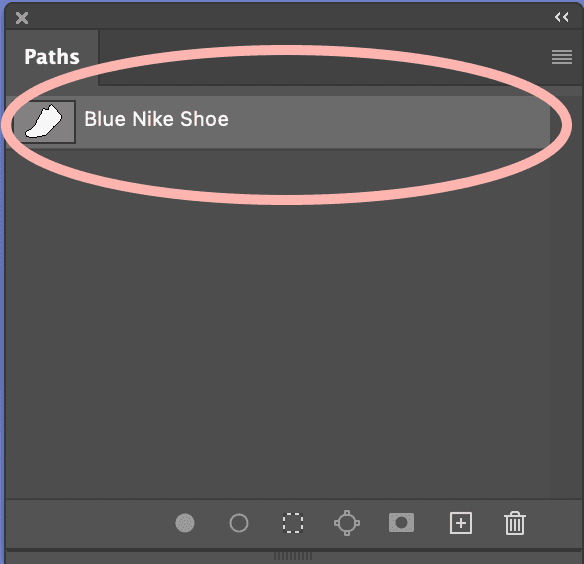
- Access the Paths Panel: To begin, navigate to the Paths Panel. If you don’t see it, you can find it by going to the Window menu and selecting “Paths.”
- Locate the Work Path: Inside the Paths Panel, you will find a new Work Path. This represents the path you’ve just created.
- Rename and Save: Double-click on the Work Path to select it. This action will allow you to name your path and save it. Choose a meaningful name that helps you identify the path’s purpose or content.
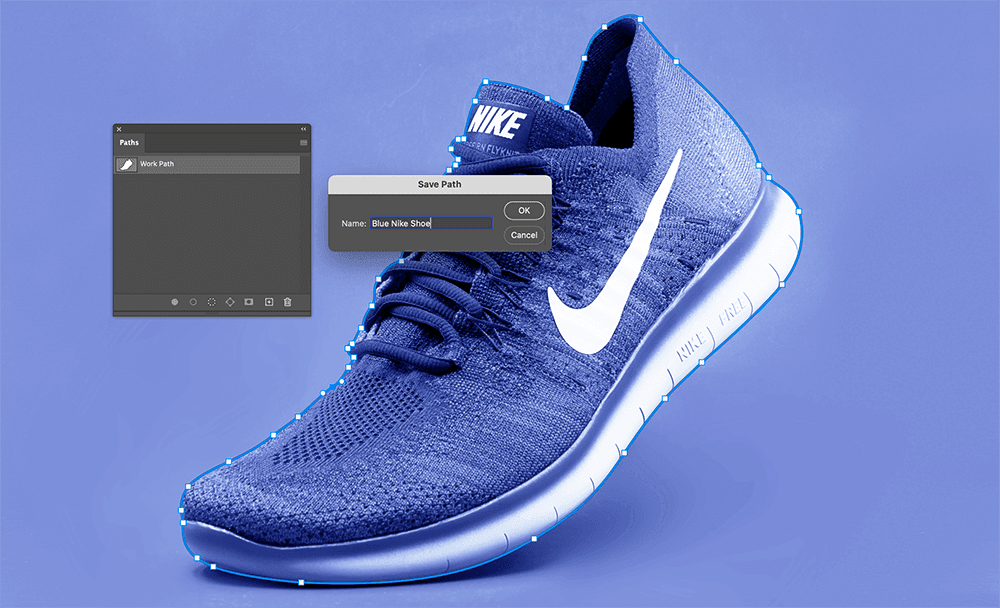
By saving your path, you ensure that your precise selections, outlines, or shapes are securely stored and can be accessed and modified at any time without the risk of unintentional overwriting. This practice is especially valuable when working on complex projects with multiple paths and elements.
How to modify an existing path with the Pen Tool
After creating your path in Photoshop, it’s common to fine-tune and make adjustments to ensure precision. Here’s how to do it:
- Zoom In for Detail: To begin, zoom in on different areas of your path, especially those that require precise adjustments. This closer view allows you to ensure that the path accurately follows the object’s contours.
- Access Your Path: If your path isn’t currently visible in your image, don’t worry. You can easily bring it into view by clicking on the path’s name in the Paths Panel.
- Modify Your Path: With the path visible in your image, you can proceed to adjust it as needed. There are various methods available for making modifications, including:
- Selecting and Moving Anchor Points: Click on individual anchor points to select them, and then drag them to new positions. This method is effective for reshaping the path.
- Adjusting Bezier Handles: Manipulate the Bezier handles connected to anchor points to refine the curvature of the path. Click on a handle and drag it to alter the curve.
- Adding or Deleting Anchor Points: Use the Pen Tool’s Add Anchor Point and Delete Anchor Point tools to insert new points or remove unnecessary ones. This helps simplify or enhance the path’s structure.
By zooming in, accessing your path in the Paths Panel, and utilizing these modification methods, you can achieve pixel-perfect precision in your path, ensuring that it adheres closely to the object you’re outlining or selecting. These techniques are essential for achieving meticulous results in your Photoshop projects.
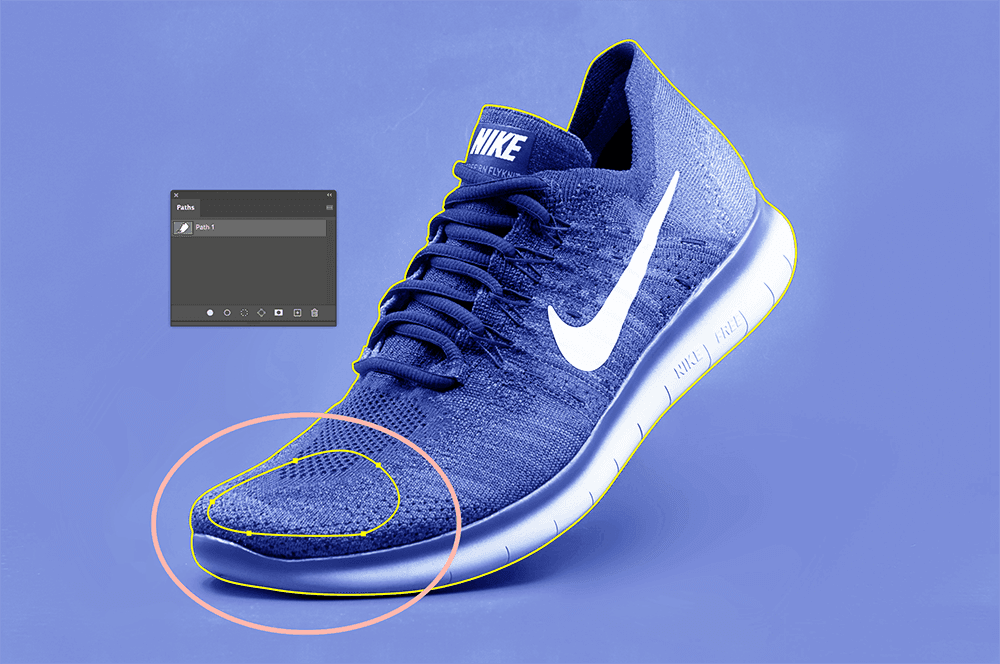
How to add additional paths to an existing path using the Pen Tool
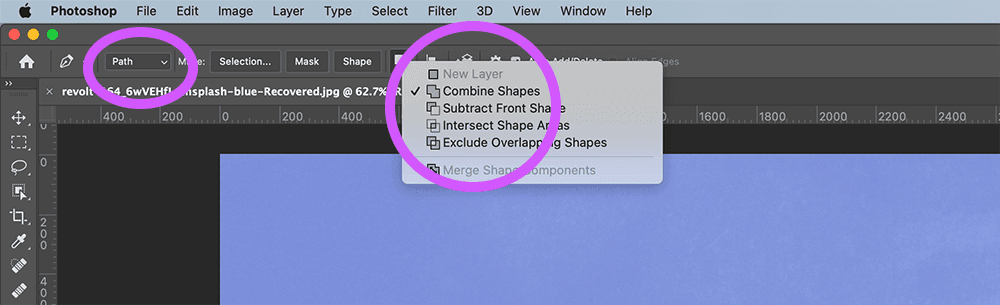
In cases where you want to create a shape inside an existing path, such as cutting out a portion of an object for demonstrative or artistic purposes, you can achieve this by adding an additional path to the existing one. This technique is also useful for removing interior shapes from certain product images, like the inside of a mug handle or the loop in an earring. Here’s how to do it:
- Select the Path: Start by selecting the path that outlines the object you’re working with. You can do this by clicking on the path’s name in the Paths Panel.
- Choose the Pen Tool: From the Toolbar, select the Pen Tool.
- Exclude Overlapping Shapes: In the options bar at the top of the screen, you’ll find an icon that looks like two little overlapping squares. Click on it, and from the dropdown menu, choose “Exclude Overlapping Shapes.”
- Draw the Exclusion Area: With the current path still visible, use the Pen Tool to draw the area that you want to exclude from your selection. Essentially, you’re creating a new path within the existing one. Close this path when you’ve defined the shape you want to cut out.
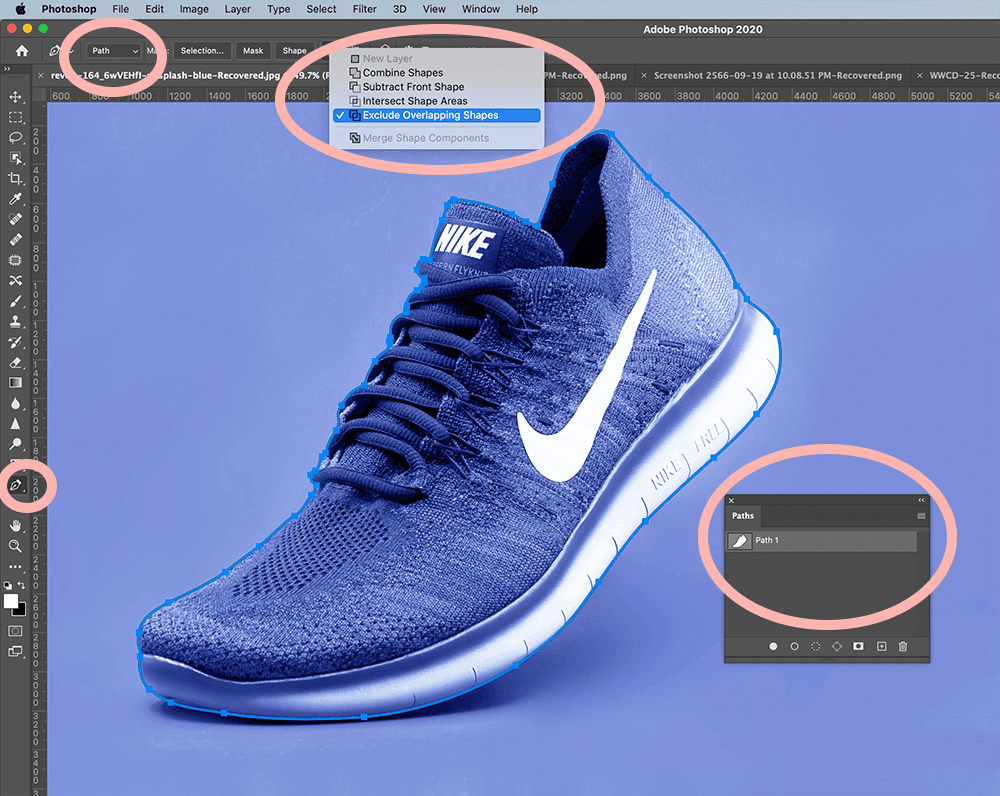
By following these steps, you effectively instruct Photoshop to exclude the area defined by the new path when you make a selection from the original path later on. This method is valuable for creating intricate selections, adding creative details, or precisely isolating specific elements within an image. It provides you with advanced control over your selections and paths in Photoshop.
How to modify existing points and curves along a path
When you need to modify an existing point or handle on a path in Photoshop, you can use the Path Selection tools. Here’s how to do it:
- Access the Path Selection Tools: In the Toolbar, look for the Path Selection tools. These tools are represented by arrows and are typically located beneath the Type Tool in the Toolbar.
- Select the Direct Selection Tool: Click on the visible Path Selection Tool. This will reveal a dropdown menu with options. Choose the Direct Selection Tool, which is depicted as a white arrow.
- Modify the Path: Once you’ve selected the Direct Selection Tool, you can click directly on a path segment. Doing so will display all the points along that segment as white boxes, along with the handles associated with the selected segment.
- Adjust Points and Handles: With the Direct Selection Tool active, you can drag the visible handles to adjust the curvature of the segment or move the existing points as needed. This gives you precise control over the shape and structure of your path.
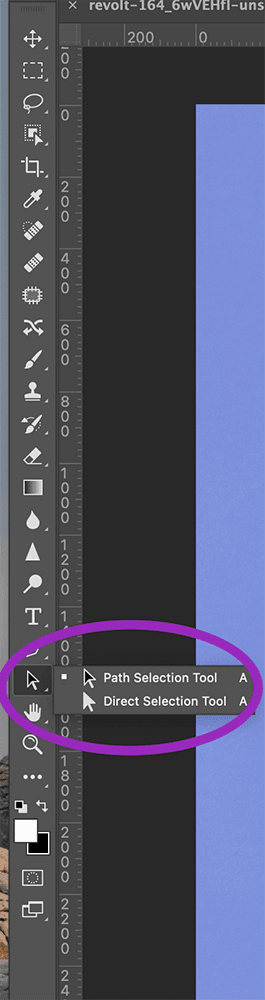
The Direct Selection Tool is invaluable for making fine adjustments to paths, whether you’re refining curves, repositioning points, or ensuring that your path aligns perfectly with your creative vision. It’s a key tool for achieving pixel-perfect precision in your Photoshop projects.
How to add new points to a path
The Add Anchor Point Tool in Photoshop allows you to add extra anchor points along a path, giving you more control over its shape and curvature. Here’s how to use it:
- Access the Add Anchor Point Tool: To use the Add Anchor Point Tool, click and hold on the Pen Tool icon in the Toolbar. This will reveal a submenu with various Pen Tool options, including the Add Anchor Point Tool.
- Select the Add Anchor Point Tool: From the submenu, select the Add Anchor Point Tool.
- Add Anchor Points: With the Add Anchor Point Tool selected, hover over the path where you want to add a new anchor point. When you’re in the desired location, click to create a new anchor point on the path.
- Modify the New Anchor Point: Once you’ve placed the new anchor point, you can use the Direct Selection Tool (the white arrow) to adjust the point’s location or manipulate its handles. This flexibility allows you to fine-tune the path to your specifications.
By using the Add Anchor Point Tool in combination with the Direct Selection Tool, you can precisely control the structure of your paths and make intricate adjustments as needed. This is particularly useful when you want to add detail or refine the path’s shape to match your creative requirements.
How to remove points from a path
The Delete Anchor Point Tool in Photoshop is used to remove existing anchor points from a path, allowing you to reshape the path as needed. Here’s how to use it:
- Access the Delete Anchor Point Tool: To use the Delete Anchor Point Tool, click and hold on the Pen Tool icon in the Toolbar. This will reveal a submenu with various Pen Tool options, including the Delete Anchor Point Tool.
- Select the Delete Anchor Point Tool: From the submenu, choose the Delete Anchor Point Tool.
- Delete an Anchor Point: With the Delete Anchor Point Tool selected, hover your cursor over the anchor point you want to remove. When the tool becomes visible over the point, click to delete it.
- Result: The selected anchor point will disappear, and the adjacent path segments will merge into a single segment. However, it’s important to note that if the handles on the surrounding points are exceptionally long, this action can sometimes lead to unexpected results.
The Delete Anchor Point Tool is useful for simplifying paths, adjusting the path’s structure, or eliminating unnecessary points to achieve smoother curves and more precise shapes. It provides greater flexibility when working with complex paths in Photoshop.
How to use the Convert Point tool
The Convert Point Tool in Photoshop, accessible by clicking and holding on the Pen Tool, provides a unique way to manipulate anchor points and their handles. Here’s how it works:
- Access the Convert Point Tool: To use the Convert Point Tool, click and hold on the Pen Tool icon in the Toolbar. This will reveal a submenu with various Pen Tool options, including the Convert Point Tool.
- Select the Convert Point Tool: From the submenu, choose the Convert Point Tool.
- Manipulate Handles: With the Convert Point Tool selected, you can click on an existing anchor point to manipulate its handles in the same way you would with the Direct Selection Tool. This allows you to adjust the curvature of the path.
- Convert Between Straight and Curved Lines: One unique feature of the Convert Point Tool is its ability to convert straight path segments into curved ones and vice versa. If you click on an anchor point that has handles, the handles will disappear, and the anchor point will become a corner point. This action converts adjacent straight path segments into curves.
- Interaction with Surrounding Points: It’s important to note that if the surrounding anchor points have handles, those handles will continue to affect the curvature of adjacent path segments. This means that the Convert Point Tool allows you to create corner points within a path while preserving the curvature of neighboring segments.
The Convert Point Tool is a versatile tool for adjusting path curvature and converting between straight and curved path segments. It provides precise control over anchor points and path structure, making it a valuable asset for shaping complex paths in Photoshop.
How to use a path to remove an object from its background
Once you’ve created a path in Photoshop, you can utilize it repeatedly for various purposes, such as creating selections. These selections can then be employed to remove an object from its background or perform other editing tasks.
How to create a selection from a path
In Photoshop, you can easily turn a path into a selection to perform various editing tasks. Here’s how to do it:
Method 1: Using the Paths Panel
- Access Your Path: Open the Paths Panel and select the path you want to convert into a selection.
- Create a Selection: Look for the icon at the bottom of the Paths Panel. It resembles a circle with a dashed outline. Click on this icon. Your image will now display a selection in the shape of your path.
Method 2: Using the Pen Tool
- Select Your Path: First, select the path you want to work within the Path’s Panel.
- Choose the Pen Tool: Then, select the Pen Tool from the Toolbar.
- Access Selection Options: In the options bar at the top of the screen, locate the “Make:” dropdown menu. Click on it to reveal options.
- Create the Selection: Choose “Selection” from the dropdown menu. A dialog box will appear, allowing you to fine-tune your selection. If your goal is to isolate an object from its background, keep the Feather Radius at 0 and ensure that “Anti-Aliased” is checked. If this is your first selection, the radio button next to “New Selection” will be selected by default.
Once you’ve created your selection, you can use it for various purposes. For instance, you can modify the object’s color, apply filters, or remove the object from its background. These selection techniques provide precise control over your editing process in Photoshop.
FAQs about the Pen Tool
What does the Pen Tool do in Photoshop?
The Pen Tool in Photoshop serves various essential functions, and it comes in several types to cater to different needs:
- Creating Paths: The Pen Tool is primarily used to create paths in Photoshop. These paths consist of anchor points connected by lines or curves and are precise and versatile.
- Converting to Selections: Paths created with the Pen Tool can be converted into selections. This allows you to isolate specific areas of an image for further editing or manipulation.
- Layer Masks: Paths can also be converted into layer masks, enabling you to control the visibility and transparency of specific areas of a layer.
- Creating Custom Shapes: The Pen Tool is used to create custom shapes within Photoshop. This is valuable for design work, creating logos, or adding unique elements to your compositions.
There are several types of Pen Tools available in Photoshop:
- Standard Pen Tool: Allows you to create straight and curved paths with precision.
- Curvature Pen Tool: Simplifies the process of creating curved paths, making it easier for beginners.
- Freeform Pen Tool: Provides more flexibility for creating paths by drawing freehand.
- Magnetic Pen Tool: Helps in creating paths by automatically snapping to edges and lines in your image.
Additionally, there are three other tools that complement the Pen Tool:
- Add Anchor Point Tool: Adds extra anchor points along an existing path.
- Delete Anchor Point Tool: Removes existing anchor points from a path.
- Convert Point Tool: Adjusts anchor points and path segments, converting them between straight lines and curves.
The Pen Tool and its variations are widely used in Photoshop for tasks like isolating objects from backgrounds, selecting portions of images for color changes, creating intricate paths, and designing custom shapes. These tools provide precise control over path creation and modification, making them essential for various graphic design and image editing tasks.
Suggested articles >>
https://www.clippingpathsource.com/blogs/tips/pre-media-clipping-path-service/
Ecommerce Outsourcing: Get Back to What’s Important in Your Business
Using Layers In Photoshop – A Comprehensive Beginners’ Tutorial

 In Photoshop")

Thank you for the nice post. Really helpful!