Email*: [email protected]

Clipping Path Source

  • Services
    • Clipping Path Service
    • Background removal
    • Photoshop Masking Services
    • Photo Retouching Service
    • Drop Shadow Service
    • Ghost Mannequin Service
    • Raster to Vector Conversion
    • Color changes
    • eCommerce Product Images Editing
    • Photo Enhancement Service
  • Pricing
  • Question?
    • FAQFind your answers
    • AboutLearn about us
  • Help
  • Blog
  • Uploads
    • Make an orderup to 2GB
    • Sendgb Uploadsup to 5GB
    • Ftp AccessUnlimited size
FREE TRIAL

Using Layers In Photoshop – A Comprehensive Beginners’ Tutorial

Using Layers In Photoshop – A Comprehensive Beginners’ Tutorial

by Sayadul Arafin Tamjid / Monday, 13 July 2015 / Published in Tutorial
Spread the love
Every image in Photoshop is edited using layers are used and finally stake together to get the best effect as desired and will show the appearance of the effect. Every Photoshop user should have complete knowledge of the use of layers in Photoshop software.

Here is the complete brief for the Photoshop beginners about “how to use layers in Photoshop”

The layer panel

The layers panel in Photoshop gives you complete access to the individual layers to create, design, and re-design the layers you are using to edit an image. The layers panel also enables you to have all the features to manipulate and design the layers simply.

Creating a new layer

It is necessary need to create or add a new layer to edit the image or achieve a certain effect or appearance on that image. The following may require creating or adding a layer in Photoshop layer panel:

There is about two ways to get it done –

Find the upper right corner of the layer panel and click on the resulting menu shown as “new layer”.

creating-a-new-layer-in-photoshop

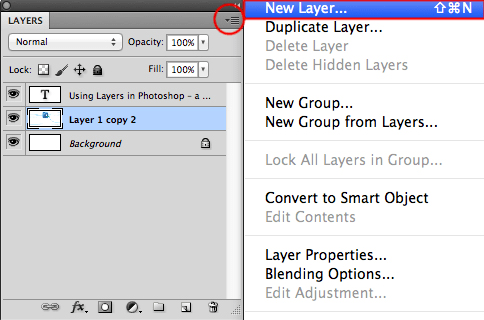
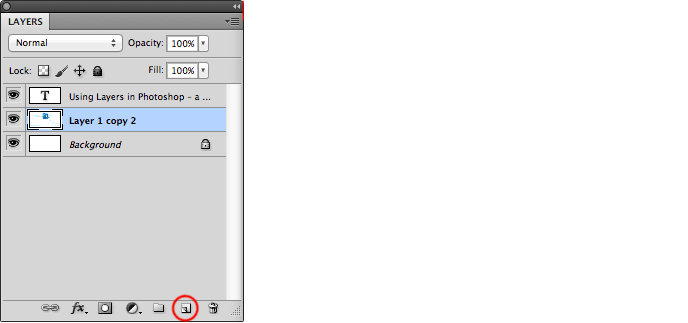
Or you can simply find the “new layer” option located at the bottom of the Layers panel.

creating-new-layer-in-photoshop-software

Duplicating a layer

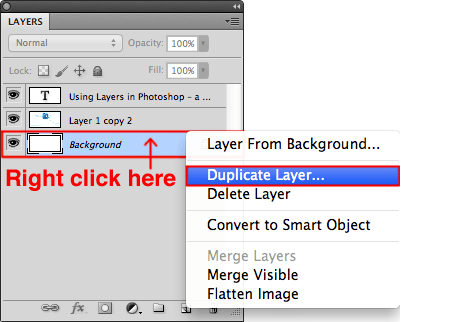
You can also create a duplicate layer to get another layer to have an existing effect. Then click on the right of the mouse and there you will find an option called “duplicate layer” from the resulting menu. Here you will find an option to add the layer on the same image or another image,  to add the layer to the same image you may simply give it a name and select “Okay”

duplicate-the-layer

If you need to add the layer in a different image, type the title of that document titled as “destination” and renames the title and then clicks “Okay”

Alternating the layers’ positions on the image

At the time of working on any image, you will find all the layers in the layers panel arranged to their default position. If you want to change the layer position you can just click on the layer which you won’t change the position then drag it to the other one to replace the position.

Hiding or deleting a layer

Sometimes you may need to hide the layer and you may want to observe the image without the layer or you can delete the layers if it is unwanted. To make a layer invisible, you will find before every layer an icon like an Eye. Just click on the icon and see the result as it is invisible and again if you click on the icon the layer will be visible as before. To delete a layer you just drag the layer along you want to delete and put it on the delete icon shown below of the layer panel.

Changing the name of the layer

You can also change the name of your layer. Sometimes you may need to change the layer’s name to make it specified or make it easy to find which work you did in which layer.

Changing a layer’s mode

If you want you can change the layer mode to change or manipulate the appearance. To change the mode you please go to the labeled opacity on the layer menu and then click on the labeled named as “normal” on the left side of the opacity tab. There will open a drop-down menu with lots of menu modes to choose from, then just one of the menu you desired and enjoy the effect.

Changing a layer’s color

Sometimes you may need to change the layer color/background color go get to see the proper result after edited any image to judge the desired quality.

To change the layer color- at first, you have to go to the specific layer and click on the left button of your mouse there you will find several options and among them, there is an option and there you will find the several color sorted by name or by color highlighted- simply click on the preferred color to change the layer’s color.

Adjusting a layer’s transparency

A layer on an image does not have to be opaque – it can be partially transparent to make the layer beneath it visible, even if only partially. To increase a layer’s transparency or opacity, simply adjust the opacity percentage from the layer’s panel – it is located just above the layers.

Save

Get regular updates →

Join our newsletter to receive updates, news from our blog. Learn about our services, interesting tutorials and get exciting discounts ahead of time.


You have subscribed successfully!

Some error occured

Please fill all the required * fields.

  • Tweet
Tagged under: how to use layer in photoshop software, how to use layers in photoshop, using layers in photoshop, Using Layers in Photoshop – a Comprehensive Beginners’ Tutorial

About Sayadul Arafin Tamjid

As CEO and head of digital marketing at Clipping Path Source, Sayadul Arafin Tamjid wants to help Photographers and Retailers to use marketing strategies and tactics that will elevate their business. He has a 10-years background in Digital Marketing, Web Development, Video Editing, Graphic design, and Content Management.

What you can read next

Reduce File Sizes without compromising the quality
How To Reduce Image File Size Without Sacrificing Quality
Photo to Pencil Sketch
Remove white background from Hair | Clipping Path Source
How To Remove Background From Hair In Photoshop CC18

Recent Posts

  • Clipping Path Service Provider Company

    0 comments
  • How to Find a Photoshop Clipping Path Service Company

    0 comments
  • The photo retouching services offered by Clipping Path Source are performed by a team of skilled graphic designers who use advanced software and techniques to achieve the desired results. They understand the importance of preserving the natural look of an image while still making necessary improvements to enhance its overall appearance.

    Touch Up Services for Photographers

    0 comments
  • Photoshop Hair Masking service. Remove the background or any object from the hairy object. Our basic price starts at $0.39 per image. Please visit our website to get more about us.

    Remove background hair photoshop

    0 comments
  • How to Find Photoshop Services Near Me

    0 comments

Categories

  • Article
  • Clipping path
  • Clipping Path Source
  • Erase tool
  • Graphic designer
  • image editing service
  • Importance of graphic design
  • Photo retouching
  • Product Photography
  • Raster to vector conversion
  • Tutorial
  • website image optimization

Services

  • Clipping Path
  • Image shading
  • Photoshop masking
  • Photo retouching
  • Raster to vector
  • Mannequin removing
  • Photo enhancement
  • Image stitching
  • eCommerce product images editing

Important links

  • Gallery
  • About us
  • Blog
  • Privacy policy
  • Refund policy
  • Terms of Use

Important links

  • Contact us
  • FAQ
  • Terms of use
  • Partnership
  • Sitemap
  • Testimonials

Recent posts

  • Clipping Path Service Provider Company

    Spread the loveA Clipping Path Service Provider...
  • How to Find a Photoshop Clipping Path Service Company

    Spread the loveIf you are looking to have a pic...

Headquarter


Mirpur –Dhaka-1216, Bangladesh.
Phone: +880-1714266446
Mail: [email protected]
Web: www.clippingpathsource.com

DMCA.com Protection Status

paymentgateway

  • GET SOCIAL

© 2023. All rights reserved Clipping Path Source.

TOP
GET YOUR QUOTE