
Clipping Path Source

  • Home
  • Services
    • Clipping Path Service
    • Image Background Removal
    • Image Masking Service
    • Photo Retouching Service
    • Drop Shadow Service
    • Ghost Mannequin Service
    • Raster to Vector
    • Photo Enhancement
    • eCommerce Photo Editing
    • Color changes
    • Multi Clipping Path Services
    • Car photo editing service
    • Image editing services
  • Pricing
  • Blog
  • Contact
    • About Us
  • Quotation
Order your edits

Using The Eraser Tool In Photoshop Software

Using The Eraser Tool In Photoshop Software

by Sayadul Arafin Tamjid / Saturday, 18 July 2015 / Published in Erase tool

>> What you’ll learn in this article

Toggle
  • Eraser tool:
  • Types of eraser tools:
  • Why we need this tool:
  • How it works:

Photoshop software is widely used in the Design Art sector/ Digital art/ Photography work/ Digital studios etc. It has many tools for doing the work in these sectors. The eraser tool is one of them. This tool is so much important and helpful for an image editor or designer.

Eraser tool:
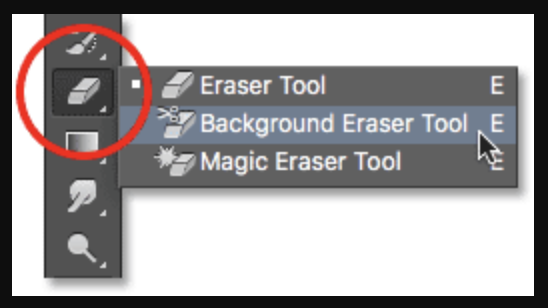
The Photoshop eraser tool is found in the toolbar of the Photoshop tool plate. It is shown on the second assembly of the tool plate in Photoshop. The eraser normally looks like a brush tool which is wipe out pixels from the background of the image.

Types of eraser tools:

The Eraser tool has three types

  • Eraser tool: This tool removes pixels or transparency of the color from the image background.
  • Background eraser tool: This tool helps you to remove the Background color from an image or layer.
  • Magic eraser tool: This is an extraordinary helping tool that usually works by clicking by mouse but does no need to drug on an image.

These three types of Eraser tools specifically work in three modes as Brush (normal edges), Pencil (strong edges), and Block (equal brush size).

Why we need this tool:

The Eraser tool basically needs for changing the Background from the layer, deleting the unexpected color or parts on the image, for hair masking, felling the color back part on the image, and many other works.

How it works:

We can use it by following this instruction-

  • First, we need to click on the eraser tool from the Photoshop tool plate.
  • Then we need to point out that the color which we want applies to our background or select a Layer in locked transparency.
  • Next from the option bar we need to select the mode setting like Brush and Pencil.
  • We need to be careful in the system of opacity and flow.
  • To erase the background then we need to click the left column of the snapshot from the History panel and drag the mouse through the area which we want to remove.
Tagged under: erase tool in photoshop, eraser tool in photoshop software

About Sayadul Arafin Tamjid

Hi, I’m Tamjid, CEO of Clipping Path Source, and a seasoned expert in image editing and SEO. With a commitment to excellence and a creative approach, I consistently deliver high-quality results across every project. My passion for graphic design drives me to share industry insights and uphold exceptional service standards, empowering clients to achieve their goals with confidence.

1 Comment to “ Using The Eraser Tool In Photoshop Software”

  1. Delmar says :
    2016-07-10 at 21:34

    Lovely just what I was searching for. Thanks to the author for
    taking his time on this one.

Get our weekly insights and tips

Subscribed for the newsletter

Recent Posts

  • How to Choose a Clipping Path Service Provider: A Complete Professional Guide

    How to Choose a Clipping Path Service Provider: Complete Guide

    0 comments
  • How to Add a Shadow in Photoshop for Product Photos

    How to Add a Shadow in Photoshop for Product Photos

    0 comments
  • What Is Photo Editing? A Complete Professional Guide to Modern Photo Editing

    What Is Photo Editing? A Complete Professional Guide to Modern Photo Editing

    0 comments
  • Why Top Brands Still Rely on Manual Clipping Path

    Why Top Brands Still Rely on Manual Clipping Path

    0 comments
  • Human-AI Collaboration in Photo Editing: Where Automation Ends and Expertise Begins

    Human-AI Collaboration in Photo Editing: Where Automation Ends and Expertise Begins

    0 comments

Categories

  • Article
  • Clipping path
  • Clipping Path Source
  • Ecommerce business
  • Erase tool
  • Graphic designer
  • Image Editing Service
  • Photo retouching
  • Photographer and Photography
  • Product Photography
  • Raster to vector conversion
  • Review
  • Sports Photography
  • Tips and tricks
  • Tutorial
  • Website image optimization

Services

  • Clipping path service provider at affordable price.
  • Image shading
  • Photoshop masking
  • Photo retouching
  • Raster to vector
  • Mannequin removing
  • Photo enhancement
  • Image stitching
  • eCommerce product images editing

Important links

About us
Gallery
Blog
Privacy policy
Term and conditions
Request an FTP Access
Glossary

Important links

Contact us
FAQ
Services
Partnership
Refund policy
Sitemap
Testimonials

Recent posts

  • How to Choose a Clipping Path Service Provider: A Complete Professional Guide

    How to Choose a Clipping Path Service Provider: Complete Guide

    How to Choose a Clipping Path Service Provider:...
  • How to Add a Shadow in Photoshop for Product Photos

    How to Add a Shadow in Photoshop for Product Photos

    Elevating how to add shadow in Photoshop for pr...

Headquarter


2360 Stony Brook Dr Louisville KY 40220.
Phone: USA: +1 (929) 226-9462
Mail: [email protected]
Web: www.clippingpathsource.com

DMCA.com Protection Status   FRANÇAIS | ITALY | N. LANDS | GERMANY

  • GET SOCIAL

© 2026. All rights reserved Clipping Path Source.

TOP
  • USD $ USA Dollar
  • EUR € Europian Euro
WhatsApp us