Elevating how to add shadow in Photoshop for product photos:
Realistic shadows can work wonders for your product photographs, elevating them to a professional and believable level. However, capturing these shadows in the right settings with perfect lighting can be a challenge.
Enter Photoshop, the tool that allows you to add natural-looking drop shadows to your product photos with patience and finesse. This photo editing process does demand some time, skill, and a good grasp of how shadows behave.
To master the art of adding shadows in Photoshop to enhance your product images, we’ve prepared a step-by-step tutorial.
How do shadows work?
Before delving into the creative process of shadow creation in Photoshop, it’s essential to grasp the fundamentals of how shadows operate. Shadows, in the realm of photography and design, come in two distinct types:
Understanding shadows is fundamental when venturing into the realm of Photoshop shadow manipulation. In this world, shadows come in two primary flavors:
- Cast Shadows: These are the shadows that extend from an object and appear on surrounding surfaces or other objects nearby. They essentially “cast” from the object onto the ground or nearby surfaces.
- Form Shadows: Unlike cast shadows, form shadows reside within the object itself. They contour the object’s three-dimensional shape, creating depth and volume.
The characteristics of both these shadows depend on several factors: the direction and distance of light sources and the number of light sources present. It’s the interplay of these elements that brings shadows to life.
For a realistic touch in your Photoshop work, understanding form shadows within your object can help you predict how a cast shadow might appear. Keep in mind that as cast shadows move further away from the object, they tend to become lighter and less distinct.
In this Photoshop tutorial, we’ll explore how to achieve this natural shadow effect using a blend of techniques, including Drop Shadow Layer Style, transform tools, gradient tools, blurs, layer masks, and alpha channels. These tools will empower you to craft shadows that breathe life and depth into your digital creations.
Distinguishing Drop Shadows from Cast Shadows: Achieving Realism in Shadow Creation
When it comes to crafting shadows, it’s crucial to understand the difference between a drop shadow and a cast shadow.
Drop Shadows: These are relatively straightforward and often what we see in basic image editing tools. They tend to be uniform in size and dimension, closely resembling the object that casts them. However, in the real world, such perfectly matched shadows are a rarity.
Cast Shadows: Here’s where things get intriguing. Cast shadows are what you encounter in the natural world. They are three-dimensional, adapting to the shape of the object casting them. These shadows shift in size and dimension based on various factors, such as the distance from the object and the angle of light.
Creating a realistic shadow involves transforming a drop shadow into a three-dimensional cast shadow. This process adds depth and authenticity to your visuals, making them appear more lifelike.
In essence, while drop shadows serve as a quick and basic solution, transitioning to the method described in this tutorial is essential to achieve shadows that look genuinely natural. So, if realism is your goal, don’t settle for mere drop shadows; dive into the world of cast shadows to breathe life into your creations.
1. Preparing to Create Shadows in Photoshop: A Step-by-Step Guide
To embark on the journey of crafting shadows in Photoshop, follow these steps:

- Open Your Image: Start by opening the image you intend to modify in Photoshop.
- Access the Layers Panel: Navigate to the Layers panel by going to “Window” in the top menu and selecting “Layers.”
- Select Your Object: Use the appropriate selection tool to choose the object within your image that you want to work on.
- Copy and Paste: Copy your selected object and paste it into a new layer. This action preserves the original photo and allows you to manipulate the product image independently.
- Name Your New Layer: Give your new layer a name that clearly indicates the background has been removed or isolated. This helps prevent confusion as you work on creating shadows.
- Hide the Background: Click on the eye icon next to your Background layer in the Layers panel to make the background invisible. This action will leave you with only your object against a transparent background, making it easier to focus on creating shadows without distractions.
![]()
Following these steps sets the stage for precise and controlled shadow creation in Photoshop, ensuring that your modifications are seamlessly integrated into your image.
2. Creating a White Background in Photoshop: A Step-by-Step Guide
To add a white background to your image in Photoshop, follow these steps:
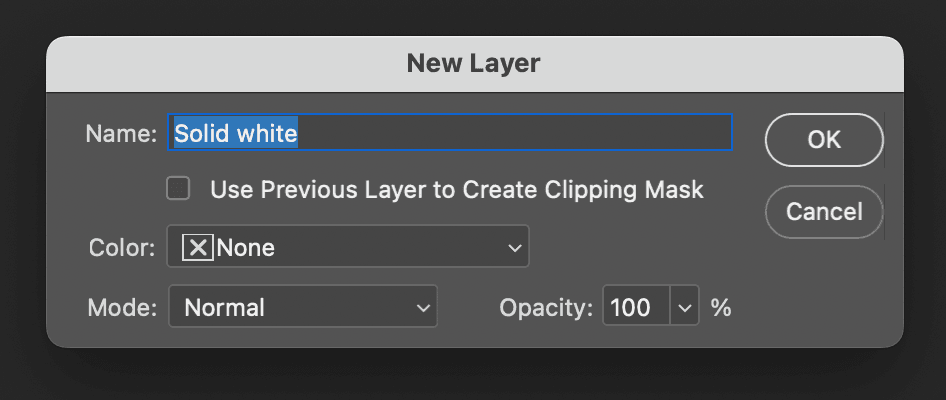
- Layers Panel: In your Photoshop workspace, navigate to the Layers panel. Ensure that your hidden background layer is selected.
- Create a New Fill Layer: Go to the top menu, select “Layer,” then choose “New Fill Layer,” and finally, click on “Solid Color.”
- Name the New Layer: A dialog box will appear, prompting you to name the new layer. Let’s call it “solid white” for clarity. Click “OK.”
- Choose White Color: The Color Picker window will now appear on your screen. To select pure white, move your cursor to the upper-left corner of the color field or enter “ffffff” (without quotes) in the hexadecimal color value at the bottom of the dialog box.
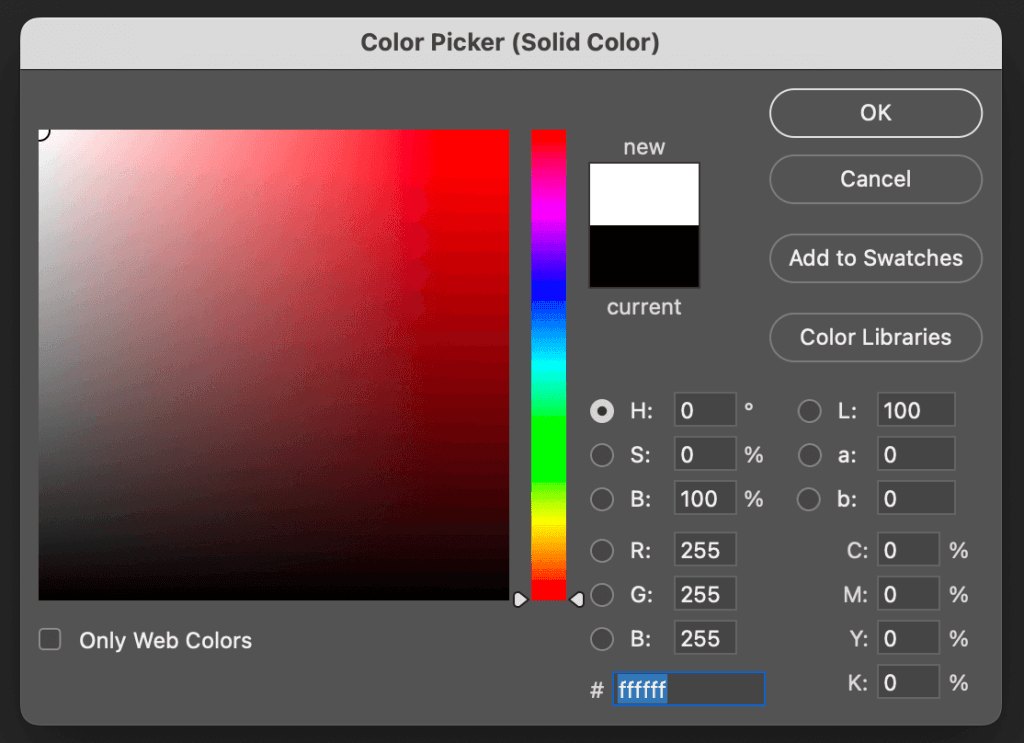
5. Finalize the White Layer: Click “OK” to confirm your white color selection. This action will create a new layer filled with solid white, effectively covering your entire image.
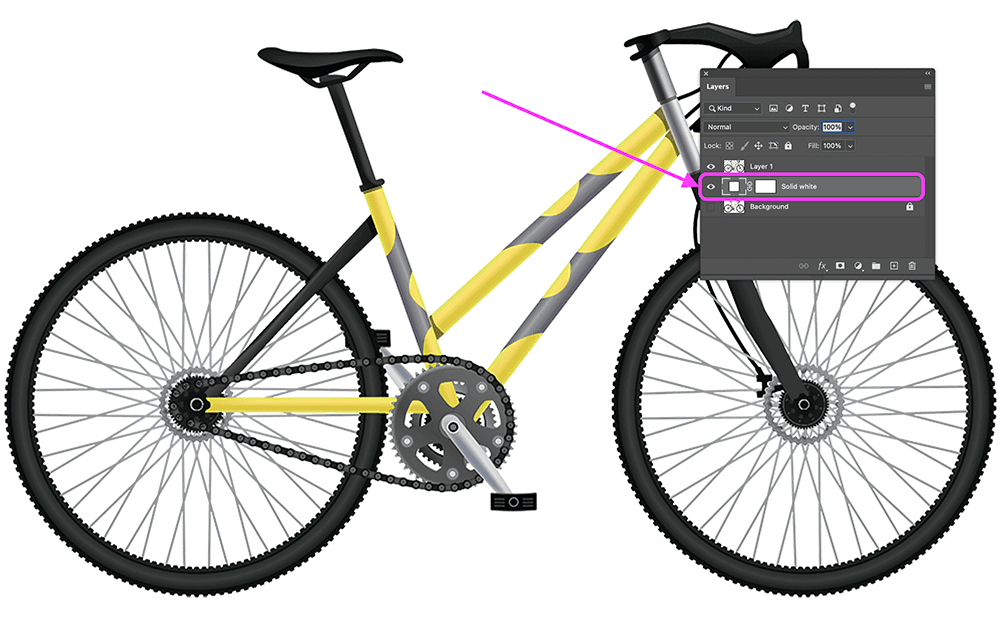
6. Arrange the Layers: In your Layers panel, click and drag the new white Fill layer so that it’s positioned underneath your “isolated” layer. This arrangement ensures that your isolated object appears in front of the white background.
By following these steps, you’ve successfully added a white background to your image in Photoshop, setting the stage for further enhancements and adjustments as needed.
3. Determine your cast shadow color
Shadows possess their own unique hues, and an effective way to discern the appropriate color for your cast shadow is by examining the form shadows present on your object. To achieve this, utilize the Eyedropper Tool to precisely select the form shadow you wish to replicate. Once selected, the chosen color will appear as your foreground color, conveniently located at the bottom of your Toolbar.
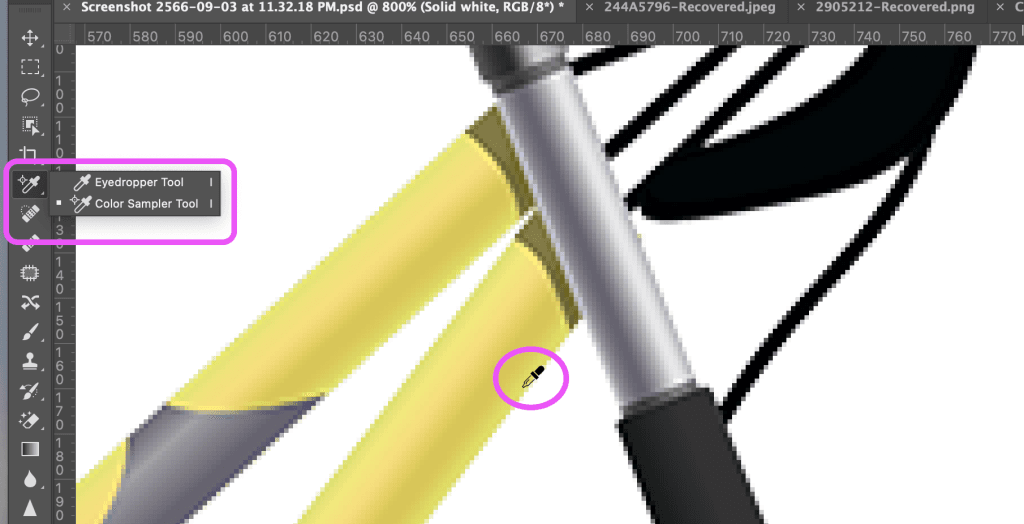
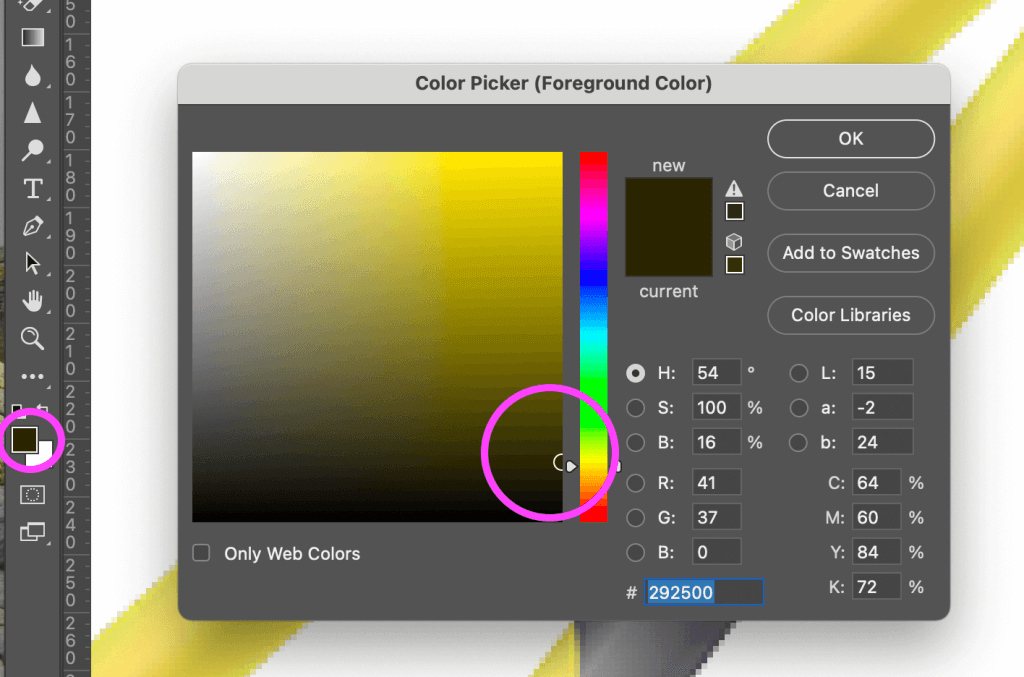
To fine-tune this selected color, initiate a double-click on the foreground color, prompting the Color Picker adjustment dialog box to appear. Here, you have the opportunity to refine the chosen shade by making it slightly darker and less saturated. Accomplish this by shifting your selection downwards and towards the left within the color field. Once satisfied with the adjustment, simply click OK to confirm your choice. This method ensures a more accurate and visually appealing representation of the cast shadow’s color.
4. Create a drop shadow
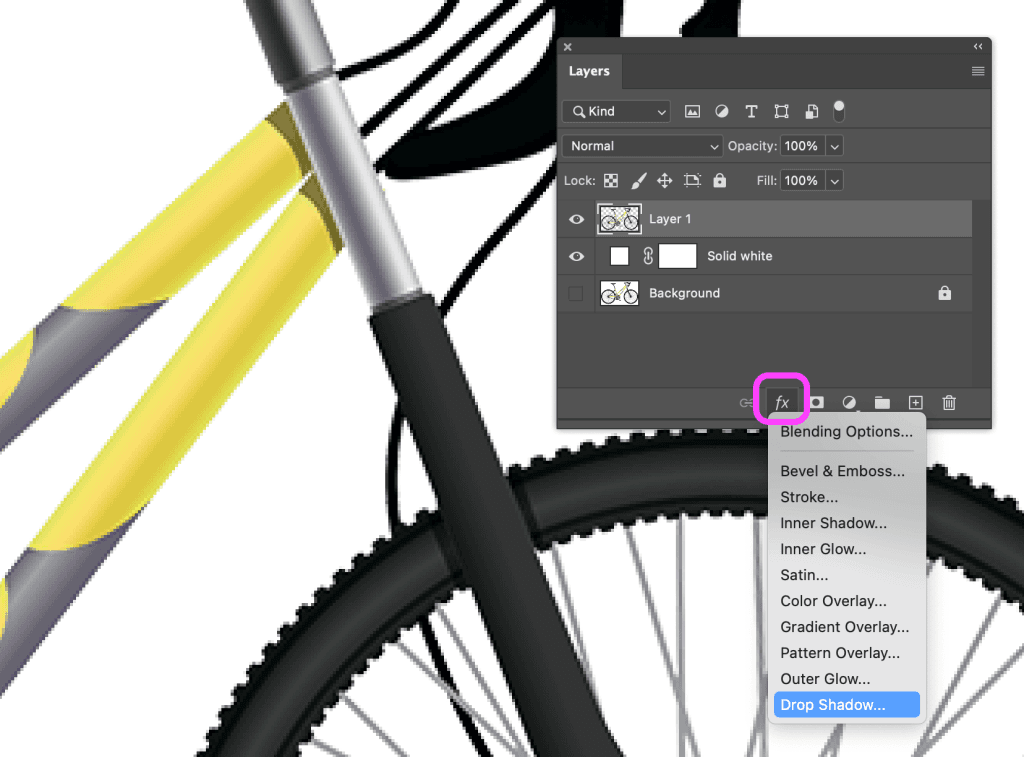
To enhance your isolated object layer, start by selecting it. Then, navigate to the layers panel and locate the “fx” button at the bottom. Click on it and opt for “Drop Shadow” from the menu that appears. This action will trigger the Drop Shadow dialog box to appear.
Now, let’s create a drop shadow effect. Begin by setting the shadow color to match your chosen foreground color. At this stage, you need not concern yourself with opacity, distance, spread, or size levels; these can be fine-tuned later to achieve the desired result. However, you can use the recommended values provided in the screenshot below as a helpful starting point.
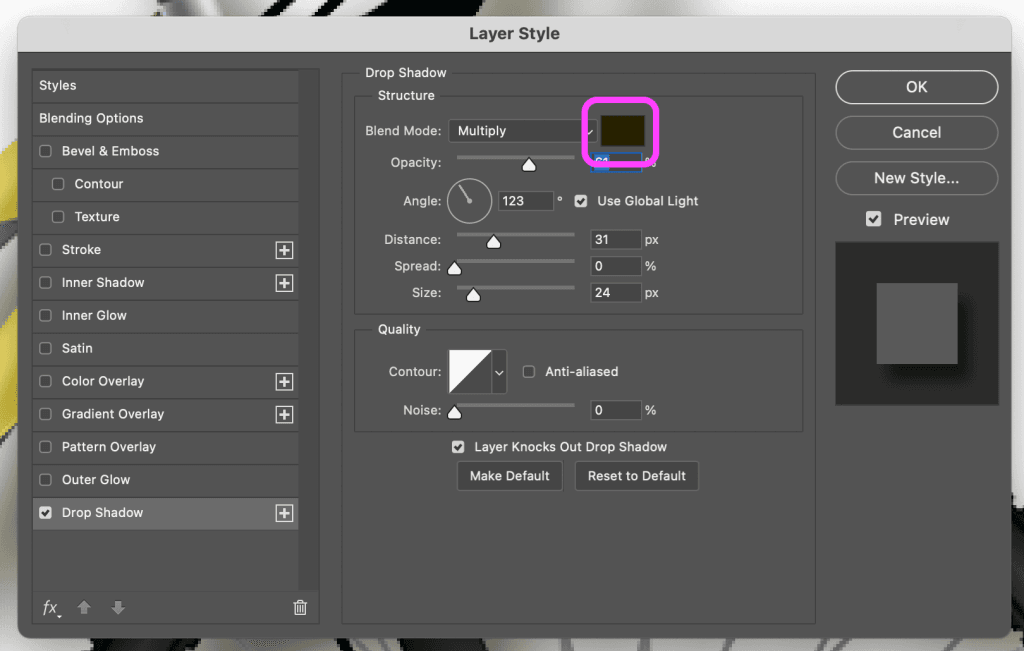
Once you have adjusted the Drop Shadow settings to your satisfaction, click the “OK” button to apply the effect. This step-by-step approach ensures you can easily enhance your object layer with a well-crafted drop shadow, giving your design that extra touch of professionalism.
5. Create a layer from your drop shadow
To gain greater control over your drop shadow, follow these steps:
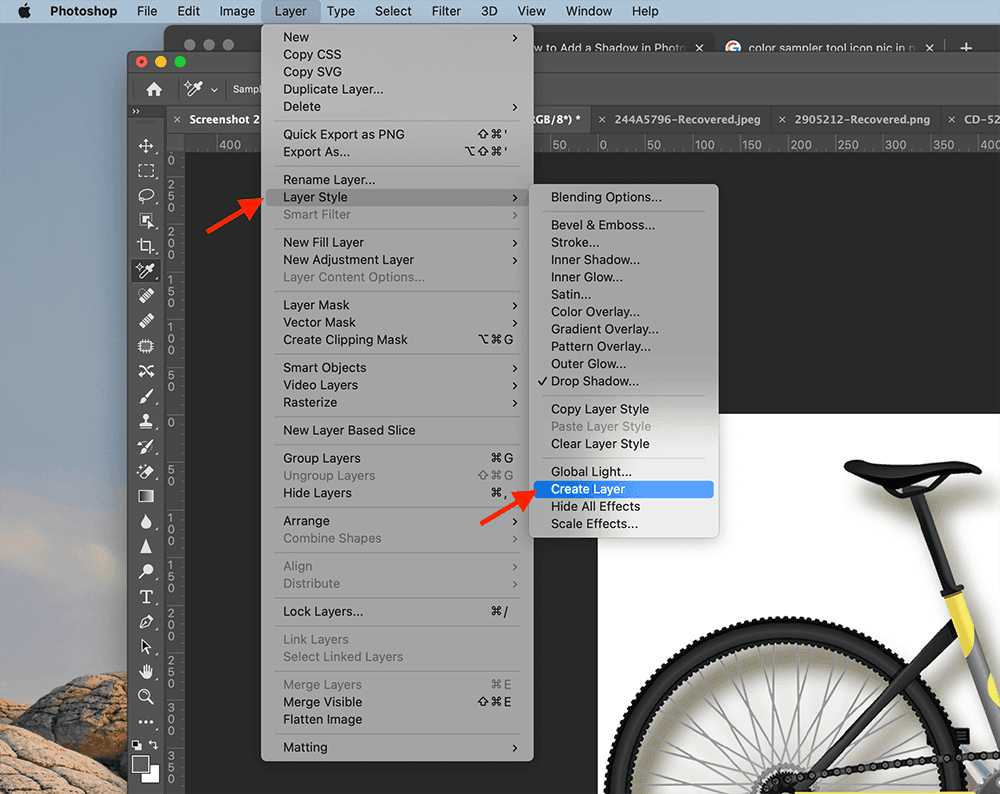
- Navigate to the “Layer” menu.
- Select “Layer Style” and then choose “Create Layer.” This action will separate the drop shadow from its original layer, enabling you to modify the shadow independently of the object.
- If a warning dialog box appears during this process, simply click “OK” to proceed.
By creating a separate layer for your drop shadow, you can fine-tune and customize the shadow’s appearance to your liking without affecting the underlying object. This allows for more precise adjustments and enhances the flexibility of your design work.
6. Distort the drop shadow
To manipulate the newly created drop shadow layer, follow these steps:
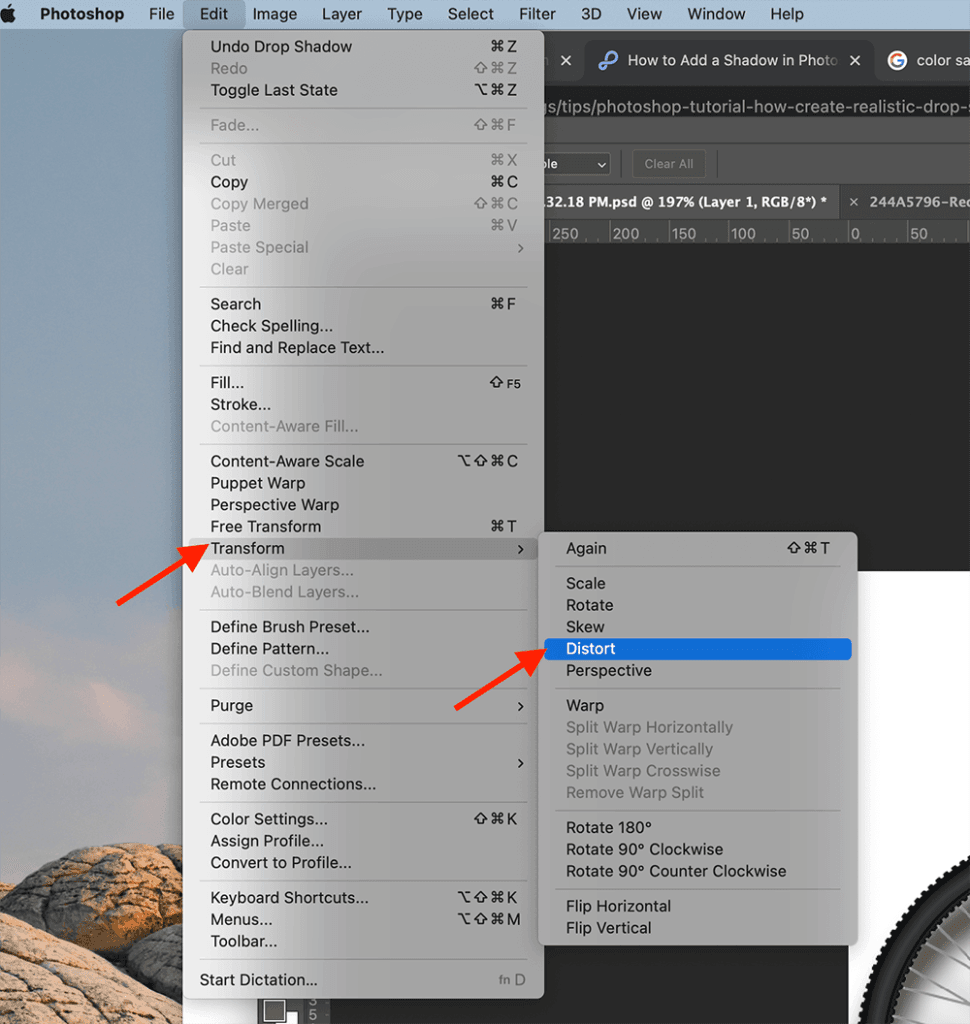
- In your Layers panel, locate and select the newly generated drop shadow layer.
- Navigate to the “Edit” menu and choose “Transform,” then select “Distort.”
- Now, you can adjust the drop shadow by pulling it down to simulate its contact with the floor. This step requires a bit of artistic insight. Consider the form of shadows on your object to determine the most natural direction for the cast shadow. Additionally, take into account the vanishing point in your image to gauge the appropriate degree of distortion needed.
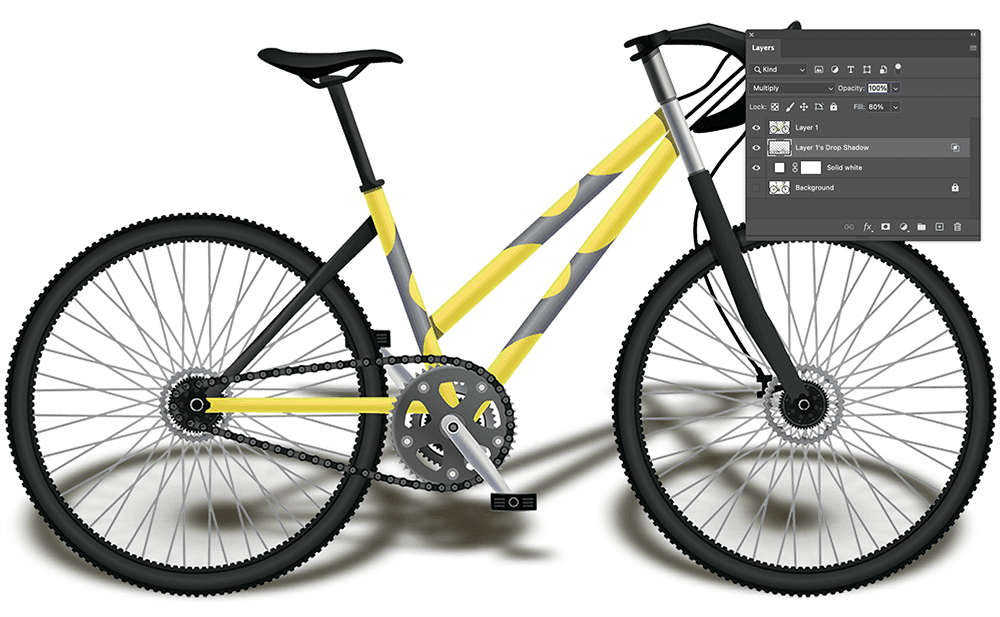
By applying this technique, you can effectively position and shape the drop shadow to create a more realistic and visually appealing effect, ensuring it complements your object’s form and the overall composition of your design.
7. Create an alpha channel
To achieve a more realistic shadow effect, it’s important to mimic how shadows naturally become blurrier and lighter as they move further from the object. One effective way to control this is by using an alpha channel. Follow these steps:
- Open your Channels Panel by going to the “Window” menu.
- Within the Channels Panel, click on the Panel menu and select “New Channel.” This action will prompt a New Channel dialog box to appear.
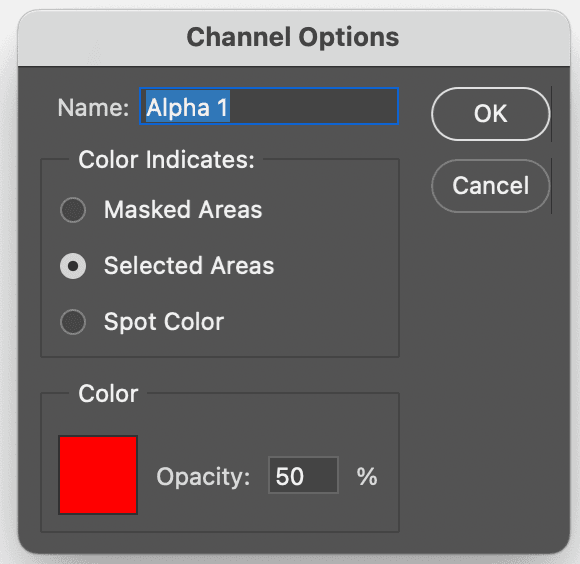
- You can retain the default name, which is “Alpha 1.”
- Ensure that the “Selected Areas” radio button is chosen under the “Color Indicates” option.
Creating an alpha channel allows you to manage the specific areas of the shadow that need to undergo blurring and lightening, contributing to a more authentic and visually appealing shadow effect in your design.
8. Create a gradient within your alpha channel
To create an alpha channel and control the shadow’s blur and lightness, follow these steps:
- In the Channels Panel, select your newly created “Alpha 1” channel as you would select a layer. Ensure that the visibility (indicated by the eye icon to the left of the channel name) is turned on for all channels.
- From the Toolbar, select the Gradient Tool. Confirm that the foreground color is set to black and the background color is set to white, which can be adjusted at the bottom of the Toolbar.
- In the Options Bar at the top of your application window, verify that the gradient is set to black-to-white and that the gradient type is linear.
- With the correct gradient settings, position your cursor at the furthest point of your shadow (or even slightly beyond) and draw the gradient towards the part of the shadow that is closest to the object.
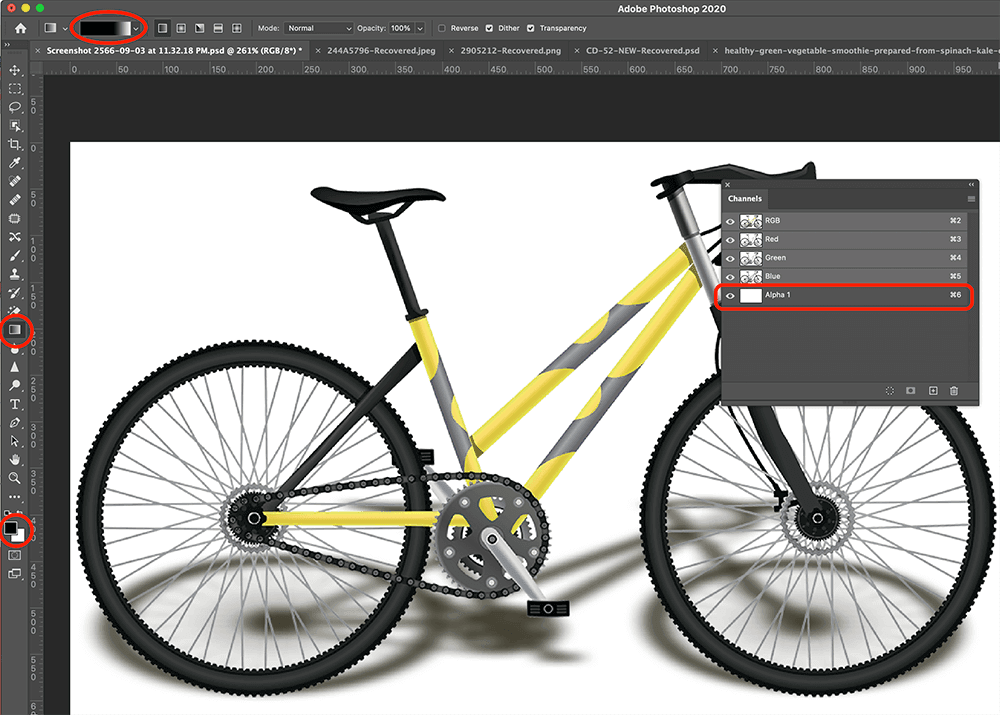
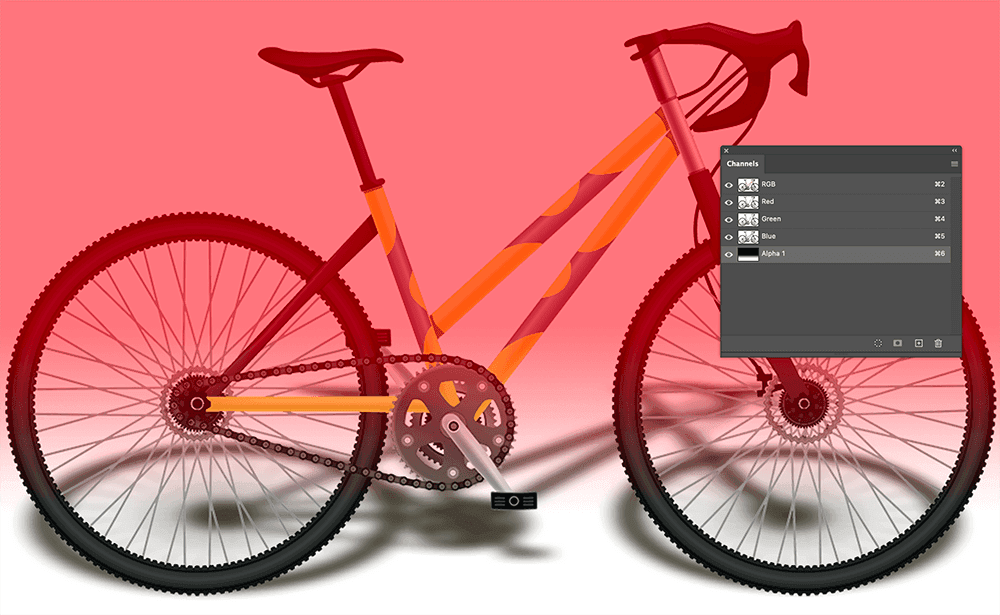
As you do this, you’ll notice the selection appearing as a red gradient overlaying your image. This technique allows you to precisely control the shadow’s blurriness and lightness, replicating the natural way shadows behave in real life, and enhancing the realism of your design.
9. Blur selection
After creating the gradient in your alpha channel, you’ll notice a red gradient overlay on top of your image, which indicates how the mask within the channel interacts with your image. To remove this distraction, you can toggle the eye icon next to “Alpha 1” to make the red gradient invisible.
Follow these steps to proceed:
- Click on the top channel in your Channels panel, which will either be RGB or CMYK, depending on your image’s color mode. This action selects your color channels and deselects the alpha channel.
- In your Layers panel, ensure that your drop shadow layer is still selected.
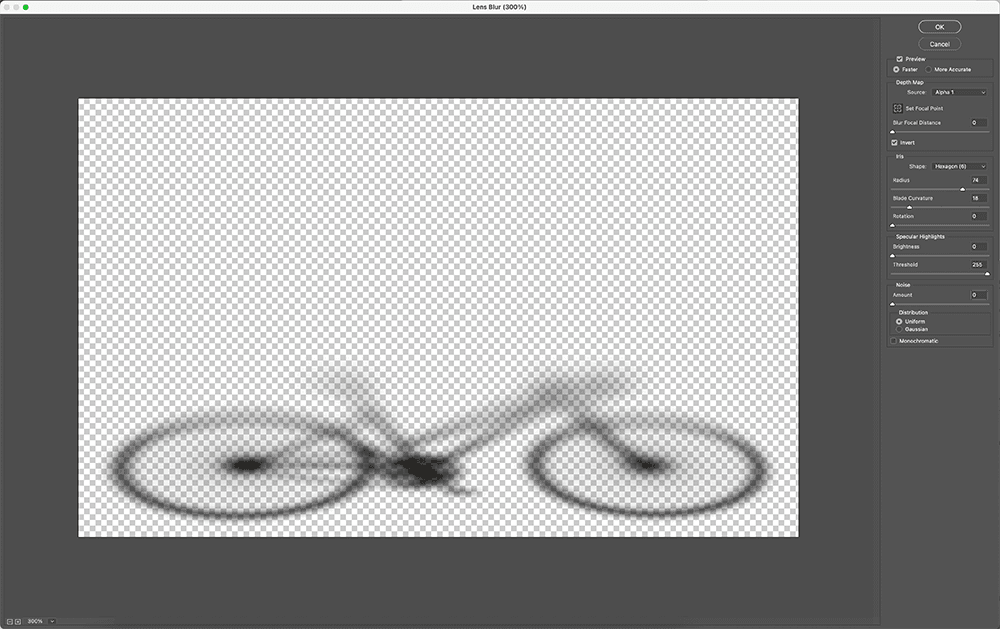
- Now, navigate to the “Filter” menu and choose “Blur,” then select “Lens Blur.” This action will open a dialog box that provides you with extensive controls over the blur effect.
- Make sure the box next to “Preview” is checked.
- Under the “Depth Map” section in the dialog box, select “Alpha 1” from the Source dropdown menu.
- Maintain the “Blur Focal Distance” at 0 and check the box next to “Invert.”
- Adjust the “Radius” by increasing it to a higher value (for instance, it’s set to 72 in this example).
- Leave all other values at their default settings.
- Once you’ve configured these options to your satisfaction, click “OK.”
These steps allow you to apply a controlled and realistic blur to your drop shadow, creating a more convincing and visually appealing effect in your design.
10. Create a layer mask
To continue refining your shadow effect, follow these steps:
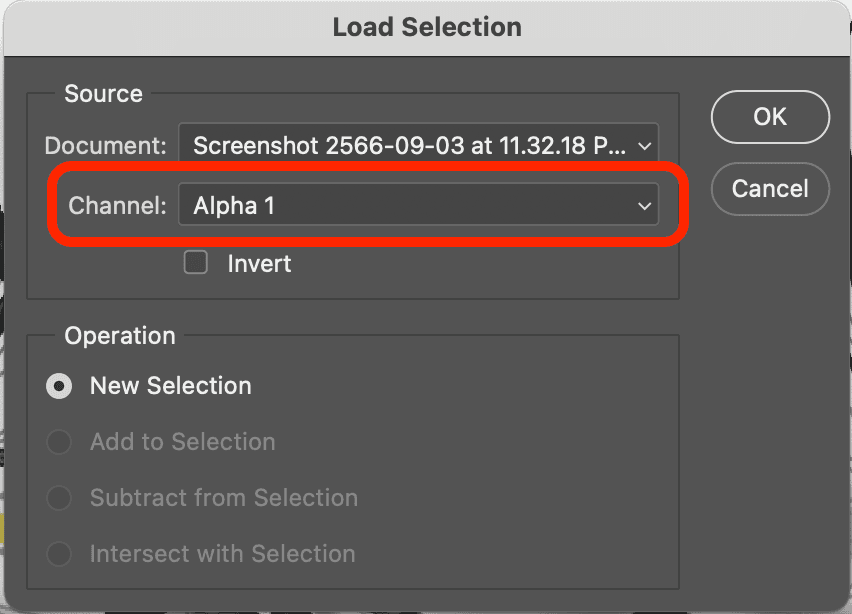
- Go to the “Select” menu and choose “Load Selection.”
- In the Load Selection dialog box, select “Alpha 1” from the Channel dropdown options.
- Ensure that the radio button next to “New Selection” is checked, then click “OK.” This will create a selection that approximates the darkest areas of the gradient you previously generated in your alpha channel.
- To select the inverse of this selection, go to the “Select” menu and choose “Select Inverse,” or use the Photoshop keyboard shortcut SHIFT + CONTROL + I (SHIFT + COMMAND + I on a Mac).
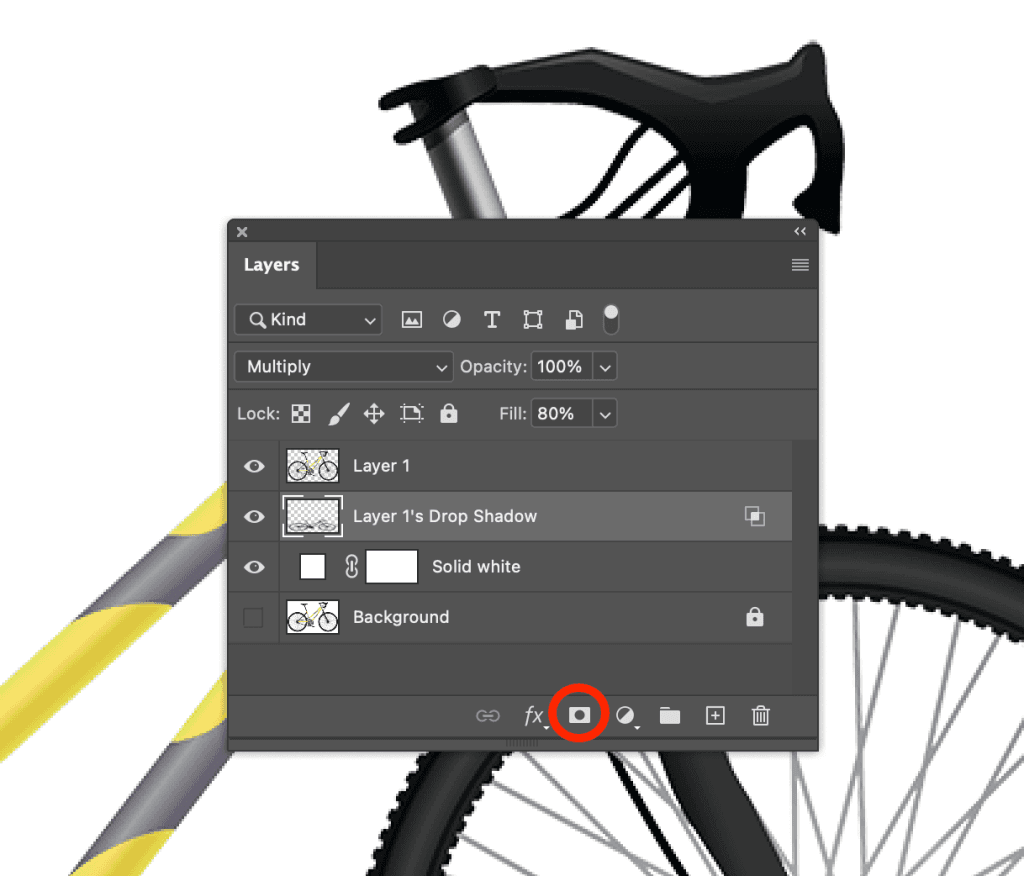
- In your Layers panel, locate and click on the Layer Mask icon at the bottom of the panel. This action applies the mask, causing the shadow to appear as if it’s fading into the background.
- Notice that the thumbnail for the layer mask should resemble the thumbnail next to “Alpha 1.”
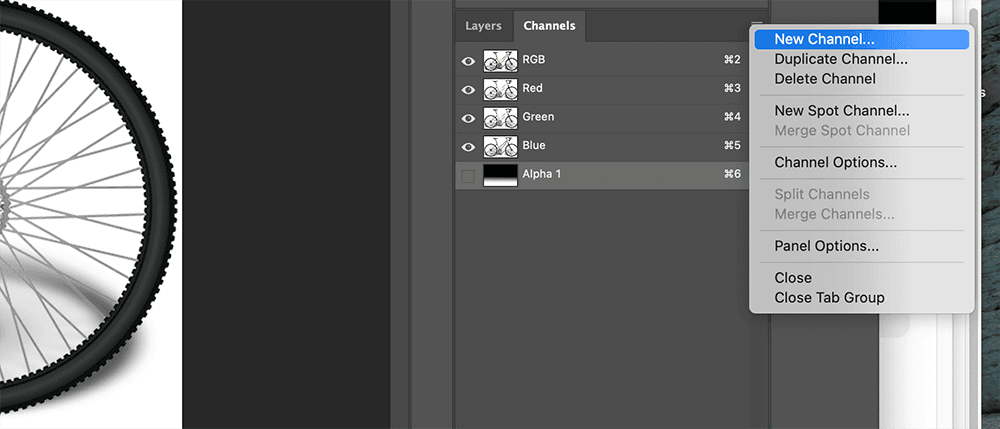
- As a result, your shadow will now appear to recede into the background as it gets further away from the object, creating a more natural and realistic effect.
- If you find the shadow effect to be too pronounced and desire a subtler appearance, you can reduce the opacity of your Drop Shadow layer in the Layers panel.
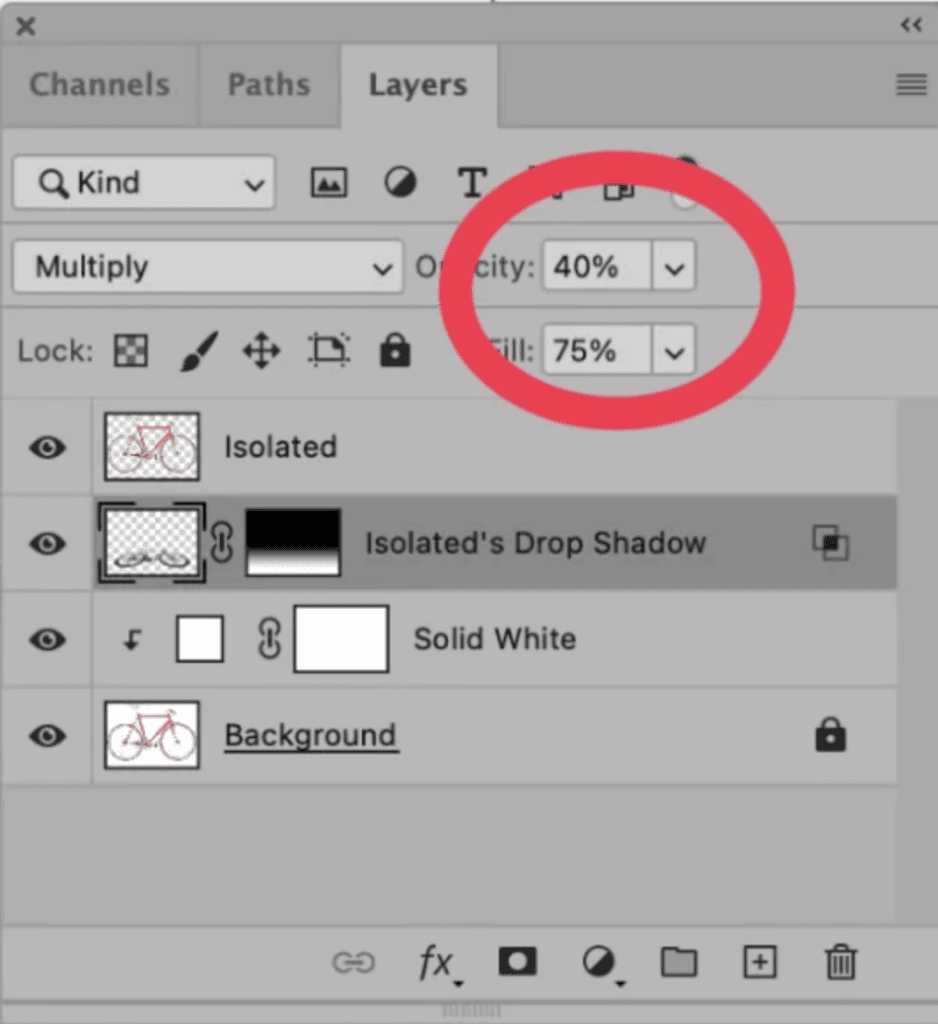
By following these steps, you can fine-tune the shadow’s appearance, enhancing its realism and ensuring it complements your design effectively.
11. Consider the light source and clean up shadows
To ensure that your shadow is accurately positioned and doesn’t appear on the wrong side of your object or product, follow these steps:

- Examine your design and identify any portions of the shadow that seem to be in front of the object. This can be done by considering the direction of your light source, which should naturally push the cast shadow behind the object.
- Select the Eraser Tool from the Toolbar in Photoshop.
- Carefully erase any shadow areas that shouldn’t be visible in front of the object. Be precise and take your time to maintain the realism of the shadow.
By using the Eraser Tool in this manner, you can ensure that the shadow adheres to the correct perspective and adds to the overall realism of your design, creating a visually appealing and convincing result.
Utilizing natural shadows in e-commerce product photography:
Utilizing natural shadows in e-commerce product photography serves various purposes and can significantly enhance the overall presentation of your products. Here are some situations when using natural shadows is particularly effective:
- White Background: When showcasing a product against a white background, incorporating a natural shadow can make the product stand out prominently while maintaining a professional and realistic appearance. It helps prevent the product from appearing flat against the background.
- Professionalism: Natural shadows impart a sense of professionalism to your product photos. They convey a level of attention to detail and care in your presentation, which can instill confidence in potential buyers.
- Furniture Photography: Furniture photography, in particular, benefits from the natural drop shadow technique. Adding these shadows can introduce dimension and depth to the images, making the furniture pieces look more substantial and appealing to potential customers.
- Avoiding Technical Lighting Challenges: Sometimes, capturing perfect shadows during a photoshoot can be technically challenging due to lighting conditions. By adding natural shadows in post-production, you can achieve the desired effect without the need for precise lighting setups during the shoot.
In essence, natural shadows are a valuable tool in e-commerce photography, enabling you to create visually engaging and realistic product images that attract and engage customers effectively. They help your products stand out, convey professionalism, and provide depth and context to your photographs, particularly in scenarios like furniture photography.


