Event photography is a dynamic field that demands precision and expertise in both equipment and settings, whether you’re shooting indoors or outdoors. Our guide is designed to offer practical, actionable tips to help photographers enhance their event photography skills significantly.
Within the realm of event photography, the right gear and settings can make a world of difference. By diving into our comprehensive guide, you’ll gain valuable insights tailored to elevate your photography game. We provide specialized advice aimed at transforming your current approach—whether it’s indoor or outdoor event photography—into a supreme and standout portfolio.
Our goal is to equip you with the knowledge and techniques necessary to move beyond standard or mediocre event photography. This guide encompasses proven strategies to refine your craft, ensuring that your work captures the essence of each event with finesse and professionalism, regardless of the setting.
Mastering Event Photography: Essential Gear Selection and Considerations
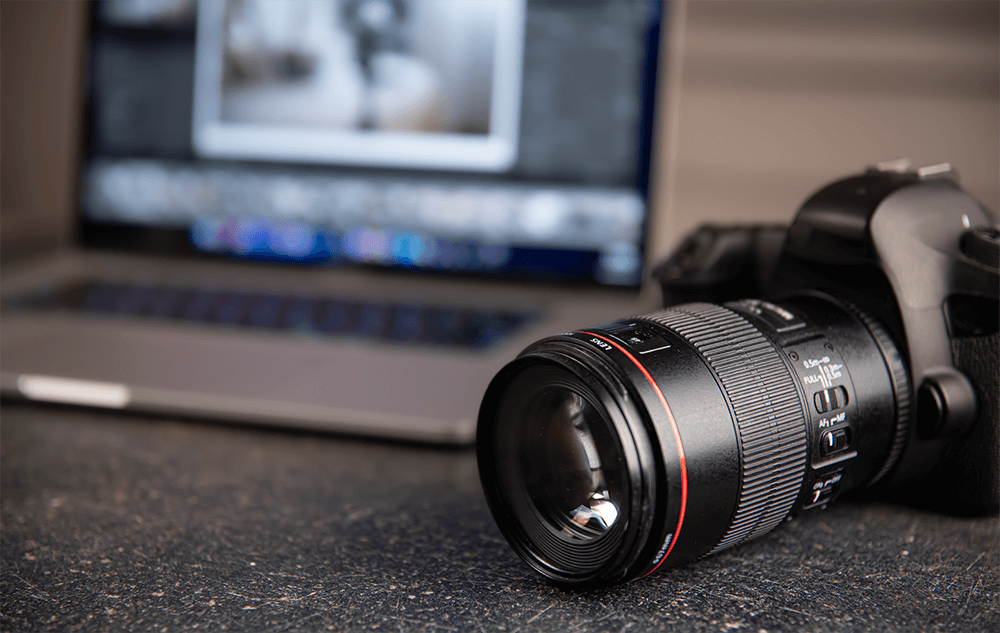
Preparation is key to delivering the image quality your clients expect in event photography. Essential gadgets like the right camera, suitable lenses, a reliable flash kit, and other necessary tools significantly impact your output and overall success in capturing memorable moments.
Camera:
Selecting the right camera for event photography is foundational. Your camera choice dictates how effectively you can capture the essence of events, especially considering the varied lighting conditions you’ll encounter. Low-light performance is crucial since many events occur indoors or during evening hours. Cameras with exceptional ISO capabilities ensure that you can shoot clear, noise-free images in challenging lighting situations. The image sensor is equally vital; opting for a full-frame sensor provides better performance in low-light settings and allows for greater detail capture. Moreover, a higher megapixel count gives you more flexibility in cropping during post-production. Don’t overlook comfort either; ergonomics play a significant role in prolonged shoots, so a camera that feels comfortable to handle for extended periods is a must-have for event photographers.
Lenses:
The lens you choose complements your camera and significantly impacts image quality. Prime lenses with wider apertures (such as f/1.4, f/1.8, or f/2.8) deliver sharper images and excel in low-light conditions. Wider lenses around 24mm or 35mm are perfect for encompassing the event’s context and capturing group shots, while lenses between 50mm and 85mm work well for more intimate compositions like couple portraits. Zoom lenses with a versatile focal range between 24mm and 70mm offer flexibility, and longer lenses help capture distant subjects, crucial in events with stage settings or where proximity to subjects is limited.
Picture Perfect Apparel: How to Edit Clothing Product Photos to Drive Sales
Lighting:
Light is the essence of photography, and in events, managing light becomes crucial. In poorly lit event spaces or nighttime outdoor settings, using an on-camera flash or speedlight becomes necessary to enhance the camera sensor’s ability to capture details. However, it’s essential to master the use of flash to avoid overexposure or harsh shadows. Employing flash diffusers and bouncing the flash off ceilings softens the light, creating more flattering illumination.
Accessories:

Beyond the core gear, having the right accessories enhances your efficiency during events. Opt for a bag that’s practical yet inconspicuous, allowing easy access to your equipment without being obtrusive. A comfortable camera strap alleviates strain during extended use, ensuring you can maneuver freely while capturing moments. Backup batteries, a battery bank, or a battery grip are essential to prevent power depletion during lengthy shoots. Ample memory cards ensure you don’t miss any critical shots due to storage limitations.
Each element contributes to a holistic approach in gearing up for event photography, ensuring that you’re well-prepared to tackle diverse shooting conditions and capture stunning, high-quality images that do justice to the occasion.
Mastering Essential Camera Settings for Stellar Event Photography
Understanding and mastering camera settings is pivotal in event photography, ensuring you capture moments effectively amidst varying lighting conditions and fast-paced environments. Let’s delve deeper into each essential setting:
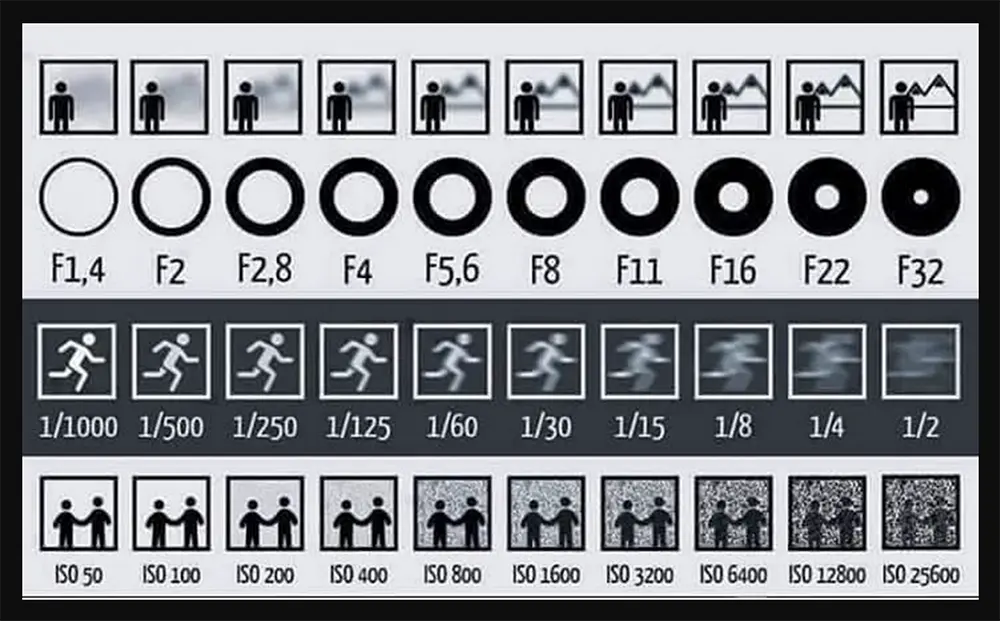
Shutter Speed: The shutter speed dictates how long the camera’s shutter remains open, controlling the amount of light that reaches the sensor. In event and concert photography, where lighting constantly changes, adjusting the shutter speed becomes crucial. A fast shutter speed ensures sharp images by freezing motion but may limit the light intake. Conversely, a slower shutter speed allows more light but can result in motion blur, which can sometimes be used creatively.
For event photography, where moments unfold quickly and unpredictably, balancing shutter speed is vital. Beginning with speeds around 1/125 to 1/250 allows enough light while still capturing action crisply. This range is effective for freezing motion while maintaining adequate exposure.
Aperture: Mastering aperture settings is fundamental for managing light intake and controlling depth of field. Aperture refers to the size of the opening in the lens that permits light. Wide apertures like f/1.4 or f/2 allow more light but create a shallow depth of field, creating a beautiful ‘bokeh’ effect, ideal for individual portraits or creative shots. On the other hand, narrower apertures like f/8 or f/11 limit light intake but result in greater in-focus content, suitable for group settings or broader scenes where more elements need to be sharp.
Choosing the right aperture setting depends on the desired aesthetic and the scene being captured. Wide apertures are perfect for isolating subjects from the background or emphasizing specific details, while narrower apertures are useful for ensuring multiple subjects or elements within a frame remain in focus.
ISO: ISO determines the camera sensor’s sensitivity to light. Higher ISO settings amplify the sensor’s sensitivity, allowing for better exposure in low-light conditions. However, increased ISO levels can introduce digital noise, degrading image quality by adding unwanted graininess or artifacts.
Starting with an ISO of around 1600 provides a good balance between capturing sufficient light and minimizing noise. Adjusting the ISO according to the available light conditions is essential to maintain image quality while preventing excessive noise.
Continuous Shooting: Continuous shooting or burst mode is a valuable feature for event photographers. This mode allows capturing multiple frames in quick succession with a single press of the shutter button. It’s beneficial when photographing dynamic events where moments pass rapidly and unpredictably.
While continuous shooting aids in capturing the perfect moment, it’s crucial to manage storage and battery life. This mode fills memory cards quickly and drains batteries faster, so be mindful of these limitations during prolonged shoots.
RAW: Opting for RAW format over JPEG is advisable for event photography. RAW files contain a wealth of data captured by the camera sensor, offering extensive editing flexibility during post-production. Unlike JPEG, which compresses image data and discards some details, RAW files retain nearly all the information captured by the sensor.
RAW files allow photographers to fine-tune exposure, recover details from shadows, and adjust highlights extensively. This is particularly advantageous for event photographers who might encounter challenging lighting situations, such as dimly lit venues or high-contrast scenes. RAW format provides the latitude needed to rescue underexposed images or refine the overall quality of photographs in post-processing.
Mastering these essential camera settings empowers event photographers to adapt to diverse shooting conditions, enabling them to capture high-quality images that preserve the essence and emotion of the event. Balancing these settings allows for creative expression while ensuring technically proficient and visually appealing photographs.
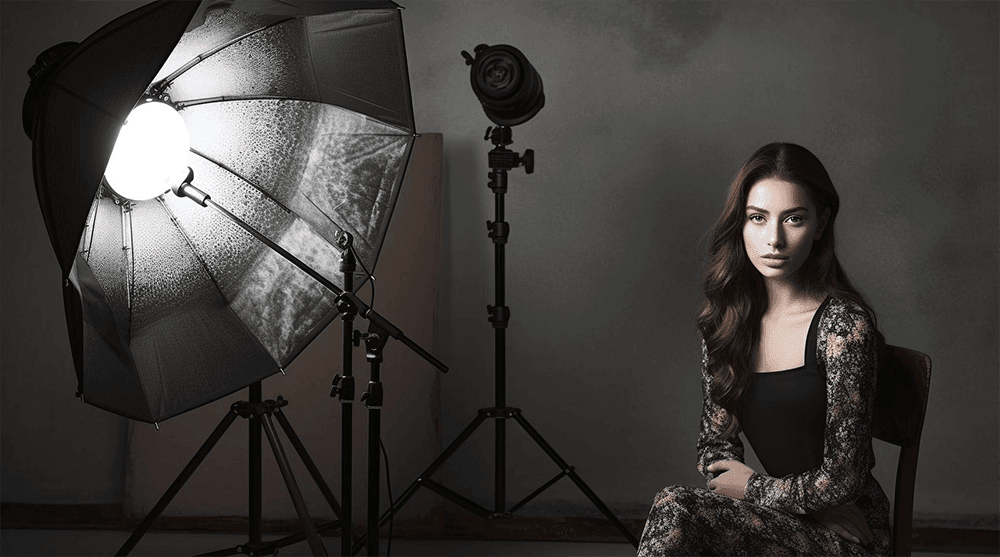
Expert Strategies for Indoor Event Photography: Lighting, Flash, Tripods, and More
Indoor event photography demands precision. Mastering lighting, flash techniques, tripod usage, and other crucial aspects is key to capturing impactful shots.
How to Take Indoor Photography?
Indoor photography is a fascinating yet challenging endeavor due to the intricacies of lighting, space limitations, and the need for precision in capturing moments. Here’s an in-depth exploration of essential tips and techniques to excel in indoor photography:
Understanding Lighting: The key to successful indoor photography lies in comprehending the available lighting conditions. Indoor environments often offer diverse lighting sources, such as natural light from windows, overhead artificial lighting, or a combination of both. Evaluating these light sources helps determine the best approach for achieving desired results.
Natural Light Utilization: If available, natural light from windows can be a photographer’s best friend indoors. It provides soft, diffused lighting that can beautifully illuminate subjects. Positioning the subject near a window or using window light as a primary source while being mindful of harsh direct sunlight can create stunning portraits or enhance the overall ambience of indoor scenes.
Artificial Lighting Consideration: In indoor settings where natural light is insufficient or unavailable, artificial lighting comes into play. Understanding the quality, color temperature, and direction of artificial lights, such as overhead fixtures or lamps, is crucial. Depending on the lighting type (fluorescent, incandescent, or LED), adjusting white balance settings on the camera ensures accurate color representation and avoids unwanted color casts in photos.
Setting White Balance: White balance adjustment is vital for indoor photography. Different light sources emit varying color temperatures, impacting the overall tone of the image. Setting the correct white balance on the camera compensates for these color temperature differences, ensuring that whites appear true and colors are accurately rendered.
Aperture and Exposure Settings: In low-light indoor environments, utilizing a wider aperture (lower f-stop number) is advantageous. A wide aperture allows more light into the camera, aiding in brighter images and creating a shallow depth of field. This shallow depth of field can isolate subjects from backgrounds, emphasizing them in the composition. Additionally, adjusting exposure settings such as shutter speed and aperture contributes to managing the amount of light entering the camera, crucial for achieving the desired exposure in indoor scenes.
ISO Sensitivity Adjustment: ISO sensitivity determines the camera sensor’s responsiveness to light. Increasing the ISO setting in low-light indoor settings brightens images, allowing for faster shutter speeds to avoid motion blur. However, higher ISO levels can introduce digital noise or graininess. Finding a balance between sufficient light sensitivity and acceptable noise levels is essential for achieving high-quality indoor photographs.
Stabilizing the Camera: Stability is imperative in indoor photography, especially in low-light conditions or when using slower shutter speeds. A tripod serves as a valuable tool to stabilize the camera, minimizing blur caused by hand movement during longer exposures. Using a tripod enables photographers to capture sharp, clear images and explore longer exposure settings without compromising quality.
Flash Techniques: While direct on-camera flash can often produce harsh lighting and unflattering results, mastering flash techniques indoors can significantly enhance photographs. Experimenting with bouncing the flash off ceilings or walls, diffusing the light using modifiers like softboxes or umbrellas, or utilizing off-camera flash setups can soften the light and create more natural-looking illumination. These techniques help in reducing harsh shadows and producing more flattering portraits or indoor scenes.
Composition and Positioning: Indoor photography offers opportunities for diverse compositions and angles. Considering different perspectives, framing techniques, and creative use of indoor spaces can elevate the visual storytelling in photographs. Anticipating moments, selecting interesting angles, and being mindful of the surroundings contribute to capturing compelling indoor images.
Attention to Background and Details: Pay attention to background elements and details while framing indoor shots. Cluttered or distracting backgrounds can detract from the main subject. Adjusting the position or using different focal lengths allows for control over what’s included in the frame, ensuring a clean and visually appealing composition.
Experimentation and Practice: Indoor photography often involves experimentation with various settings, lighting setups, and composition techniques. Practice and experimentation help in understanding how different adjustments impact the final image. Experimenting with different angles, lighting arrangements, and compositions aids in honing one’s skills and discovering unique approaches to indoor photography.
In conclusion, mastering indoor photography requires a thorough understanding of lighting conditions, adeptness in adjusting camera settings, utilizing available light sources effectively, employing proper techniques for stability and lighting, and a creative approach to composition. By applying these techniques and continually practicing and experimenting, photographers can excel in capturing stunning and evocative images in indoor settings.
Should You Bounce or Direct Flash?
When considering whether to use bounce or direct flash in event photography, several factors come into play, impacting the quality and ambiance of your images. Let’s weigh the considerations for both techniques:
Bounce Flash Technique: Bouncing the flash off a surface, often a low white ceiling is a popular method in indoor event photography. This approach diffuses the light, creating a softer, more natural illumination. When the ceiling is lower, around 4-5 meters, bouncing the flash can yield a flattering light by evenly distributing it across the room.
Advantages:
- Soft, diffused light: Bounce flash produces softer shadows and reduces the harshness of direct flash on subjects’ faces, creating a more flattering look.
- Even illumination: It spreads light more uniformly, reducing hotspots and creating a balanced exposure.
Considerations:
- Ceiling height and color: Bounce flash works best in rooms with low, neutral-colored ceilings. Higher or colored ceilings may limit its effectiveness.
- Practice required: Mastering bounce flash requires practice in finding the right angles and adjustments for optimal results.
Direct Flash Lighting: Direct flash involves pointing the flash straight at the subject, sometimes with diffusers or adjustments to balance ambient light. This method can be necessary when bounce flash isn’t feasible due to high ceilings or dark surfaces.
Advantages:
- Control in challenging environments: Direct flash can be the only option in spaces with high or dark ceilings where bouncing isn’t viable.
- Room ambiance: Skillful use of direct flash can capture the atmosphere of the room, especially when balanced with ambient light.
Considerations:
- Potential harshness: Direct flash can produce strong, harsh light and stark shadows, potentially resulting in an unnatural look.
- Loss of context: Excessive direct flash in low-light environments may diminish ambient light, leading to a loss of the room’s atmosphere and context in photos.
Choosing Between the Two: The decision between bounce and direct flash often hinges on the venue’s characteristics, the desired lighting effect, and the photographer’s skill level. Bounce flash tends to produce softer, more flattering light and is suitable for rooms with low, neutral ceilings. On the other hand, direct flash can be useful in challenging environments but requires finesse to balance with ambient light and avoid harshness.
Ultimately, the choice depends on the specific conditions of the venue and the intended mood of the photographs. Experimentation, practice, and adapting to the environment play a crucial role in determining which technique will yield the best results for a particular event.
Should You Deploy a Tripod for Event Photography?
Using a tripod in event photography can offer advantages depending on the circumstances and shooting style. Let’s explore the considerations:
Advantages of Using a Tripod:
- Stability and Sharpness: A tripod provides stability, minimizing camera shake and ensuring sharper images, especially in low-light conditions or when using slower shutter speeds. This stability is crucial for capturing clear, crisp photos, particularly in environments where handheld shooting might introduce blur.
- Long Exposures: In situations requiring longer exposures, such as capturing ambient light or taking posed group shots in low light, a tripod is invaluable. It prevents motion blur caused by hand movement during extended exposures.
- Composition and Consistency: A tripod allows for consistent framing and composition. It enables the photographer to set up a shot, then step away to interact with subjects or adjust lighting, knowing that the framing remains unchanged when returning to the camera.
- Video Recording: For event videography, a tripod offers stable support for recording speeches, performances, or interviews, ensuring steady footage without jitter or shakiness.
Considerations Against Using a Tripod:
- Mobility and Flexibility: Events are often dynamic and fast-paced, requiring photographers to move quickly to capture spontaneous moments. Carrying a tripod might limit mobility and hinder the ability to navigate crowded or changing environments swiftly.
- Engagement with Subjects: Depending on the event’s nature, using a tripod could create a barrier between the photographer and the subjects. It might feel less engaging or intimate compared to handheld shooting, affecting interactions and the candidness of the shots.
- Space Constraints: In crowded or confined spaces, setting up a tripod might not be feasible due to limited room or obstruction by other attendees.
When to Consider Using a Tripod:
- Low-Light Situations: In venues with dim lighting or when shooting nighttime events, a tripod helps maintain image quality by stabilizing the camera for longer exposures without compromising sharpness.
- Planned Shots or Set Pieces: For posed group shots, portraits, or when composing specific scenes, using a tripod ensures consistency in framing and allows for fine-tuning settings without rushing.
- Steady Video Footage: When recording speeches, presentations, or performances, a tripod stabilizes the camera for smooth, professional-looking video footage.
Ultimately, the decision to deploy a tripod in event photography depends on the specific context, shooting requirements, and the desired outcome. It’s beneficial in scenarios where stability, consistent framing, or longer exposures are essential, but its use might be limited in fast-paced, crowded, or highly interactive event settings where mobility and spontaneity are crucial.
How to Take Better Event Low Light Photos?
Capturing impressive photos in low-light event settings can be challenging but rewarding. Here are several tips to enhance your low-light event photography:
1. Use a Wide Aperture Lens: Opt for a lens with a wide aperture (small f-number) like f/1.8 or lower. This allows more light into the camera, enabling better exposure in low-light conditions and creating a shallower depth of field for artistic shots.
2. Increase ISO Sensitivity: Boost the camera’s ISO setting to amplify its sensitivity to light. However, be cautious as higher ISO levels can introduce digital noise. Find a balance between ISO sensitivity and noise by testing different settings to achieve acceptable noise levels while retaining image quality.
3. Optimize Shutter Speed: Use a faster shutter speed to freeze motion and prevent blur in low-light conditions. Balance the need for a faster shutter with maintaining adequate exposure, adjusting it according to the movement of your subjects.
4. Use Image Stabilization: If available, activate the image stabilization feature on your lens or camera. This helps counteract camera shake, allowing for sharper images, especially when shooting handheld in low light.
5. Tripod Usage: Consider using a tripod to stabilize the camera, particularly for longer exposures or when shooting stationary subjects. A tripod minimizes blur caused by hand movements, ensuring sharper images in low-light environments.
6. Use Available Light Sources: Utilize available light sources strategically. Look for natural light from windows, artificial lighting, or ambient sources within the venue. Position yourself to make the most of these sources to illuminate your subjects.
7. Consider External Lighting: Carry portable, off-camera lighting sources like speedlights or LED panels. These can be useful for adding supplemental light or creating more flattering illumination, especially for portraits or group shots.
8. Shoot in RAW Format: Opt to shoot in RAW rather than JPEG. RAW files retain more information and offer greater flexibility in post-processing. They allow for better adjustments to exposure, noise reduction, and white balance correction without significantly degrading image quality.
9. Pre-focus and Patience: Pre-focus your camera on areas where you anticipate action or subjects to appear. Patience is key in low-light situations. Wait for the right moments and take multiple shots to increase your chances of capturing the perfect image.
10. Experiment and Practice: Practice shooting in various low-light conditions to become familiar with your equipment’s capabilities. Experiment with different settings, compositions, and techniques to refine your skills and find what works best for each situation.
By implementing these tips and techniques, you can improve your ability to capture stunning and compelling images even in challenging low-light event scenarios.
Mastering Outdoor Event Photography
Outdoor event photography brings its own set of considerations that revolve around leveraging natural light and selecting suitable backgrounds to enhance the overall composition of your shots.
Leveraging Natural Light: In outdoor settings, natural light is abundant, but timing is crucial. Early mornings and late afternoons provide softer, more diffused light, casting a warm glow that can enhance your subjects and scenes. This soft light creates fewer harsh shadows and reduces the risk of overexposure, resulting in more flattering portraits and balanced exposures.
Midday sunlight tends to be harsh, creating strong contrasts and shadows that might not be ideal for most subjects. Scheduling your shoot during these times can be challenging due to the intensity of the light. If possible, plan your outdoor shoots around sunrise or sunset to capitalize on the softer, more appealing light.
Background Considerations: The outdoor environment offers a diverse range of backgrounds, from natural landscapes to architectural elements. Selecting the right background is crucial as it complements your subject and adds context to the scene. A well-chosen background can enhance the overall visual impact of your photos.
Consider backgrounds that don’t overwhelm the subject but instead complement and highlight it. Look for clean and uncluttered backgrounds that don’t distract from the main subject. Avoid backgrounds with excessive clutter or elements that may detract from the subject’s prominence.
Furthermore, pay attention to elements that can inadvertently appear in the background, such as poles, trees, or other objects that might intersect with your subject. Position yourself or your subject in a way that minimizes distractions from unwanted elements in the background.
By being mindful of natural light and background selection in outdoor event photography, you can elevate the visual storytelling of your images, creating compelling and aesthetically pleasing compositions that captivate viewers’ attention.
What to Shoot in Event Photography?
Client-Centric Approach: Identifying what clients need is pivotal in event photography. Tailoring your approach to meet their specific requirements is crucial. Whether they prioritize individual portraits, decor highlights, or candid moments, aligning with their vision is key.
Purpose-Driven Photography: Different events have distinct purposes for photography. Understanding the end use of the images, whether for press releases, website content, or capturing the ambiance of a company gathering, shapes the focus and style of your photography.
Client Consultation: Engage in thorough discussions with clients before the event. Asking pertinent questions about their preferences, desired moments, and key aspects they want emphasized ensures alignment between their expectations and your deliverables.
Capturing Candid Moments:
Anticipating Natural Moments: Anticipating and capturing natural, unscripted moments is a significant aspect of event photography. Being aware of event sequences helps in positioning yourself to seize genuine emotions, interactions, laughter, and touching moments that reflect the essence of the occasion.
Photojournalistic Skills: Mastering the art of photojournalism is advantageous for capturing candid moments effectively. Practicing this genre beforehand equips you to anticipate and capture fleeting, unscripted moments with finesse.
Group Photos:
Variety in Group Shots: Group photos are integral to event documentation. These may range from spontaneous groupings to more structured, editorial-style compositions, each requiring different approaches and setups.
Diverse Group Photo Types: Understanding the nuances of various group photo types, from casual ‘grip and grins’ to more formal editorial poses, helps in planning and executing these shots efficiently.
Detail and Décor Photography:
Timely Detail Capture: Timing is crucial for capturing detailed shots of décor before guests arrive. Sequencing your shots, starting with close-ups and progressing to wider angles, helps ensure comprehensive coverage before guests fill the space.
Managing Decor Photography: Navigating the challenging timeline between finishing décor and guest arrival requires efficient planning. Focusing on smaller sections initially, then requesting a brief window to capture overall décor shots, optimizes the photography process.
By understanding client needs, mastering different photography genres, and adeptly managing timing and sequencing, event photographers can deliver a comprehensive and tailored visual narrative that meets the specific requirements of each event.
Event Photography Challenges:
Event photography encompasses various challenges that photographers face while capturing moments at different events and gatherings:
Low-Light Conditions: Events often take place indoors or during the evening, presenting challenges due to insufficient natural light. Managing exposure settings, such as aperture, shutter speed, and ISO, becomes critical to avoid underexposed or blurry images while minimizing noise in the photos.
Dynamic Environments: Events are inherently dynamic, with constant changes in lighting, movements, and scenes. Photographers need to be agile, ready to adapt quickly to varying conditions, anticipate moments, and adjust camera settings swiftly to capture fleeting but significant moments effectively.
Crowded Spaces: Event venues can be crowded, making it challenging to capture clear shots without distractions or obstructions. Finding unobtrusive angles and navigating through crowds to get the right composition requires skill and patience.
Client Expectations: Understanding and meeting diverse client expectations is crucial. Each client may have specific preferences, desired shots, or the purpose behind the event coverage. Tailoring photography to align with these expectations ensures client satisfaction.
Time Constraints: Events operate on tight schedules, allowing limited time for photographers to capture essential moments, group photos, and details. Efficient time management while ensuring comprehensive coverage is a constant challenge in event photography.
Balancing Creativity and Documentation: Balancing creative expression with capturing the event’s essence and documenting moments is another challenge. While striving for artistic and authentic shots, photographers must ensure they capture the key moments and tell the event’s story effectively.
Equipment and Technical Challenges: Managing photography equipment effectively in different environments is crucial. Handling various lighting conditions, ensuring equipment readiness, and being proficient in technical aspects are essential to delivering high-quality images consistently.
Overcoming these challenges requires a blend of technical expertise, adaptability, creativity, and effective communication. Successful event photographers navigate these obstacles skillfully to deliver engaging, comprehensive, and visually compelling narratives of the events they cover.
Mastering Event Photography: Gear, Settings, and Expertise
Embarking on event photography demands precision and attention to detail. Half the battle is won by selecting the ideal camera and gear, complemented by a thorough understanding of optimal settings.
The remaining challenge lies in harnessing your event photography expertise, intuition, and the wealth of experience you’ve amassed over the years. This fusion ensures a seamless execution, capturing the essence of each moment flawlessly.