Why jewelry product photo editing is important?
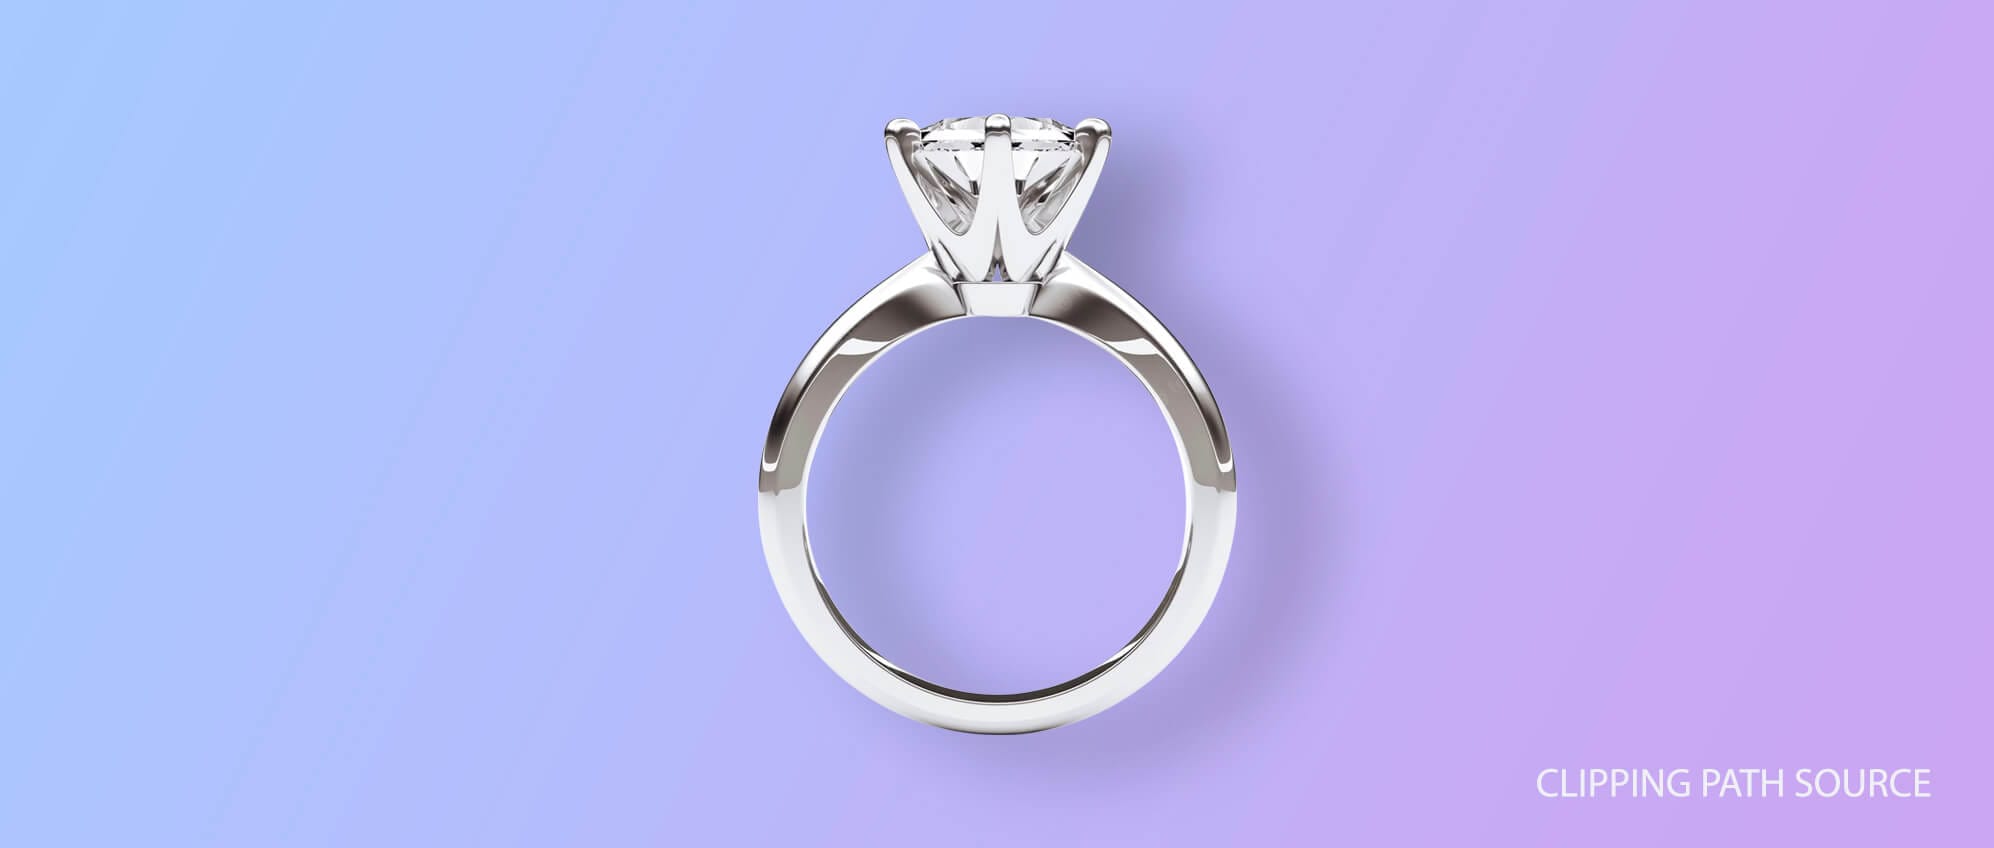
Editing is a crucial aspect of jewelry photography that significantly enhances the overall quality and appeal of the images. When it comes to capturing the intricate details, brilliance, and beauty of jewelry pieces, photography alone may not always be sufficient to bring out their true essence. Editing allows photographers to fine-tune and optimize various elements, ensuring that the final images showcase the jewelry in its most captivating form.
One of the primary reasons why editing is vital in jewelry photography is to highlight the intricate details and textures of the pieces. Jewelry often features delicate craftsmanship, intricate designs, and exquisite gemstones, all of which need to be accurately represented in photographs. Through editing, photographers can adjust the lighting, contrast, and sharpness to bring out the fine details, ensuring that viewers can appreciate the artistry and craftsmanship involved.
Moreover, editing allows for the correction of imperfections and flaws that may arise during the photography process. Jewelry pieces can be prone to reflections, unwanted shadows, or even dust particles that can detract from their overall appeal. Skilled editing techniques can help minimize or eliminate these distractions, resulting in cleaner, more polished images.
Another critical aspect of editing in jewelry photography is color correction and enhancement. Precise color representation is crucial as it directly affects how the jewelry is perceived. Editing enables photographers to adjust color balance, saturation, and tone, ensuring that the jewelry’s colors are accurate and vibrant. This is especially important for gemstones, where the accurate portrayal of their unique hues and brilliance can significantly impact a viewer’s impression of the piece.
Adjust exposure and white balance to showcase jewelry accurately.
Step 1: White Balance Adjustment
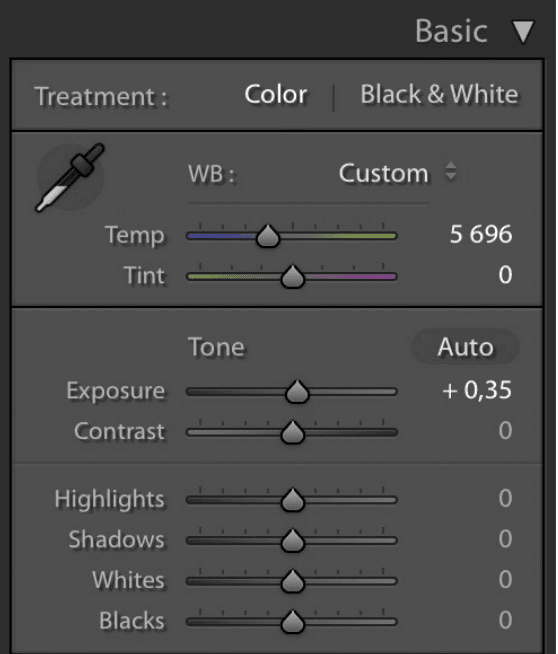
- Proceed to the “White Balance” section, located in the “Basic” panel.
- There are a few ways to set the white balance accurately: a. Use the “Auto” button to allow Lightroom to automatically adjust the white balance. b. Use the “Eyedropper” tool located at the top of the “White Balance” section. Click on a neutral area of the image that should be white or gray. This will help Lightroom correct the color temperature and tint accordingly. c. Manually adjust the “Temperature” and “Tint” sliders to fine-tune the white balance. If your image appears too warm (yellow/orange), decrease the “Temperature” value. If it appears too cool (blue), increase the “Temperature” value. To correct any green or magenta tints, adjust the “Tint” slider accordingly.
Step 2: Fine-Tune the Image
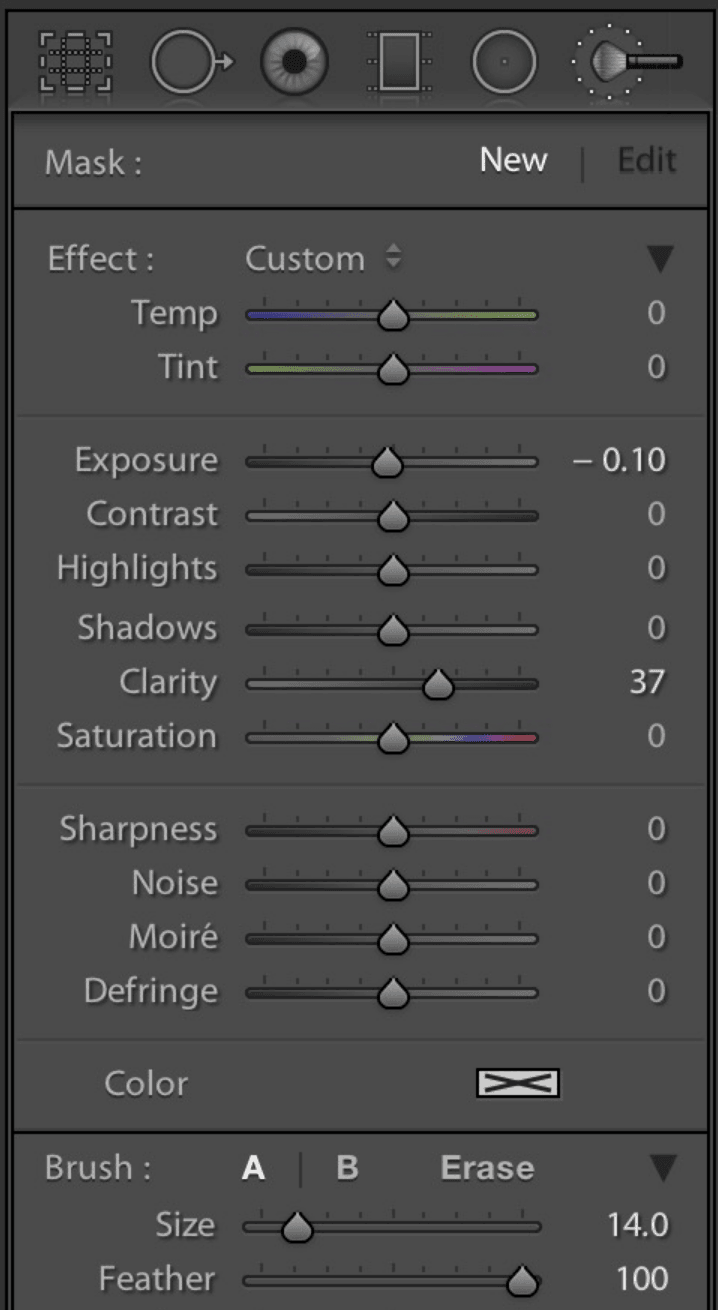
- After adjusting exposure and white balance, you can further enhance the image with other settings in Lightroom:
a. Use the “Contrast” slider to increase or decrease the overall contrast.
b. Adjust the “Highlights,” “Shadows,” “Whites,” and “Blacks” sliders to fine-tune the tonal range.
c. Utilize the “Clarity” slider to add mid-tone contrast and make the jewelry details pop.
d. The “Vibrance” slider can be used to boost the intensity of colors without affecting skin tones too much.
Step 3: Export the Image
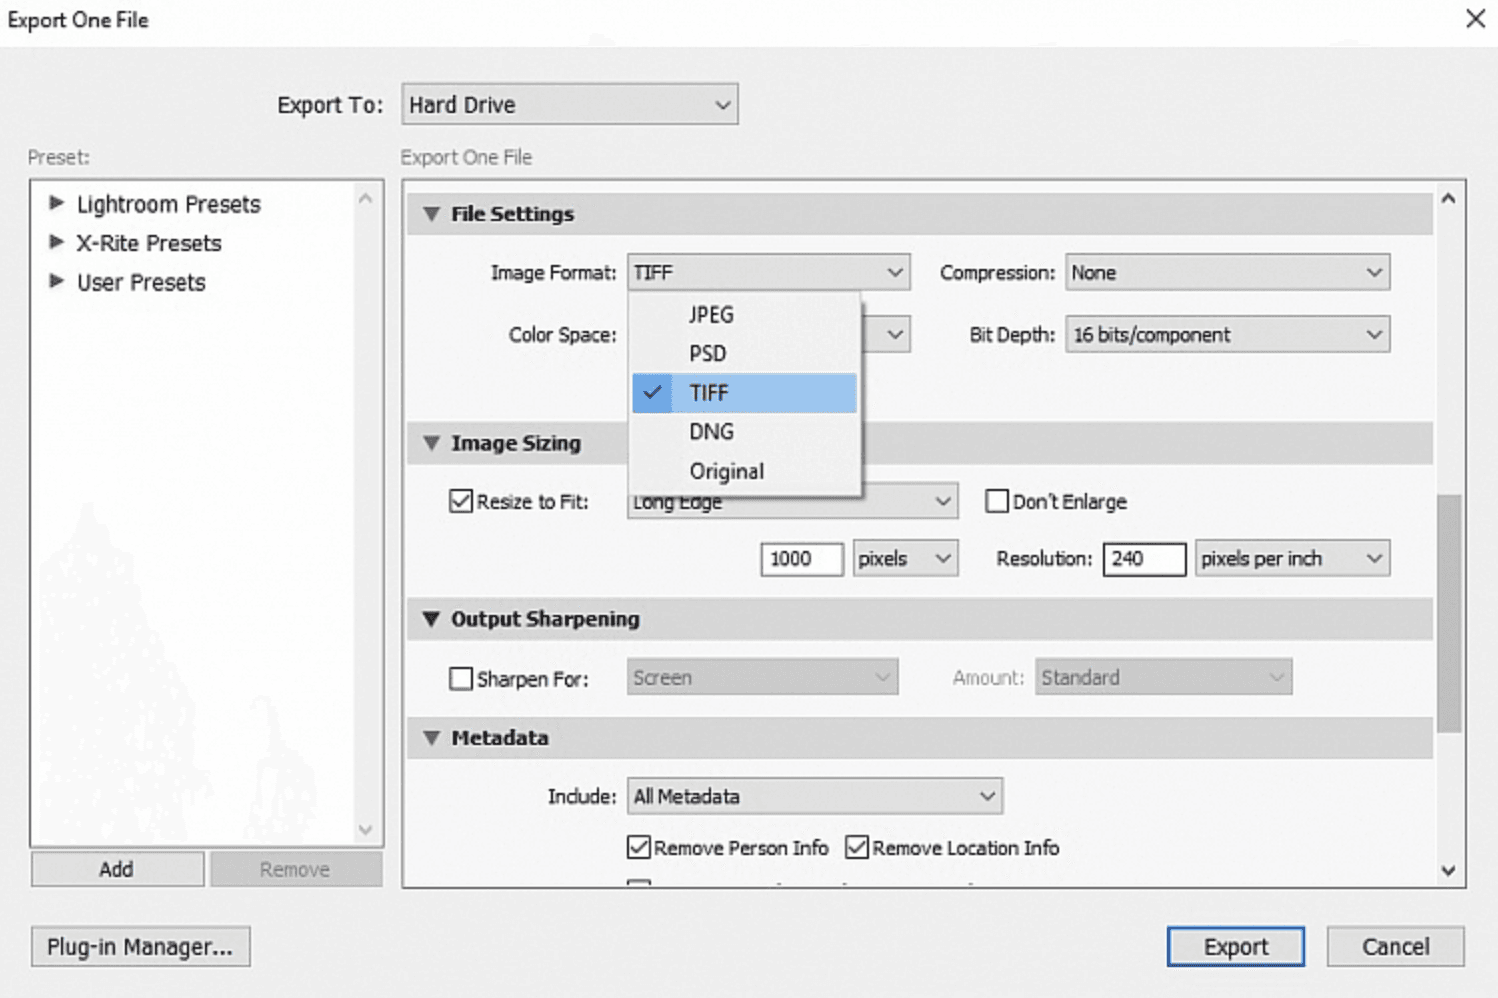
- Once you are satisfied with the adjustments, you can export the edited image to your desired format and size. Go back to the Library module by pressing “G” on your keyboard or clicking on the “Library” button in the top right corner.
- Right-click on the image and select “Export” to choose the export settings like file format, resolution, and quality.
Remember, the goal is to showcase the jewelry accurately, so it’s essential to strike a balance between enhancing the image and maintaining its true representation. Additionally, always make sure to work on a copy of the original image to preserve the original file intact.
Fix colors: hue and saturation
Customers demand realistic product photos to avoid disappointment and reduce returns. Adjusting exposure and white balance helps, but precise color representation is vital. For instance, jewelry like gold can have various hues, necessitating spot-on color accuracy in photos to match customer expectations.
How to adjust hue and saturation
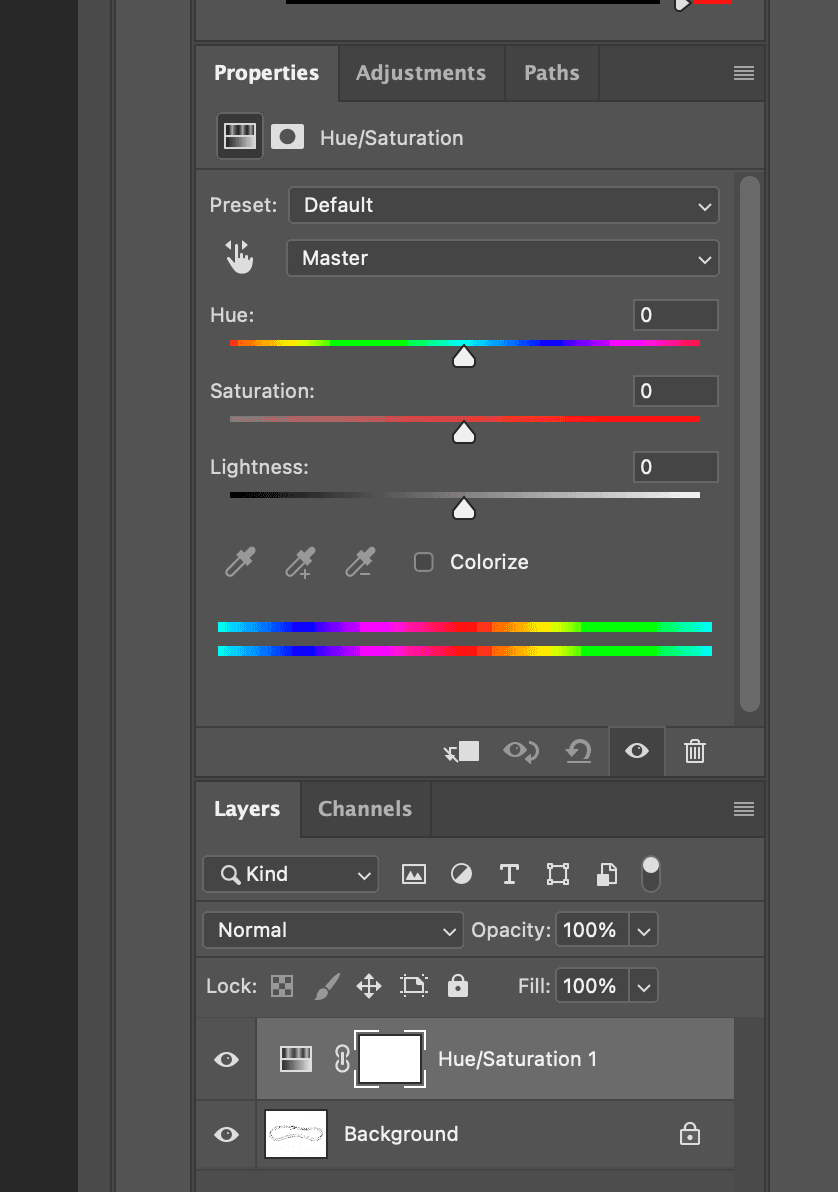
Certainly! To fix colors, hue, and saturation for a jewelry product in Photoshop, follow these detailed steps:
- Open the Image:
- Launch Adobe Photoshop and open the jewelry product photo you want to edit. To do this, click on “File” in the top menu, then choose “Open” and select the image from your computer.
- Duplicate the Layer:
- Before making any adjustments, it’s essential to work on a duplicate layer to preserve the original image. Right-click on the background layer in the Layers panel (usually named “Layer 0”) and choose “Duplicate Layer.” This will create a new layer above the original one.
- Adjust Hue and Saturation:
- With the duplicated layer selected, navigate to “Image” in the top menu, then go to “Adjustments” and choose “Hue/Saturation.”
- A dialog box will appear, displaying three sliders: “Hue,” “Saturation,” and “Lightness.”
- Hue Adjustment:
- The “Hue” slider allows you to change the color tones of the image. Slide it left or right to shift the colors. For example, moving the slider to the left will shift the colors toward cooler tones, while moving it to the right will shift them toward warmer tones.
- Saturation Adjustment:
- The “Saturation” slider controls the intensity of colors. Sliding it to the left will desaturate the image, making the colors more muted, while sliding it to the right will increase saturation, making the colors more vibrant and pronounced.
- Lightness Adjustment (Optional):
- The “Lightness” slider adjusts the overall brightness of the colors. Moving it to the left will make the colors darker while moving it to the right will make them brighter. Use this slider cautiously, as it can easily lead to overexposure or underexposure of the image.
- Fine-tune with Selections (Optional):
- If you want to adjust specific areas of the jewelry product, you can create selections using tools like the “Lasso,” “Magic Wand,” or “Quick Selection” tool. Once you’ve made the selection, go back to “Image” > “Adjustments” > “Hue/Saturation,” and the adjustments will only affect the selected area.
- Preview and Apply:
- As you make adjustments, keep an eye on the image preview to see the changes in real-time. When you are satisfied with the colors, click “OK” to apply the changes.
- Save Your Edited Image:
- After making the desired color fixes, save your edited image in a suitable file format like JPEG or PNG.
Remember, it’s essential to strike a balance and avoid excessive adjustments to maintain a natural and appealing look that accurately represents the jewelry product. Always keep a copy of the original image or work on separate layers to preserve the option of going back and making further changes if needed.
Sharpen the details of the jewelry product
In the realm of jewelry photography, achieving absolute sharpness during the initial shoot is not always guaranteed. However, fret not, for the wonders of Photoshop can come to the rescue. With its adept sharpening tools, you can easily rectify any shortcomings and elevate the brilliance of your jewelry images to the next level.
The process of sharpening jewelry details in Photoshop serves a profound purpose—it bestows your captured pieces with the power to captivate. By accentuating intricate elements like precious stones, glistening gems, and exquisite engravings, these enhancements enable your jewelry to radiate its true splendor.
In the pursuit of excellence, Photoshop emerges as an indispensable ally, breathing life into your photos with unparalleled finesse. Each facet of the jewelry comes alive, allowing it to stand out effortlessly against any backdrop.
The craftsmanship of your jewelry deserves the utmost attention, and Photoshop ensures that no detail goes unnoticed. As the software’s virtual brush delicately enhances the contours and lines, even the tiniest facets and carvings become more pronounced, adding a touch of refinement to the overall composition.
To sharpen the details of a jewelry product in Photoshop, follow these brief steps:
- Open the Image: Launch Photoshop and open the jewelry product image you want to sharpen.
- Duplicate the Layer: Right-click on the Background layer in the Layers panel and select “Duplicate Layer” to create a copy of the image layer.
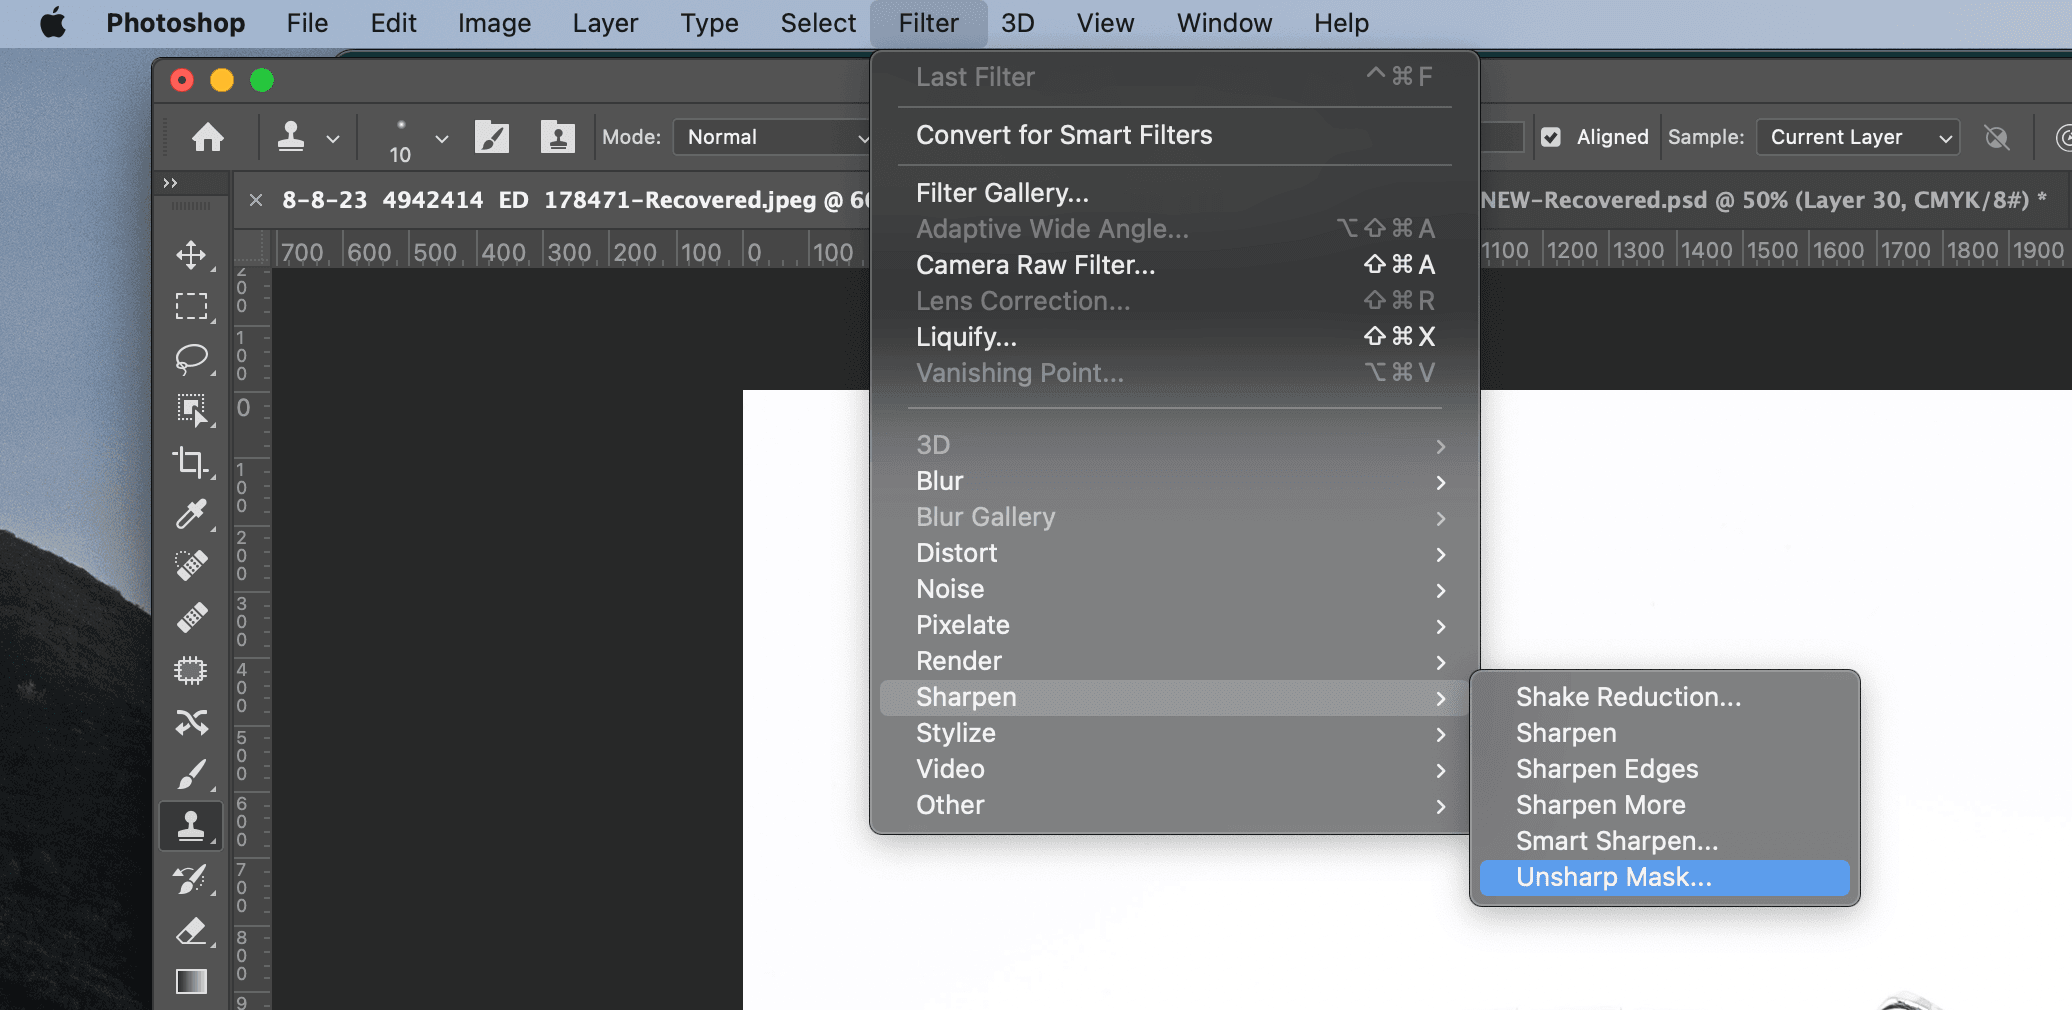
- Apply Smart Sharpen Filter: With the duplicate layer selected, go to Filter > Sharpen > Smart Sharpen.
- Adjust Settings: In the Smart Sharpen dialog box, adjust the settings to control the sharpening effect:
- Amount: Increase to strengthen the sharpening effect (start with a conservative value, e.g., 50%).
- Radius: Adjust the size of the sharpening area (smaller values for jewelry, around 1-2 pixels).
- Remove: Choose an option (e.g., Lens Blur or Gaussian Blur) to reduce blurriness artifacts if present.
- More Accurate: Check this box for refined sharpening results (slightly increases processing time).
- Preview and Adjust: Use the preview window to see the effect as you adjust the settings. Avoid over-sharpening to prevent noise and artifacts.
- Apply Sharpening: Click “OK” to apply the Smart Sharpen filter to the duplicate layer.
- Optional: Add a Layer Mask: If needed, add a layer mask to hide sharpening in specific areas (e.g., gemstones or delicate parts). Paint black on the mask to conceal the sharpening effect.
- Compare Before and After: Toggle the visibility of the duplicate layer to compare the sharpened version with the original.
- Save the Image: Save the sharpened jewelry image as a new file or export it in the desired format.
Remember to work on a duplicate of the original image to preserve the original data and consider using non-destructive editing techniques for flexibility.
Add a shadow effect
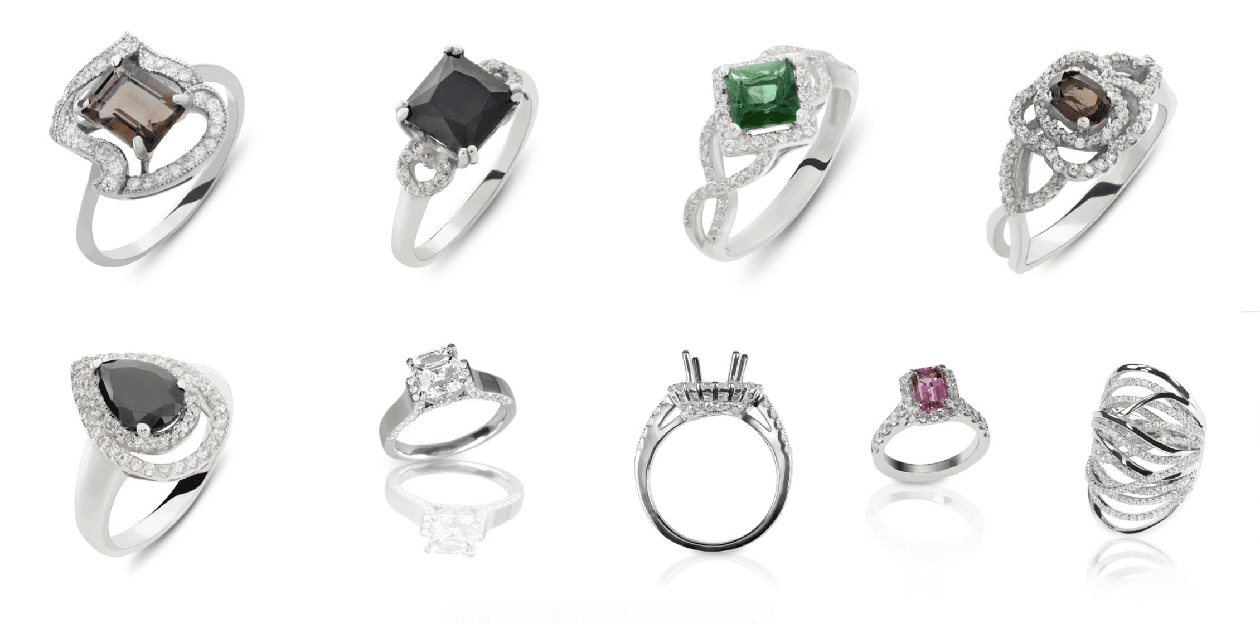
The shadow effect is a crucial aspect of jewelry product photography in Photoshop, as it helps create a sense of depth and realism, making the jewelry piece appear more three-dimensional and visually appealing. Adding shadows in Photoshop requires careful attention to lighting and perspective to ensure that the shadows look natural and consistent with the environment.
When it comes to jewelry product photography, various shadow effects can be applied in Photoshop to add depth, realism, and visual appeal to the images. Each shadow effect serves a specific purpose and can be chosen based on the jewelry piece, lighting conditions, and the desired artistic outcome. Here are some common shadow effects used for jewelry products:
- Drop Shadow: The drop shadow effect is one of the most basic and widely used shadow effects in jewelry photography. It involves creating a shadow that appears below the jewelry piece, simulating the effect of the jewelry being slightly elevated above the surface. The drop shadow helps ground the jewelry, making it look more three-dimensional and adding a sense of depth to the image.
- Natural Shadow: The natural shadow effect is used to recreate the shadow that the jewelry naturally casts on the surface it rests upon during the photoshoot. By adding this shadow in post-processing, the jewelry appears more realistic and convincingly placed within the environment. This effect is especially important when photographing jewelry on a plain background or a reflective surface.
- Reflection Shadow: The reflection shadow effect involves creating a mirror-like reflection of the jewelry piece below it. This technique is particularly effective when showcasing jewelry on a glossy or reflective surface, adding a touch of elegance and luxury to the image. Reflection shadows can be created with varying opacity levels to control the intensity of the reflection.
- Soft Shadow: A soft shadow effect is characterized by its subtle, diffused edges and gentle transition from light to shadow. This type of shadow is commonly used for jewelry with rounded edges or when the lighting is soft and diffused. Soft shadows create a delicate and sophisticated look, making the jewelry appear more appealing and alluring.
- Hard Shadow: In contrast to the soft shadow, the hard shadow effect has well-defined, crisp edges and a sharp transition from light to shadow. Hard shadows are suitable for jewelry pieces with distinct, angular shapes, or when the lighting is direct and creates strong shadows. This effect can add a bold and dynamic element to the jewelry image.
- Inner Shadow: The inner shadow effect involves adding a shadow inside the jewelry piece, giving the illusion of depth and dimension within the design. This effect works well for jewelry with intricate patterns, engravings, or cut-outs, making the details stand out more prominently.
- Long Shadow: The long shadow effect extends the shadow of the jewelry piece, giving it a sense of elongation and drama. This effect is often used for creative or artistic purposes, adding an element of visual interest and uniqueness to the image.
By skillfully applying these different shadow effects in Photoshop, jewelry product photographers and designers can elevate the aesthetics of their images, making the jewelry pieces more captivating and appealing to potential customers. The choice of shadow effect should align with the jewelry’s design, the desired mood of the image, and the overall branding strategy.
How to add a reflective shadow
Adding a reflective shadow to a jewelry product photo in Photoshop can enhance its realism and make it visually striking. Here’s a step-by-step guide on how to achieve this effect:
- Open the image: Start by opening the jewelry product photo in Adobe Photoshop.
- Duplicate the layer: To preserve the original image, create a duplicate layer. Right-click on the layer in the Layers panel and select “Duplicate Layer.”
- Flip the duplicate layer: With the duplicated layer selected, go to Edit > Transform > Flip Vertical. This action will flip the layer vertically, creating the reflection effect.
- Position the reflection: Move the flipped layer below the original layer in the Layers panel. Use the Move tool (shortcut: V) to drag the flipped layer downwards until the reflected part aligns with the jewelry’s base or surface.
- Resize if needed: Depending on the photo’s composition and how much of the jewelry is visible, you may need to resize the flipped layer to match the reflection accurately. Use Edit > Free Transform (Ctrl/Cmd + T) to adjust the size and position as necessary.
- Create a layer mask: With the reflected layer still selected, click on the Layer Mask icon at the bottom of the Layers panel. This will add a layer mask to the reflected layer.
- Gradient tool for the reflection fades: Select the Gradient tool (shortcut: G) from the toolbar. In the Options bar, make sure the gradient is set to “Foreground to Transparent.” Choose a soft brush and a linear gradient style.
- Apply the gradient mask: With the gradient tool selected, click and drag from the bottom of the reflection upwards, fading the reflection gradually as it moves away from the jewelry. This step helps create a smooth transition between the reflection and the background, making it look more realistic.
- Adjust opacity: To control the intensity of the reflection, adjust the opacity of the reflected layer in the Layers panel. A lower opacity value will create a subtle reflection, while a higher value will make it more pronounced.
- Refine and clean up: Use the Eraser tool with a soft brush to clean up any unwanted artifacts and smoothen the edges of the reflection. Pay close attention to maintaining a natural look, especially around the jewelry’s base.
- Final touches: After adding the reflective shadow, you may want to make further adjustments to the overall image, such as adjusting brightness, contrast, and color balance, to ensure the reflection blends seamlessly with the rest of the photo.
- Save and export: Once you are satisfied with the result, save your edited image in the desired format.
By following these steps, you can add a reflective shadow to your jewelry product photo in Photoshop, making it more captivating and visually appealing.

