
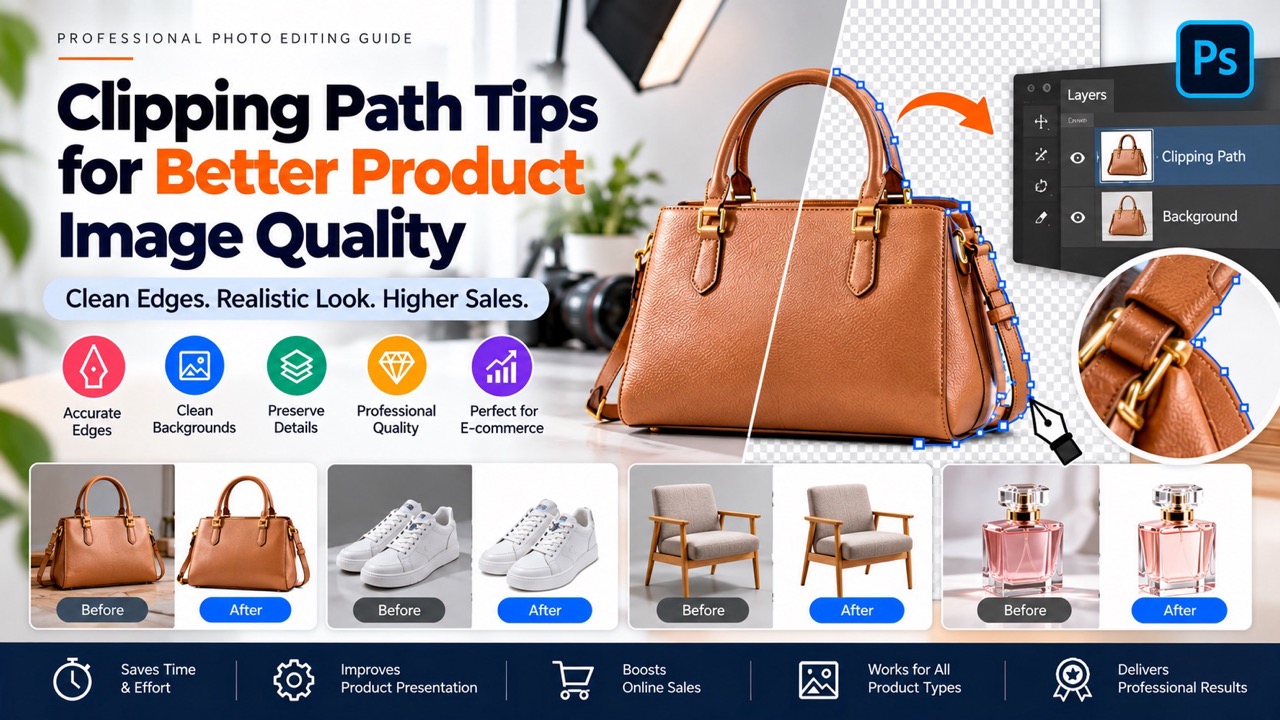
Product photography plays an important role in how customers experience an online store. When someone shops online, they cannot physically touch a product, examine its finish, or inspect every detail before making a purchase. Instead, they depend on photographs to understand the product’s shape, color, texture, and overall appearance.
A high-quality product image should communicate these details clearly while keeping unnecessary distractions out of the frame. However, even photographs captured in professional studios may need additional editing before they are ready for ecommerce websites, online marketplaces, advertisements, or printed catalogs.
One of the most effective techniques for preparing commercial product images is clipping path editing.
A clipping path allows an editor to separate a product from its original background while maintaining control over the product’s visible boundaries. This makes it possible to replace distracting backgrounds, create consistent product presentations, and prepare images for different commercial applications.
However, creating a professional clipping path involves more than simply drawing an outline around an object. The editor must understand the product’s shape, identify difficult edges, use appropriate Photoshop tools, and preserve details that make the item look natural.
Poor clipping path work can produce rough edges, unnatural curves, missing product details, and visible background remnants. These problems can reduce the overall quality of an otherwise excellent photograph.
In this guide, we will explore 20 practical clipping path tips for better product image quality, explain why they matter, and show how photographers, ecommerce businesses, and professional photo editors can achieve cleaner, more accurate results.
What Is a Clipping Path in Product Photography?
A clipping path is a vector-based outline created around an object to separate it from its surrounding background. In Adobe Photoshop, professional editors commonly create clipping paths using the Pen Tool, which allows them to place anchor points along the product’s visible edges and connect those points using straight segments or Bézier curves.
Once the path is completed, it can be used to create a selection or mask that isolates the product. The original background can then be removed, replaced, or adjusted according to the intended use of the image. Unlike rough manual selections, vector paths offer precise control over smooth curves, sharp corners, and other clearly defined boundaries.
For example, imagine a leather handbag photographed against a gray studio background. Although the lighting and composition may be excellent, an ecommerce retailer might require the product to appear against a clean white background. A professional editor can create a clipping path around the handbag, following its handles, straps, corners, and body without unnecessarily changing its shape. The background can then be replaced while preserving the product’s natural appearance.
Clipping paths are particularly useful for products with clearly defined edges, such as shoes, handbags, furniture, electronics, packaging, and household accessories. However, products containing hair, fur, transparent materials, or extremely soft edges may require image masking instead. Understanding when to use each technique is essential for achieving professional product image quality.
Why Clipping Path Quality Matters for Ecommerce
The quality of a clipping path affects more than the appearance of an individual photograph. It also influences how consistently products are presented throughout an ecommerce website or catalog. When customers browse several products within the same category, differences in background colors, edge quality, positioning, and shadows can make the collection appear visually disorganized.
Consider an online furniture store displaying twenty different chairs. If some photographs have rough edges, others contain visible background fragments, and several products appear to float because their natural shadows have been removed, the overall presentation may feel inconsistent. Even when the furniture itself is attractive, poor editing can distract customers from its design and construction.
Professional clipping paths help create cleaner product backgrounds while preserving accurate shapes and important details. They also make it easier to standardize images across different product categories and prepare photographs for multiple marketing channels. An isolated product can be placed against a white background for an ecommerce listing, incorporated into a promotional banner, or used in a printed catalog without requiring another photoshoot.
However, successful clipping path editing should not be measured only by whether the background has been removed. The real measure of quality is whether the finished product looks natural, accurate, and consistent with the original photograph.
1. Start With the Highest-Quality Original Image
One of the simplest ways to improve clipping path quality is to begin with the best available source photograph. A sharp, high-resolution image provides more useful visual information about the product’s boundaries, textures, and structural details. This makes it easier for an editor to identify where the product ends and the background begins.
When an image is blurry, heavily compressed, or poorly illuminated, the product’s edges may become difficult to distinguish. For example, a black handbag photographed against a dark background may have straps that blend into the surrounding area. Even an experienced editor may need additional time to identify the correct outline and preserve the original shape.
Whenever possible, work with original camera files or high-quality exports rather than images that have been repeatedly compressed. JPEG compression artifacts can introduce unwanted patterns around product edges, while excessive resizing may remove fine details that would otherwise help with accurate tracing.
Good source photography does not eliminate the need for professional editing, but it creates a stronger foundation for clean and precise clipping paths. Investing attention in image quality before editing can reduce unnecessary corrections and improve the consistency of the final results.
2. Choose the Right Editing Technique for Each Product
Although the Photoshop Pen Tool is widely used for professional clipping paths, it is not the ideal solution for every type of subject. Different products have different edge characteristics, and selecting the appropriate editing technique is one of the most important decisions in the workflow.
Products with solid, clearly defined boundaries are generally suitable for clipping paths. These include boxes, shoes, handbags, furniture, electronics, and many household accessories. The Pen Tool allows editors to follow these edges accurately while maintaining control over curves and corners.
However, products with soft, irregular, or partially transparent boundaries often require image masking. A fur-trimmed jacket, for example, contains fine fibers that cannot be reproduced naturally with a conventional hard vector outline. Similarly, a transparent glass bottle may require masking to preserve the subtle visibility of objects and light passing through the material.
Professional editors should evaluate the product before beginning. In some cases, the best result comes from combining a clipping path for solid edges with masking for delicate areas. Choosing the right technique from the beginning can prevent unnecessary rework and help preserve the product’s natural appearance.
3. Use Anchor Points Strategically
Anchor point placement is one of the most important skills in manual clipping path editing. Every anchor point influences the shape of the path, and unnecessary points can make the outline difficult to control.
Beginners often assume that placing more anchor points will automatically create a more accurate clipping path. In practice, excessive points can introduce irregularities into otherwise smooth curves. A rounded bottle, for example, may appear slightly uneven if the editor places dozens of points along a continuous curved edge.
Experienced editors usually identify important changes in curvature and place anchor points where they provide meaningful control. Direction handles are then adjusted to create smooth Bézier curves between those points. This approach often produces cleaner paths that are easier to modify.
However, using fewer points should never become more important than accuracy. Products with sharp corners, narrow components, or irregular shapes may require additional anchor points. The objective is to use exactly as many points as necessary to reproduce the visible product boundary without creating unnecessary complexity.
4. Maintain Smooth Curves and Accurate Corners
Professional clipping paths should follow the actual geometry of a product. Smooth curves need to remain smooth, while sharp corners should retain their original definition. Failing to distinguish between these shapes can make a product look distorted.
Consider a smartphone with slightly rounded corners. If the editor exaggerates those curves, the phone may appear more rounded than it actually is. Similarly, a handbag may contain smooth handles, curved corners, and sharp structural transitions that require different types of anchor point adjustments.
The Photoshop Pen Tool allows editors to control these transitions using direction handles and corner points. Smooth points are useful for continuous curves, while corner points are necessary when the path changes direction sharply.
The most effective approach is to study the product’s shape before tracing it. Editors should avoid forcing every edge into a perfectly smooth curve because some products naturally contain irregularities or deliberate design features. Accuracy is more important than artificial perfection.
5. Work at Different Zoom Levels
Zooming in is essential when editing complicated product boundaries, but working exclusively at extreme magnification can create problems. A product edge may look accurate in a small section while the overall silhouette appears uneven when viewed at normal size.
For example, the curved sole of a shoe may contain several transitions that are difficult to evaluate when only a tiny portion is visible on the screen. An editor may adjust each segment individually without noticing that the complete curve has become inconsistent.
A better approach is to alternate between close-up inspection and broader viewing. High magnification is useful for refining narrow straps, small openings, and difficult corners. Lower magnification helps evaluate the overall shape and identify unwanted changes in curvature.
This combination allows editors to maintain both local precision and visual consistency. Professional clipping path work requires attention to individual pixels, but the final image must also look natural when viewed as a complete product.
6. Preserve the Product’s Original Shape
One of the most important responsibilities of a professional photo editor is preserving the original shape of the product. Background removal should not unintentionally change its proportions, thickness, or structural features.
A handbag handle should retain its natural width, a chair leg should not become thinner, and the rounded toe of a shoe should not be flattened. These may seem like minor details, but inaccurate tracing can change how the product appears to potential customers.
Editors should follow the visible product boundary carefully without cutting too far inside the subject or leaving excessive background pixels outside it. When the edge is difficult to identify, the original photograph should remain the primary reference.
For ecommerce businesses, accurate product representation is particularly important because customers rely on photographs to understand what they are purchasing. Professional clipping paths should improve presentation while preserving the design characteristics of the actual item.
7. Handle Internal Openings With Precision
Many products contain openings through which the original background remains visible. These areas can be easy to overlook, particularly when an editor concentrates primarily on the product’s outer boundary.
Furniture provides a useful example. A wooden chair may have open spaces between its legs, beneath the seat, and through the backrest. Removing only the background outside the chair will leave unwanted background areas inside its structure.
Professional editors create additional paths or subpaths to isolate these openings accurately. Similar techniques are necessary for handbag handles, bicycle frames, decorative metal products, and machinery with visible gaps between components.
Internal openings become increasingly important as clipping path complexity increases. A product with numerous small gaps may require substantial manual attention, even when its outer silhouette is relatively straightforward.
Careful treatment of these spaces helps ensure that the isolated product looks natural against any replacement background.
8. Protect Fine and Narrow Product Details
Thin straps, wires, shoelaces, jewelry chains, and other narrow components are among the most challenging areas in product background removal. These details can disappear or become distorted if the clipping path is not positioned accurately.
For example, a narrow handbag strap may appear uneven if the editor cuts too far into its edges. A thin metal component may become disconnected from the main product if part of its outline is accidentally removed.
Professional editors should inspect these details carefully and preserve their original thickness wherever possible. When a narrow element contains a clearly defined edge, a precise clipping path may be appropriate. When the detail is extremely fine, soft, or partially transparent, masking may produce a more realistic result.
The objective is not simply to create a clean background. It is to retain the visual information that makes the product recognizable and accurately represents its construction.
9. Combine Clipping Paths With Image Masking When Necessary
Clipping paths and image masking are often discussed as separate editing techniques, but they can work together effectively. Understanding their strengths helps editors produce more natural product images.
Clipping paths are particularly useful for hard, defined edges. Image masking is better suited to soft transitions, fine fibers, and transparent materials. A product containing both characteristics may require a combination of techniques.
Consider a fashion photograph featuring a model wearing a structured jacket with fur trim. The jacket’s main outline may be isolated accurately using a clipping path, while the fur requires masking to preserve its delicate fibers.
Similarly, a perfume bottle may need a clipping path around its solid outer shape and additional masking to retain realistic transparency through the glass.
Professional editors should avoid forcing every product into a single technique. A flexible approach often produces better results, particularly when working with fashion, beauty, jewelry, and other visually complex products.
10. Eliminate Background Halos and Edge Contamination
A background halo is a visible outline of the original background that remains around an isolated product. It can make an otherwise clean image appear poorly edited.
For example, a dark leather handbag photographed against a light gray background may retain a faint gray border after the background is removed. This becomes especially noticeable when the product is placed against a pure white or dark-colored background.
To identify these problems, editors should inspect isolated products against contrasting backgrounds. White, black, and medium gray backgrounds can reveal different types of edge contamination.
Corrections should be applied carefully. Excessive edge contraction can remove legitimate product pixels, while aggressive color decontamination may alter the appearance of the product boundary.
The goal is to create a natural transition between the product and its new background without introducing visible artifacts or changing the subject’s original shape.
11. Preserve Natural Shadows and Depth
A product photograph can have perfectly isolated edges and still look unrealistic if its shadows are handled poorly. Shadows help communicate depth, lighting direction, and the relationship between an object and the surface beneath it.
When the original background is removed, contact shadows may disappear along with it. This can make shoes, handbags, furniture, and other products appear to float unnaturally.
Professional editors should evaluate whether the original shadows can be preserved or whether new shadows are necessary. Contact shadows are particularly important where a product touches a surface. Drop shadows can create additional depth, while reflection effects may be suitable for certain polished products.
However, shadows should never overpower the product. Their direction, softness, opacity, and placement should be consistent with the intended lighting.
A subtle, realistic shadow is often more effective than a dramatic effect that draws attention away from the product itself.
12. Maintain Accurate Product Colors
Color accuracy is an essential part of professional ecommerce photography. Customers frequently choose products based on the colors they see online, so unwanted color changes can create unrealistic expectations.
Clipping path editing should not automatically change the color of the product. Background removal and color correction are separate processes, even though they may be performed within the same editing workflow.
For example, a dark brown leather handbag should retain its natural shade after being placed against a white background. A cream-colored sofa should not become noticeably yellow or gray because of inconsistent color adjustments.
When color correction is requested, editors should use reliable references, approved product samples, or established color-management procedures. Consistent monitor calibration and appropriate color profiles can also help reduce unwanted differences between images.
Professional editing should improve visual presentation without misrepresenting the actual product.
13. Preserve Texture and Material Characteristics
Texture is one of the most important visual characteristics of a product. Leather, wood, fabric, glass, and metal all have distinctive surfaces that help customers understand what an item is made from.
A leather handbag may contain natural grain, stitching, and subtle variations in tone. Wooden furniture may display unique grain patterns. Fabric products may show visible fibers and weave structures.
Excessive retouching can remove these details and make products appear artificial. For example, aggressive smoothing may cause genuine leather to resemble plastic, while unnecessary texture reduction can make wooden furniture look unnaturally flat.
Professional clipping path editing should preserve material characteristics unless the client specifically requests additional retouching. Temporary dust, unwanted reflections, or photography-related imperfections may be corrected when appropriate, but genuine product features should remain visible.
The purpose of editing is to present the product clearly and attractively while maintaining its authenticity.
14. Choose the Appropriate Background for Each Platform
Different ecommerce platforms and marketing channels may require different image backgrounds. A product photograph prepared for an online marketplace may need a different presentation from one used in a social media advertisement or printed catalog.
White backgrounds are commonly used for product listings because they provide a clean and consistent appearance. Transparent backgrounds are useful for promotional designs where products need to be placed against branded colors or creative layouts.
Lifestyle backgrounds can also be effective when the objective is to show a product in a realistic environment. However, these backgrounds should complement the product rather than distract from it.
Before preparing final images, editors should confirm the intended platform and review its current image requirements. Background color, dimensions, margins, product placement, and additional graphic elements may all be subject to specific guidelines.
A professional workflow should adapt to the client’s requirements instead of applying identical settings to every image.
15. Keep Product Scale and Positioning Consistent
Consistent product scale and positioning are important for creating an organized ecommerce catalog. Even when individual photographs are edited well, noticeable differences in product size and alignment can make a collection appear inconsistent.
Imagine a fashion retailer displaying several handbags within the same product category. If one handbag occupies nearly the entire frame while another appears much smaller, customers may find it difficult to compare them visually.
A standardized editing workflow can help maintain consistent image dimensions, product alignment, margins, and overall composition. However, editors should avoid distorting product proportions simply to make every item occupy the same amount of space.
The appropriate scale may vary depending on the product’s actual dimensions and shape. The goal is to establish a visually balanced presentation while preserving accurate product representation.
Consistent positioning is particularly valuable for businesses managing large collections or frequently updating product catalogs.
16. Save Editable Paths and Master Files
A professionally created clipping path can remain useful long after the initial background removal. Saving editable paths allows photographers and ecommerce businesses to reuse the same product isolation for different purposes.
For example, a retailer may initially require a handbag photograph against a white background. Later, the marketing team may want to use the same product in a promotional banner with a colored background.
If the original clipping path has been preserved, the editor can prepare the new version without tracing the product again.
Photoshop master files can retain paths, masks, layers, and adjustment settings when saved in appropriate formats. These editable elements make future revisions easier and help maintain consistency across different versions of an image.
Organized file naming and storage procedures are also important, especially when working with large product catalogs.
Maintaining high-quality master files can reduce repetitive work and support more efficient image production.
17. Avoid Excessive Retouching
Professional product image editing should improve presentation without making the item look unrealistic. One of the most common mistakes is applying unnecessary corrections that remove genuine product characteristics.
Excessive smoothing, sharpening, color adjustment, or shadow enhancement can change how a product appears. For example, removing natural leather grain may make a handbag look artificially smooth, while aggressive sharpening can create visible halos around its edges.
Editors should distinguish between temporary imperfections and permanent product features. Dust, unwanted background elements, and certain photography-related distractions may be removed when appropriate. However, genuine material characteristics and structural details should generally remain intact.
The best product images are polished but believable. Customers should be able to recognize the actual item from its photograph.
Professional restraint is often just as important as technical editing skill.
18. Follow a Consistent Quality-Control Process
Quality control is one of the most important stages of professional clipping path editing. Even experienced editors can occasionally overlook small errors, particularly when working with large batches of images.
A structured review process helps identify problems before the final files are delivered. Editors should examine the accuracy of product edges, internal openings, fine details, background cleanliness, color consistency, and shadow realism.
The finished product should also be reviewed at different zoom levels. Close inspection can reveal small background fragments or irregular edges, while normal viewing size helps evaluate the overall appearance.
For ecommerce projects, quality control should extend beyond individual images. The complete collection should be checked for consistent backgrounds, product scale, positioning, and visual treatment.
A reliable quality-control process helps reduce revisions and ensures that the final images meet the client’s expectations.
19. Understand Clipping Path Complexity Levels
Not every product requires the same amount of clipping path editing. Professional editing providers often classify images according to their complexity to estimate the amount of work involved.
Basic clipping paths are generally suitable for products with straightforward shapes and minimal details, such as rectangular boxes or books. Simple clipping paths involve smooth curves and uncomplicated structures, including bottles and basic household accessories.
Medium clipping paths are used for products with multiple curves, internal openings, or additional structural details, such as handbags and certain shoes. Complex clipping paths involve more intricate objects, including decorative furniture, machinery, and products with numerous openings.
Super complex clipping paths are reserved for highly detailed subjects such as bicycles, chandeliers, and complicated industrial equipment.
These categories help photographers and ecommerce businesses communicate their requirements more effectively. However, the actual difficulty should always be evaluated from the original image rather than the product category alone.
20. Know When to Outsource Clipping Path Editing
For photographers, ecommerce retailers, and creative agencies handling large image volumes, manual clipping path editing can become time-consuming. Outsourcing may be a practical option when internal teams need to focus on photography, marketing, product management, or other responsibilities.
Professional clipping path service providers often have specialized editors who work with different product categories and complexity levels. However, selecting a provider should involve more than comparing prices.
Businesses should evaluate the accuracy of sample work, consistency of quality control, communication, turnaround reliability, and file-handling procedures. A small test batch can help establish expectations before beginning a larger project.
Clear instructions are equally important. The client should specify the desired background, shadow treatment, output format, dimensions, and any restrictions on product alterations.
A dependable outsourcing relationship should make image production more efficient while maintaining the accuracy and visual consistency of the finished photographs.
Common Clipping Path Mistakes to Avoid
Even when editors use appropriate tools, certain mistakes can reduce the quality of product photographs. One common problem is placing too many anchor points along smooth curves, which can create uneven edges and make the path difficult to adjust.
Another frequent mistake is cutting away important product details during background removal. Narrow straps, wires, handles, and small accessories can become distorted if the clipping path is not positioned accurately.
Editors may also overlook internal openings, leave background halos, or remove natural shadows without replacing them appropriately. Inconsistent product positioning and unnecessary color adjustments can create additional problems across large ecommerce catalogs.
These issues are easier to prevent when editors follow a structured workflow, understand the product’s characteristics, and review the finished images carefully.
The most effective approach combines technical precision with an understanding of how the product should naturally appear.
Clipping Path Tips for Different Product Categories
Fashion and Apparel Photography
Fashion products require careful attention to fabric edges, stitching, straps, and garment shapes. Structured accessories such as handbags and shoes are often suitable for clipping paths, while soft fabrics, fur, and transparent materials may require masking. Editors should preserve natural folds, textures, and silhouettes rather than making garments appear artificially rigid.
Furniture Photography
Furniture products frequently contain straight edges, curved components, and internal openings. A wooden chair, for example, may require additional paths to remove the background visible between its legs and through its backrest. Editors should maintain accurate proportions, natural wood grain, and realistic contact shadows.
Jewelry and Watch Photography
Jewelry and watches often contain reflective surfaces, narrow components, and intricate details. Professional editors must preserve fine structures while avoiding unwanted background fragments. Certain transparent gemstones and reflective elements may require additional masking or retouching to maintain a realistic appearance.
Electronics Photography
Electronic products commonly feature precise manufactured shapes, smooth curves, and sharp corners. Even small inaccuracies can make these products appear distorted. Editors should preserve their geometry carefully while maintaining natural reflections and material finishes.
Cosmetics and Beauty Product Photography
Cosmetic products frequently include transparent glass, reflective packaging, and smooth surfaces. A clipping path can isolate the solid outer boundary, while masking may be necessary to preserve transparency. Accurate colors and realistic reflections are particularly important for maintaining a polished commercial appearance.
Household Product Photography
Household products vary widely in shape and complexity. Some contain straightforward geometric boundaries, while others feature complicated openings or transparent materials. Editors should evaluate each product individually and choose techniques that preserve its natural structure while creating a clean and consistent presentation.
Frequently Asked Questions About Clipping Path Quality
What is the best way to improve clipping path quality?
The best approach is to begin with a high-quality source image, use carefully positioned anchor points, maintain smooth curves, and preserve the product’s natural shape. Professional editors should also inspect the finished image against contrasting backgrounds and perform a thorough quality-control review.
Why are fewer anchor points often better?
Fewer strategically positioned anchor points can create smoother curves and make paths easier to adjust. However, the correct number depends on the product’s geometry. Additional points should be used whenever they are necessary to reproduce the visible boundary accurately.
Is manual clipping path better than automatic background removal?
Manual clipping paths provide precise control over defined product boundaries, while automatic background removal tools can be useful for quick processing. The most appropriate method depends on the product’s complexity, image quality, and required accuracy. Some workflows benefit from combining automation with manual refinement.
Can clipping paths improve ecommerce product photography?
Yes. Clipping paths can help create cleaner backgrounds, preserve accurate product shapes, and maintain consistent catalog presentations. They also allow isolated products to be reused across different marketing channels without requiring new photographs.
What causes rough edges in clipping path editing?
Rough edges can result from poor anchor point placement, inaccurate Bézier curves, low-quality source images, or insufficient quality control. Excessive anchor points and incorrect edge adjustments can also contribute to uneven product outlines.
Should every ecommerce product image have a white background?
No. White backgrounds are common for ecommerce listings, but the appropriate background depends on the platform, brand style, and intended use. Transparent backgrounds are useful for promotional graphics, while lifestyle backgrounds may be appropriate for advertising and editorial content.
Can clipping paths be used for transparent products?
Clipping paths can define the solid outer boundaries of transparent products, but preserving realistic transparency often requires additional masking or image editing techniques. Glass bottles, transparent packaging, and similar products frequently benefit from a combined approach.
Why are natural shadows important in product photography?
Natural shadows help communicate depth and establish how a product relates to the surface beneath it. Without appropriate contact shadows, isolated products may appear to float. Realistic shadows contribute to a more believable and professional presentation.
Does clipping path editing change product colors?
Not inherently. Clipping paths are used to define product boundaries and support background isolation. Product color correction is a separate process and should be performed only when required by the client’s instructions.
How can ecommerce businesses maintain consistent product images?
Businesses can maintain consistency by establishing clear editing guidelines for backgrounds, product scale, alignment, shadows, color accuracy, and export settings. A structured quality-control process helps ensure that these standards are followed across the entire catalog.
Final Thoughts
Creating professional product images requires attention to details that customers may not consciously notice but can still appreciate. Smooth edges, accurate product shapes, clean backgrounds, realistic shadows, and consistent presentation all contribute to a polished final result.
The most effective clipping path tips for better product image quality are not necessarily complicated. They involve understanding the product, selecting the right editing technique, placing anchor points carefully, preserving natural details, and reviewing the finished image thoroughly.
For ecommerce businesses, photographers, and creative agencies, these principles can help establish a reliable product image workflow. Clipping paths are particularly valuable when products need to be isolated accurately and reused across different backgrounds or marketing materials.
However, professional editing should never be confused with making a product look artificially perfect. The real objective is to present the item clearly, consistently, and accurately.
When clipping paths are created with care, the result is more than a clean cutout. It is a product image that looks natural, feels professional, and supports a better online shopping experience.



You must be logged in to post a comment.