
Transforming Sports Photography: From Raw Shots to Riveting Images
Sports photography captures fleeting moments of speed, emotion, and intensity. But even the most dramatic frame can fall flat without the right editing. Post-processing is where those raw, high-energy images truly come to life—where you inject intensity, amplify colors, and sharpen motion to make each photo a visual thrill.
To create images that leap off the screen, it’s not just about heavy editing—it starts with preparation. Let’s explore how to set the stage before you even touch a slider.
Pre-Editing Essentials: Set the Foundation for Stunning Edits
Shoot in RAW for Maximum Flexibility
If you’re serious about quality, always shoot in RAW. Unlike JPEGs, RAW files retain every ounce of detail, giving you full control over exposure, white balance, and color grading during editing. While these files are larger in size, the payoff is huge—especially when enhancing high-speed sports action.
Import and Organize with Purpose
Use editing platforms like Adobe Lightroom or Bridge to import your files efficiently. Structure your folders by event, date, or team to streamline your workflow. This simple organization trick turns a chaotic photo dump into a curated visual archive—saving time and keeping your focus on creativity.
Cull Like a Pro
Shooting sports often means capturing hundreds of frames. But not every shot deserves a spot in your edit queue. Focus on images that are sharply in focus, rich in emotion, and well-composed. Skip the blurry and the bland. By curating a strong selection upfront, you’ll maintain editing consistency and deliver a more powerful final set.
Check and Calibrate Your Camera Settings
Great editing begins with smart shooting. Before the next game, review your camera settings—optimize ISO, shutter speed, and white balance based on lighting conditions. A few minutes of prep can save hours of correction later.
Cropping for Maximum Impact
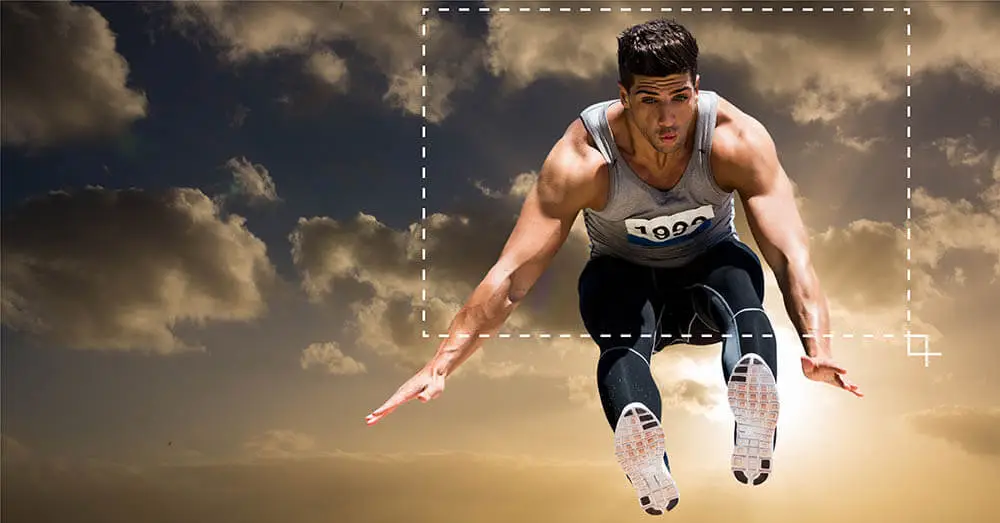
Cropping is more than trimming edges—it’s storytelling. A well-cropped sports photo can direct attention, increase drama, and elevate a good shot to something extraordinary. Apply the rule of thirds to create dynamic balance, positioning athletes off-center to draw the eye naturally.
Always leave space in front of moving subjects to suggest motion and anticipation. Straighten tilted frames and eliminate distractions like background clutter or off-field objects that steal attention. Different platforms demand different compositions—vertical crops excel on social media, while wide formats work best for web and print layouts.
Don’t be afraid to zoom in tight. Highlight the athlete’s expression, the sweat, the tension—it’s in those details where the emotion lives. Thoughtful cropping turns fleeting action into unforgettable moments.
Mastering Exposure & Contrast in Sports Photography
Capturing sports moments with impact starts with mastering exposure. Whether your scene is drenched in sunlight or tucked in the shadows of a stadium, correct exposure ensures your subject remains the focal point. Aim for a balance—keep your highlights clean and crisp while allowing the shadows to remain soft and natural. This approach draws the viewer’s eyes to the action without distractions.
Once exposure is dialed in, elevate your photo with contrast. A boost in contrast adds dimension and intensity, making athletes stand out with clarity and emotion. Every muscle, every expression becomes more pronounced—injecting energy into your image. To fine-tune this effect, use the Highlights and Shadows sliders for better dynamic range, and carefully adjust the White and Black points to create a seamless tonal spectrum. The result? High-impact, high-contrast visuals that leap off the screen.
Sharpening & Noise Reduction: Precision for Peak Performance
Sports photography is all about freezing peak moments with sharp clarity. But fast movement and tricky lighting often introduce softness or digital noise. This is where sharpening and noise reduction become your best allies—bringing back detail and polish without sacrificing authenticity.
Sharpen with Precision
Begin by gently sharpening the image to enhance textures and focal points like faces, uniforms, and gear. In Lightroom, the Sharpening tools give you granular control:
-
Amount: Think of it like the sharpening volume. Start conservatively and build as needed.
-
Radius: Controls how wide the sharpening effect spreads—stay between 0.8 to 1.5 for crisp action shots.
-
Detail: Accentuates finer textures such as grass or jersey threads. Use sparingly to avoid amplifying noise.
-
Masking: Hold Alt (or Option on Mac) and slide to isolate sharpening to the main subject—perfect for keeping athletes sharp while minimizing background distraction.
Eliminate Noise, Preserve Quality
High ISO settings in low light often introduce graininess. Use Luminance Noise Reduction to smooth out rough textures while preserving the essential details. Add a hint of Color Noise Reduction to eliminate colorful speckles in shadows or uniforms. Always zoom in to 100% while editing—subtlety is key. Overdoing it can make faces look plastic and lifeless.
The goal is balance. Blend just enough sharpening and noise reduction to achieve a clean, natural look without losing the raw emotion of the shot.
Amplifying Colors & Uniform Details with Intent
In sports photography, color does more than beautify—it defines identity and emotion. To start, make sure the white balance is accurate. Neutral tones correct for odd lighting—whether under artificial indoor lights or an overcast sky—so skin tones and uniforms look authentic.
Once the image is neutrally balanced, boost vibrancy to make the scene pop—while keeping hues believable. Want a team’s signature color to stand out? Use selective color adjustments. For example, enhance a bright red jersey so it boldly contrasts against a green turf without overwhelming the frame.
Don’t forget the uniform’s finer points. Logos, numbers, and fabric textures should remain clean and legible. Thoughtful color enhancement not only adds depth and polish—it turns each photo into a storytelling piece. With every tweak, you’re not just editing—you’re celebrating the moment.
Retouching & Object Removal
Even the most dynamic sports photographs can lose impact due to unwanted distractions. Whether it’s a random figure in the background, a cluttered advertising banner, or misplaced gear, these elements can divert attention from the moment that matters. This is where expert retouching steps in—like a silent hero—clearing visual noise to let the main subject take center stage.
Using tools like the Spot Healing Brush and Clone Stamp in Photoshop, you can seamlessly remove background clutter and minor imperfections. Eliminate sweat stains, dirt marks, or distracting creases while keeping the emotion and energy intact. The goal is subtle refinement, not over-polishing—too much editing can flatten the intensity. Aim to enhance clarity while preserving the raw spirit of the game.
Adding Motion & Drama
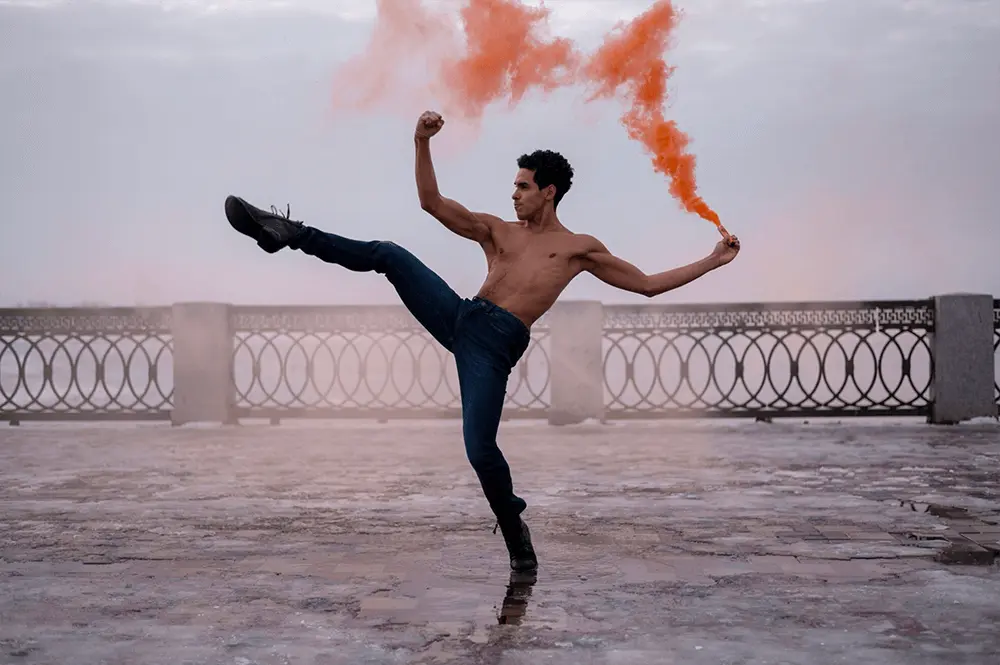
Sports photography thrives on motion. To elevate the energy in your images, introduce effects that amplify movement. A gentle radial or directional blur can simulate speed—ideal for scenes involving runners, cyclists, or fast-moving balls. These techniques not only highlight motion but also guide the viewer’s eye straight to the action.
Consider using a soft vignette around the corners to naturally draw focus toward the center. Want to intensify emotion? Convert the image to black and white. Stripping away color can reveal the true essence of a moment—the grit, the determination, the emotion.
Play with contrast, shadows, and light to add drama without overwhelming the composition. These enhancements don’t change the story—they intensify its impact. Done right, your photograph becomes more than just an image—it becomes a memory in motion.
Exporting for Web, Print, or Social Media
Once your edits are complete, exporting your image correctly is crucial. This final step ensures your work looks its best, whether it’s shared online or printed for display. For web and social media platforms, prioritize a lightweight yet vibrant file. A JPEG at 72 DPI with dimensions ranging from 1200 to 2000 pixels on the long side typically offers the ideal balance between quality and speed.
When preparing content for platforms like Instagram or Facebook, consider a 4:5 or square aspect ratio. These formats maximize screen space and engagement. For high-quality prints, switch to 300 DPI and export in JPEG or TIFF for full detail retention.
Don’t overlook color space—use sRGB for web sharing and Adobe RGB for print fidelity. And if you’re showcasing your work professionally, add a subtle watermark to protect your images while promoting your brand. A mindful export process ensures your efforts translate beautifully across every platform.

 In Photoshop")
