Jewelry Photography Tips (2023)
Photographing jewelry can be a challenging task that demands careful attention to detail and a good understanding of lighting, camera settings, and editing techniques. Whether you’re a jewelry enthusiast looking to capture your collection’s beauty or a seller aiming to present your products in the best light, achieving professional-quality jewelry photos is essential.
Jewelry photography equipment
Selecting the right photography equipment is a budget-conscious decision. Whether you opt for cost-effective essentials or invest in higher-end gear, your choices can significantly impact the quality of your jewelry photography. Here’s a smart way to navigate your options:
Your choice of photography equipment should align with your budget and the quality you aim to achieve. You have the flexibility to start with minimal gear and gradually expand your toolkit as needed. For those on a tighter budget, focusing on essential items like a good camera and tripod is a practical start. Smartly utilizing available light sources can further reduce costs.
However, for those seeking professional-level results, investing in advanced equipment such as specialized lighting and display setups can make a substantial difference. These higher-end options enhance the overall quality of your jewelry photography.
Essential jewelry photography equipment:
- Camera
- Tripod
- Lighting Source
- Table
- White Background
- Foam Boards
- Clamps or Tape
With these basic equipment pieces, you can start your jewelry photography journey. As you progress and your budget allows, consider additional gear like macro lenses, lighting modifiers, and macro rails for more advanced and detailed shots.
How to photograph jewelry
Now that you’ve gathered your essential photography equipment, let’s delve into the process of photographing your jewelry and preparing it for display in your e-commerce store. This step-by-step guide will ensure that your jewelry images are captivating, professional, and ready to engage potential customers.
1. Set up your table
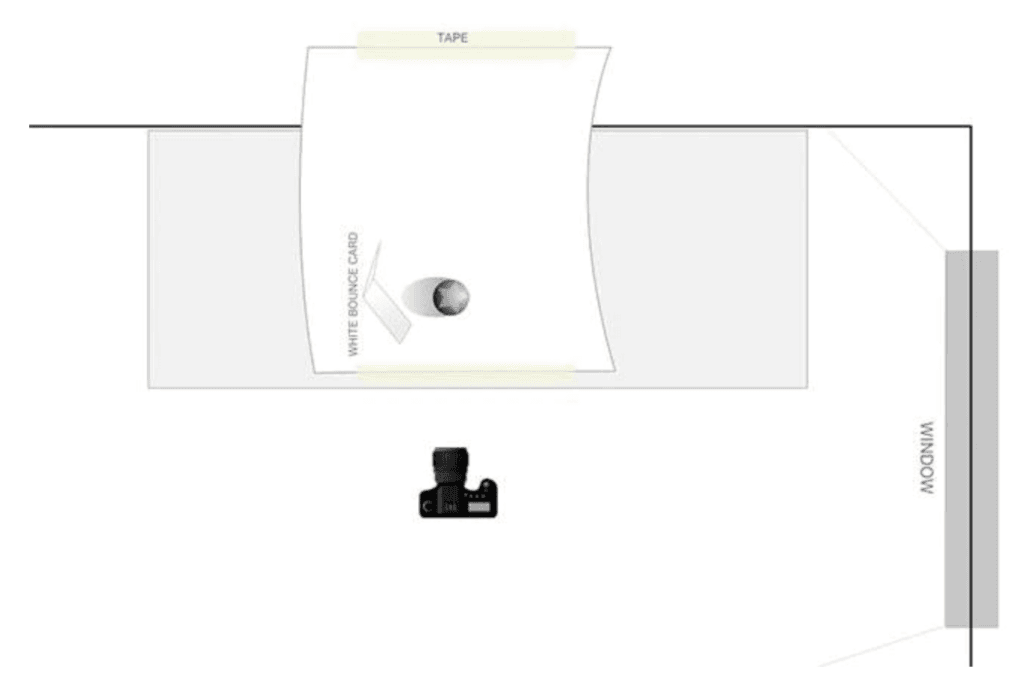
To create an ideal space for your photo studio, it’s crucial to consider the quality of light. If you have access to a window, position your table at a 90-degree angle to the window. The closer you are to the window, the softer and more flattering the natural light will be.
Once your table is in place, it’s time to set up your background, or “sweep.” The objective here is to have the sweep arranged vertically. If you’re working near a wall, you can affix your sweep to it using tape. If not, you’ll need to construct a stand or support surface to secure the back of your sweep. This ensures a seamless and professional-looking background for your photos.
Next, position your tripod in front of your setup. If you’re using a smartphone with a short tripod, you can place it directly on the sweep, ensuring it’s stable and level. This arrangement allows you to capture your jewelry or products with the appropriate framing, and the table should be large enough to accommodate your items comfortably.
By following these steps, you can create an effective and efficient photo studio setup for capturing high-quality images of your jewelry or products.
2. Position your lighting
When working with natural light, the window serves as your primary light source, offering excellent illumination. However, if artificial lighting is your choice, your setup will require a slightly different configuration. Position a single light source, equipped with a softbox or umbrella, at a 45-degree angle to the subject, such as your jewelry piece. This arrangement ensures that the lighting is soft and evenly distributed, reducing harsh shadows and providing a professional appearance.
To capture your subject effectively, keep your camera directly in front of the jewelry piece, maintaining a consistent angle for a balanced and well-composed shot. If your product is initially placed closer to the back of your backdrop (sweep), you may encounter unwanted shadows. In this case, simply adjust the positioning of your product closer to your camera, ensuring a clean and seamless white background, which is especially important for product photography.
3. Style your jewelry
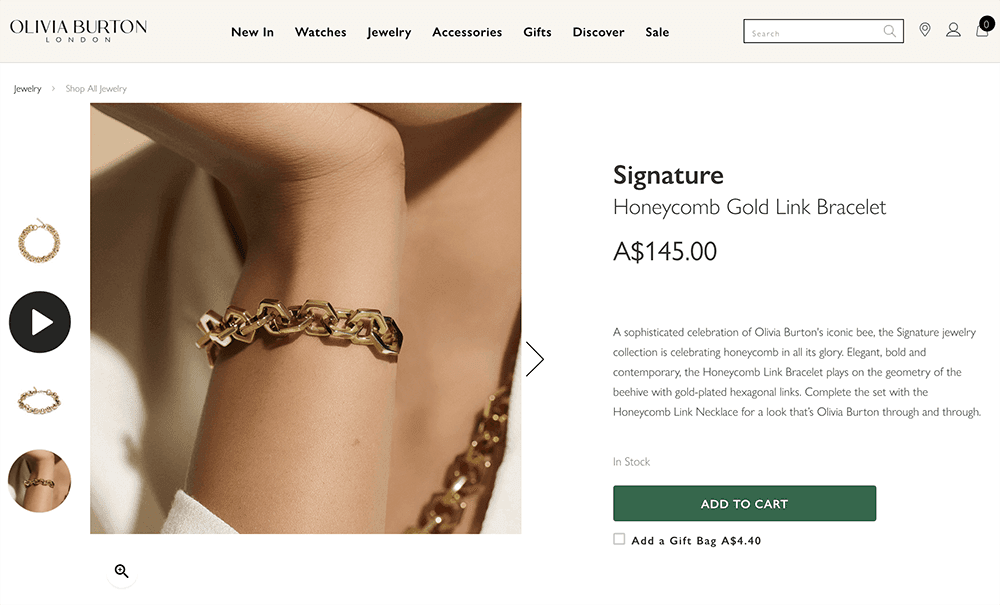
For those (like OLIVIA BURTON) new to jewelry photography, commencing with a white background is an excellent choice as it establishes a standard and simplifies the process. As you gain experience, you can gradually introduce various elements and staging variables to enhance the visual appeal of your jewelry images.
To add intrigue and creativity to your photos, consider placing your jewelry on props or against alternative backgrounds, including:
- Marble Slab Background: Utilize a sleek marble slab as a background to impart a sense of elegance and luxury to your jewelry shots.
- Simple Textured Backgrounds: Experiment with textured backgrounds to create depth and visual interest in your jewelry photography. These can be anything from wood grains to fabrics.
- Ring Holders or Stands: Display your rings on specialized holders or stands designed to showcase them beautifully, making your jewelry stand out.
- Group Photos: Arrange your jewelry alongside other pieces to create captivating group photos that demonstrate versatility and styling possibilities.
Furthermore, you can explore the use of models to illustrate how your jewelry appears when worn. This approach, as exemplified by Aether’s promotion of diamond jewelry, provides customers with a real-world perspective. Ultimately, your styling choices should align with how you wish to present your products. There is no singular, fixed method. Begin with simplicity, and as you gain experience, introduce and experiment with different elements to refine your jewelry photography over time.
4. Prepare your jewelry
Ensuring the pristine condition of your jewelry is paramount, considering the high level of detail captured by a DSLR camera in conjunction with a well-established lighting setup. The final image is often magnified significantly beyond the jewelry’s actual size, exposing intricacies that may go unnoticed to the naked eye.
After meticulously cleaning and polishing your jewelry, position it at the center of the flat section of your background sweep. Leave some space for the subsequent placement of your white reflector card, a valuable tool for enhancing lighting and reducing shadows.
It’s essential to maintain the cleanliness of your jewelry throughout the process. Every time you handle it, be sure to wipe it down, as even minor imperfections can be highly visible in the detailed photographs. To save time and avoid potential reshoots, consider wearing cotton gloves, which help prevent smudges and fingerprints from tarnishing your jewelry’s appearance.
5. Set your camera
Avoid capturing artsy, low-aperture photos that isolate specific parts of your jewelry. Instead, opt for high-aperture, full-focus photography to produce sharp and trustworthy images that showcase every detail your customers desire.
Certainly! Let’s delve deeper into the key photography tips for capturing jewelry effectively:
- Aperture Selection: When photographing jewelry, it’s essential to avoid using low-aperture settings (such as f/2.8 or f/4) that create a narrow depth of field and focus on only a small part of the product. Instead, opt for high-aperture settings like f/11 or even greater. High aperture values provide a wide depth of field, ensuring that the entire piece of jewelry remains sharply in focus. This is crucial to present a complete and detailed image that your customers can trust.
- ISO Settings: To achieve the best image quality, set your camera’s ISO to the lowest possible value, which is typically ISO 100. Lower ISO values result in cleaner images with minimal noise, which is especially important for capturing intricate details in jewelry.
- White Balance: White balance is critical for accurately representing the colors of your jewelry. You have two options:
- Manual White Balance: This method allows you to precisely adjust the white balance settings based on the lighting conditions in which you are shooting. You can use a white balance card or a gray card to set a custom white balance, ensuring that the colors in your photos are true to life.
- Automatic White Balance: Alternatively, you can rely on your camera’s automatic white balance setting. However, it’s important to double-check the results, especially if you are shooting in mixed lighting conditions, as automatic white balance may not always produce the most accurate color representation. You can make slight adjustments in post-processing if needed.
By following these guidelines, you can produce jewelry photographs that not only showcase every detail but also present the products in a way that instills trust and accurately reflects their colors, thus enhancing the overall appeal to potential customers.
6. Take the photo
To achieve optimal lighting for your jewelry photography, it’s essential to set up your camera, lights, and tripod in a specific manner. This setup is designed to ensure even and diffused lighting without creating undesirable bright spots on your product. Here’s a more detailed explanation:
- Camera Positioning: Mount your camera securely on a tripod, allowing you to maintain stability and consistency in your shots. Position the camera so that the lens is slightly angled downward toward the jewelry product. This angle helps you capture the product from an advantageous perspective, showcasing its details and facets effectively.
- Lighting Placement: Use diffusing umbrellas on your lights to soften and spread the light. Position these lights above your jewelry product on either side, typically at about 45-degree angles. Ensure that the lights are angled downward, directed towards the product but not too steeply to avoid harsh shadows. Placing the lights at symmetrical angles helps create an even, balanced illumination that minimizes glare and reflections.
- Equal Light Intensity: Set both lights to the same power level. This ensures that the lighting on both sides of the jewelry is consistent, preventing uneven lighting or unattractive bright spots on the product. This uniform lighting is crucial for showcasing your jewelry’s features and maintaining a professional appearance in your photographs.
By positioning your camera and lights in this manner, you create a controlled and efficient lighting setup that fills the frame with even, diffused light. This approach minimizes harsh shadows and reflections, allowing your jewelry to appear at its best, with all the intricate details and facets clearly visible in your photos.
7. Retouch and finalize
Post-production processing is a crucial step in jewelry photography to ensure that your images appear professional and visually appealing. There are two primary routes to consider when it comes to this aspect:
- Hiring a Professional Editor: One of the most straightforward options is to enlist the services of a professional photo editor. This approach can be particularly beneficial if you’re not well-versed in photo editing techniques or if you have a large volume of images to process. Professional editors have the expertise to retouch and enhance your jewelry photos, saving you time and potentially money in the long run. They can ensure that your product images look polished, with colors accurately represented, and any imperfections corrected.
- DIY Photo Editing: If you prefer a more hands-on approach and want to maintain control over the editing process, you can choose to edit the images yourself. Numerous free online photo editors and software options are available. It’s essential to learn the basics of photo editing, which typically include techniques such as adjusting exposure, contrast, color balance, and removing background imperfections. These basic editing skills are often sufficient to improve the quality of your jewelry photos and make them suitable for sharing across various marketing and sales platforms.
Elaborating on the DIY option, here are some key steps to consider:
- Adjusting Exposure: Ensure that the overall brightness and darkness levels are well-balanced. Properly exposed images are crucial to reveal the jewelry’s details.
- Color Correction: Correct any color discrepancies to accurately represent your jewelry. Make sure gemstones and metals appear as they do in reality.
- Background Removal or Enhancement: Depending on your preferences, you can either remove the background or enhance it to create a specific atmosphere for your product images.
- Cropping and Resizing: Crop the images to focus on the jewelry and resize them to match the dimensions suitable for your online store and various marketing channels.
- Shadows and Highlights: Refine and soften shadows and highlights to achieve a more professional and polished look.
The choice between hiring a professional editor and editing images yourself depends on your specific needs, resources, and level of expertise. Both approaches can lead to high-quality jewelry photographs that effectively showcase your products and contribute to your online store’s success.
Jewelry photography on phones
Taking high-quality product photos of your jewelry doesn’t necessarily require a DSLR camera. Modern smartphones with decent cameras can be excellent tools for this purpose. Here are some essential considerations when using your smartphone for jewelry photography:
1. Use a Mini Tripod:
- A mini tripod is essential when using your smartphone for jewelry photography. It stabilizes your device and eliminates any potential handshakes or movement, resulting in consistently sharp and clear images. A tripod allows you to maintain the same angle and composition for each shot, ensuring a cohesive look for your product catalog.
2. Explore Portrait Mode:
- Portrait mode is a powerful tool found on many modern smartphones. It creates a shallow depth of field, making your jewelry the central focus of the image while naturally blurring the background. This effect accentuates the intricate details of your jewelry and enhances its visual appeal. Experiment with portrait mode to see how it can make your products stand out.
3. Choose the Rear-Facing Camera:
- Most smartphones feature two cameras, a front-facing (selfie) camera and a rear-facing camera. Opt for the rear-facing camera for jewelry photography. These cameras typically have higher megapixels and better image quality, allowing you to capture the fine details and textures of your jewelry accurately.
4. Manage White Balance and Exposure:
- Some smartphones provide manual control over white balance and exposure settings. These settings are essential for ensuring the accurate representation of your jewelry’s colors and achieving proper exposure. Adjust the white balance to match the lighting conditions and control exposure to avoid overexposed or underexposed areas in your photos. If your smartphone lacks manual controls, you can fine-tune these settings during the post-processing stage.
5. Lock Camera Settings:
- After you’ve configured your smartphone camera settings to your liking, it’s wise to lock them in place. Locking your settings prevents the camera from automatically adjusting them between shots. Consistency is paramount when creating a cohesive product catalog. With locked settings, you can be confident that each jewelry product photo will maintain the same quality and style, enhancing the professionalism of your store.
By employing these practices and exploring the capabilities of your smartphone’s camera, you can produce high-quality jewelry images that are perfect for displaying your products online, in marketing materials, or on e-commerce platforms. Keep in mind that practice and experimentation will help you optimize your results over time.
Jewelry photography tips
Irrespective of whether you’re launching a new jewelry business or expanding your existing one, these key jewelry photography tips should always be at the forefront of your mind to capture stunning product images:
The Art of Jewelry Photography: A Comprehensive Guide
Jewelry photography is an essential element in the success of your jewelry business, whether you’re a newcomer to the industry or a seasoned jeweler. Your jewelry photos are not only a way to showcase your products but also a means to capture the essence of your brand and engage potential customers. In this comprehensive guide, we will explore the intricacies of jewelry photography, from choosing the right equipment to mastering lighting techniques and post-processing. By the end of this guide, you’ll be well-equipped to produce stunning jewelry images that captivate your audience and drive sales.
Get a Pixel Perfect Product Photography Frame: 10 Things to Avoid
Section 1: Equipment and Setup
1.1. Camera Selection
- DSLR vs. Smartphone: Before diving into the photography process, you need to decide on your primary photography equipment. While professional DSLR cameras offer superior image quality, modern smartphones with advanced cameras are increasingly popular for their convenience and accessibility. For beginners, a high-end smartphone can produce impressive results, but serious jewelry photographers may opt for a DSLR or mirrorless camera for greater control and flexibility.
1.2. Lenses
- Macro Lenses: When using a DSLR or mirrorless camera, a macro lens is crucial for capturing the intricate details of jewelry. Macro lenses allow for extreme close-ups without distortion, making them ideal for small subjects like rings, necklaces, and earrings. Smartphone cameras often have built-in macro capabilities, but external lens attachments can enhance their performance.
1.3. Tripods
- Stability is Key: Regardless of your camera choice, a stable platform is essential to avoid blurriness in your jewelry photos. A tripod provides the necessary stability, ensuring consistent images and permitting longer exposure times without camera shake. Invest in a quality tripod that can be adjusted for different angles and heights.
1.4. Backgrounds
- Creating the Perfect Setting: The choice of background significantly impacts your jewelry images. A clean and unobtrusive background allows the jewelry to take center stage. White, black, or neutral gray backgrounds are commonly used, but you can also experiment with textured or custom backdrops to match your brand’s aesthetic.
1.5. Lighting
- The Heart of Jewelry Photography: Lighting is the cornerstone of jewelry photography. Proper lighting reveals the true colors and fine details of your jewelry, enhancing their appeal. There are two primary options:
- Natural Light: Utilizing sunlight through a window or diffused natural light sources can produce beautiful, soft results. However, this approach requires an understanding of daylight’s qualities, such as intensity and direction, to optimize your shots.
- Artificial Light: Controlled artificial lighting provides consistent results and allows you to shoot at any time. Softboxes and diffusing umbrellas are common tools to diffuse and soften artificial light sources. Position your lights at specific angles to achieve the desired effect, ensuring even illumination without harsh shadows or reflections.
Section 2: Preparation and Shooting
2.1. Clean and Prepare Your Jewelry
- The Importance of Pristine Jewelry: Before photographing your jewelry, ensure that it is clean and polished. The high-resolution capabilities of modern cameras, whether DSLR or smartphone, reveal even the tiniest imperfections. Clean your jewelry thoroughly to present it in the best possible light.
2.2. Camera Settings
- Mastering the Settings: Understanding your camera’s settings is crucial for capturing stunning jewelry photos. For DSLRs and mirrorless cameras, explore manual modes to control aperture, shutter speed, and ISO settings. For smartphones, you may have access to a variety of settings through manual modes or third-party camera apps. A lower ISO setting (typically ISO 100) minimizes noise, while adjusting the aperture allows you to control depth of field.
2.3. Focus and Composition
- Precision Matters: Achieving precise focus is vital in jewelry photography. Use the autofocus feature of your camera to focus on specific areas of the jewelry. In macro photography, it’s common to focus on a specific gemstone or feature while allowing the rest of the piece to blur slightly, creating a sense of depth and dimension.
- Composition and Angles: Experiment with different compositions and angles to find the most flattering and captivating presentation for each piece of jewelry. Frontal shots are common for showcasing entire pieces, but don’t hesitate to explore close-up shots, three-quarter views, or tilted angles to highlight specific details.
2.4. White Balance and Color Accuracy
- Precise Color Representation: To capture your jewelry’s true colors accurately, set the white balance according to your lighting conditions. For DSLRs and mirrorless cameras, manual white balance settings provide precise control. Smartphone cameras often have automatic white balance modes, but you can make adjustments during post-processing if necessary.
2.5. Use of Reflectors
- Balancing Light and Reducing Shadows: Reflectors can be valuable tools for jewelry photography. White reflector cards can help balance light and reduce shadows, especially when photographing reflective surfaces. Place reflectors strategically to control the light’s direction and intensity.
2.6. Models for Context
- Showcasing Wearability: If your jewelry is designed to be worn, consider using models to demonstrate how the pieces look when worn. This not only provides context but also allows customers to visualize the jewelry in a real-world setting.
Section 3: Post-Processing and Editing
3.1. Editing Software
- Choosing the Right Tool: After capturing your jewelry images, post-processing and editing are essential to fine-tune your photographs. You can choose from a range of photo editing software, from professional options like Adobe Photoshop and Lightroom to free online tools and mobile apps. Select a tool that suits your skill level and budget.
3.2. Color Correction
- Fine-Tuning Colors: Color correction is a critical step in post-processing. Ensure that gemstones, metals, and other materials in your jewelry appear true to life. Adjust color balance, saturation, and vibrancy to achieve accurate representation.
3.3. Background Enhancement or Removal
- Background Choices: Depending on your brand’s aesthetic, you may opt to enhance your background to create a specific atmosphere. Alternatively, you can remove the background entirely to isolate the jewelry. Background removal, often referred to as clipping path or deep etching, requires precision and patience. You can perform this task manually or use automated tools.
3.4. Cropping and Resizing
- Optimizing for Web and Marketing: Crop and resize your images to fit the dimensions required for your website and marketing channels. Consistency in image sizes ensures a cohesive and professional appearance.
3.5. Shadows and Highlights
- Refining Lighting Effects: In post-processing, you can further refine lighting effects by adjusting shadows and highlights. This step enhances the overall appeal of your jewelry and creates a polished look.
3.6. Saving Multiple File Formats
- Versatility in Presentation: Save your images in multiple file formats to accommodate various platforms and purposes. JPEG is suitable for online use, while TIFF or PNG formats preserve high-quality images for print and other applications.
Section 4: Consistency and Branding
4.1. Establish a Photography Style Guide
- Creating a Visual Blueprint: Consistency is paramount in jewelry photography. Develop a photography style guide that outlines your specific guidelines and standards. This guide should cover aspects such as lighting, background, camera settings, and equipment positioning. Your style guide serves as a blueprint for all your jewelry photos, ensuring a unified and professional look.
4.2. Documenting the Process
- Reproducibility: Document everything related to your photography process, including camera settings, lighting setups, background choices, and equipment positioning. This documentation enables you to reproduce your photography setup consistently, making it useful when resuming photography on different days or for new products.
4.3. Building Customer Trust
- Professionalism and Attention to Detail: Consistency in your jewelry photography demonstrates professionalism and meticulous attention to detail. This consistency builds trust with customers, assuring them that what they see online accurately represents the products they’ll receive. Trust is a critical factor in driving online sales.
4.4. Time and Cost Efficiency
- Streamlining the Process: Once you’ve established a consistent photography process, it becomes more efficient and cost-effective. You’ll spend less time troubleshooting or re-photographing products due to variations and inconsistencies. This efficiency allows you to focus on other aspects of your business.
Section 5: Ongoing Maintenance and Engagement
5.1. Regular Updates
- Keeping Up with Trends: Stay updated with current photography trends and regularly refresh your product images. Consistently updated images help your brand remain competitive and engaging in the market. Showcase new collections, seasonal pieces, or special promotions through high-quality photos that align with your established style.
5.2. Engaging the Audience
- Creating Visual Stories: Jewelry photography isn’t just about presenting products but also telling visual stories. Share the craftsmanship behind your jewelry, your design inspirations, and the unique qualities of each piece. Engaging narratives can further captivate your audience.
5.3. Feedback and Evolution
- Listening to Customers: Pay attention to customer feedback and preferences. Their insights can help you refine your photography style, adapt to changing market demands, and continually improve your jewelry photography.
In conclusion, jewelry photography is an art that combines technical proficiency with creative expression. By mastering your equipment, lighting techniques, and post-processing skills, and maintaining consistency in your photography style, you can create images that not only showcase your jewelry but also convey the essence of your brand. These captivating photos will not only drive sales but also establish trust and engagement with your customers. Stay updated, stay consistent, and keep refining your craft to achieve the best results in the world of jewelry photography.
You can also read the following articles
How to Convince Your Team It’s Time to Invest in High-Quality Product Photography


